• ABOUT ME
    • PRIVACY POLICY
  • COLLABORATE
  • BLOG
    • ART
    • WEDDING
    • LIBRARY
    • DECOR
    • JEWELLERY
    • STATIONARY
    • NAIL ART
    • BAKING
    • CHRISTMAS
    • EASTER
    • ART PRINTS
    • WEDDING STATIONARY
  • CONTACT
Menu

ISOSCELLA

Street Address
City, State, Zip
Phone Number

Your Custom Text Here

ISOSCELLA

  • ABOUT
    • ABOUT ME
    • PRIVACY POLICY
  • COLLABORATE
  • BLOG
  • ART
    • ART
    • WEDDING
    • LIBRARY
  • DIY
    • DECOR
    • JEWELLERY
    • STATIONARY
    • NAIL ART
    • BAKING
    • CHRISTMAS
    • EASTER
  • SHOP
    • ART PRINTS
    • WEDDING STATIONARY
  • CONTACT

Clay Leaf Shelf

June 29, 2024 Isoscella M

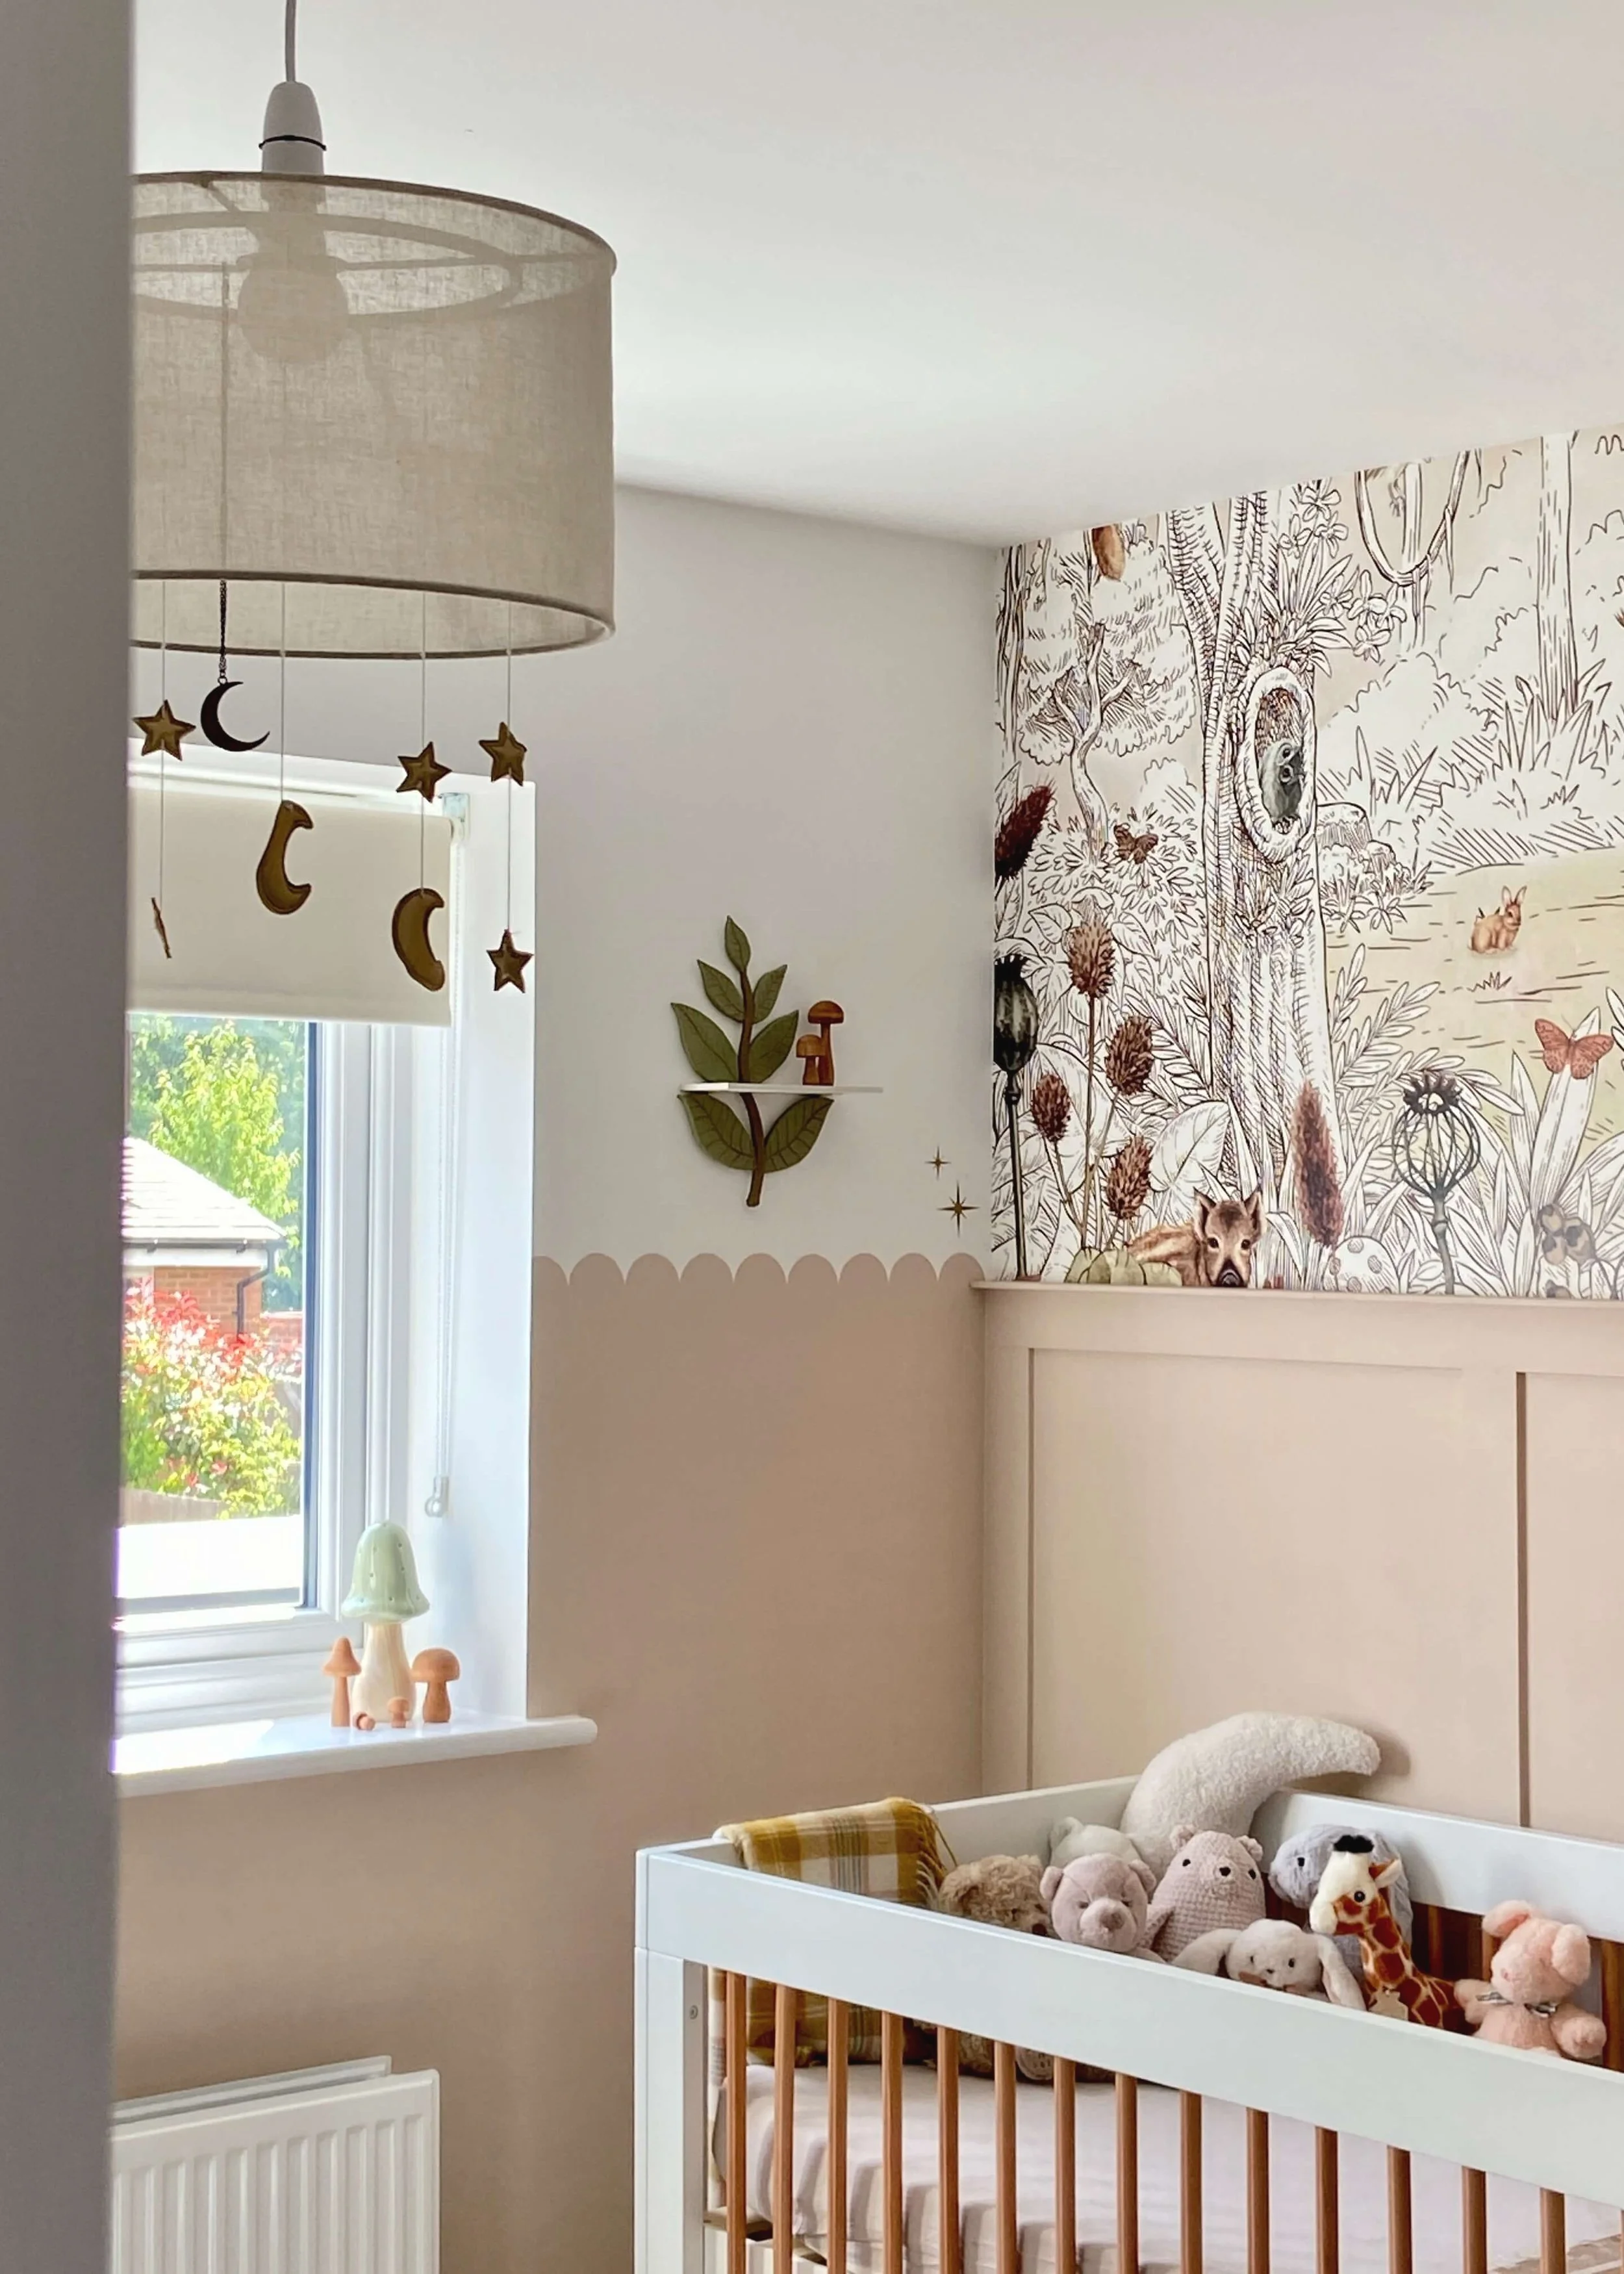
Create a beautiful leaf shelf from air-dry clay and MDF for your little one’s nursery or bedroom!

I’ve got another nursery DIY for you this week - the nursery really has been a labour of love for me and I’m really enjoying creating bits and bobs for every corner of it. With our little one now 6 months old, she’s technically ready to move into her own room (even if we aren’t yet!) and so I’ve been thinking about getting a baby monitor for her room to keep an eye on her overnight. I’ve seen lots of baby monitors with wall brackets, which is more appealing to me than a stand, but to be honest both aren’t quite what I wanted for the nursery. I really wanted every item placed into the nursery to add some magic to it, but after a quick look, I couldn’t find anything that fit the bill, and so of course, I got thinking about how to make exactly what I was looking for.

Air-dry clay

It’s my favourite medium as it’s just so versatile, and so when I was thinking about how I could create what I wanted, I immediately thought of air dry clay. I knew that I wouldn’t trust air-dry clay to hold a monitor safely near her cot, so I wanted any weight bearing part of the shelf to be made from wood and proper brackets, but then to decorate around this using air-dry clay. I love working with air-dry clay as well, and feel pretty confident in getting the effect I’m after. I left my air-dry clay pieces to dry for several days, and would advise not attempting to speed the drying process up as this can cause cracks.

I’m so happy with how this little shelf turned out. It’s pretty, whimsical but also practical. Let me know what you think of this, keep reading for the materials I used and the step by step process…

Air-dry clay

Paint

MDF

Jigsaw

Shelf brackets

MDF Primer

Command strips

1.

First of all, work out how large you want your shelf and draw it out on paper. I stuck two pieces of A$ together to create a piece of A3 and drew out my design on this. Once I was happy, I drew a thick outline in a felt tip and stuck my design with tape to a piece of wood. You could also just stick it to a table.

2.

Next, I cut a plastic sleeve in half and stuck this on top of my paper and design. I secured it around the edge using tape.

3.

I then took pieces of air dry clay and softened them up in my hands. I rolled out pieces to my desired thickness and so that they were big enough to cover each aspect of my design.
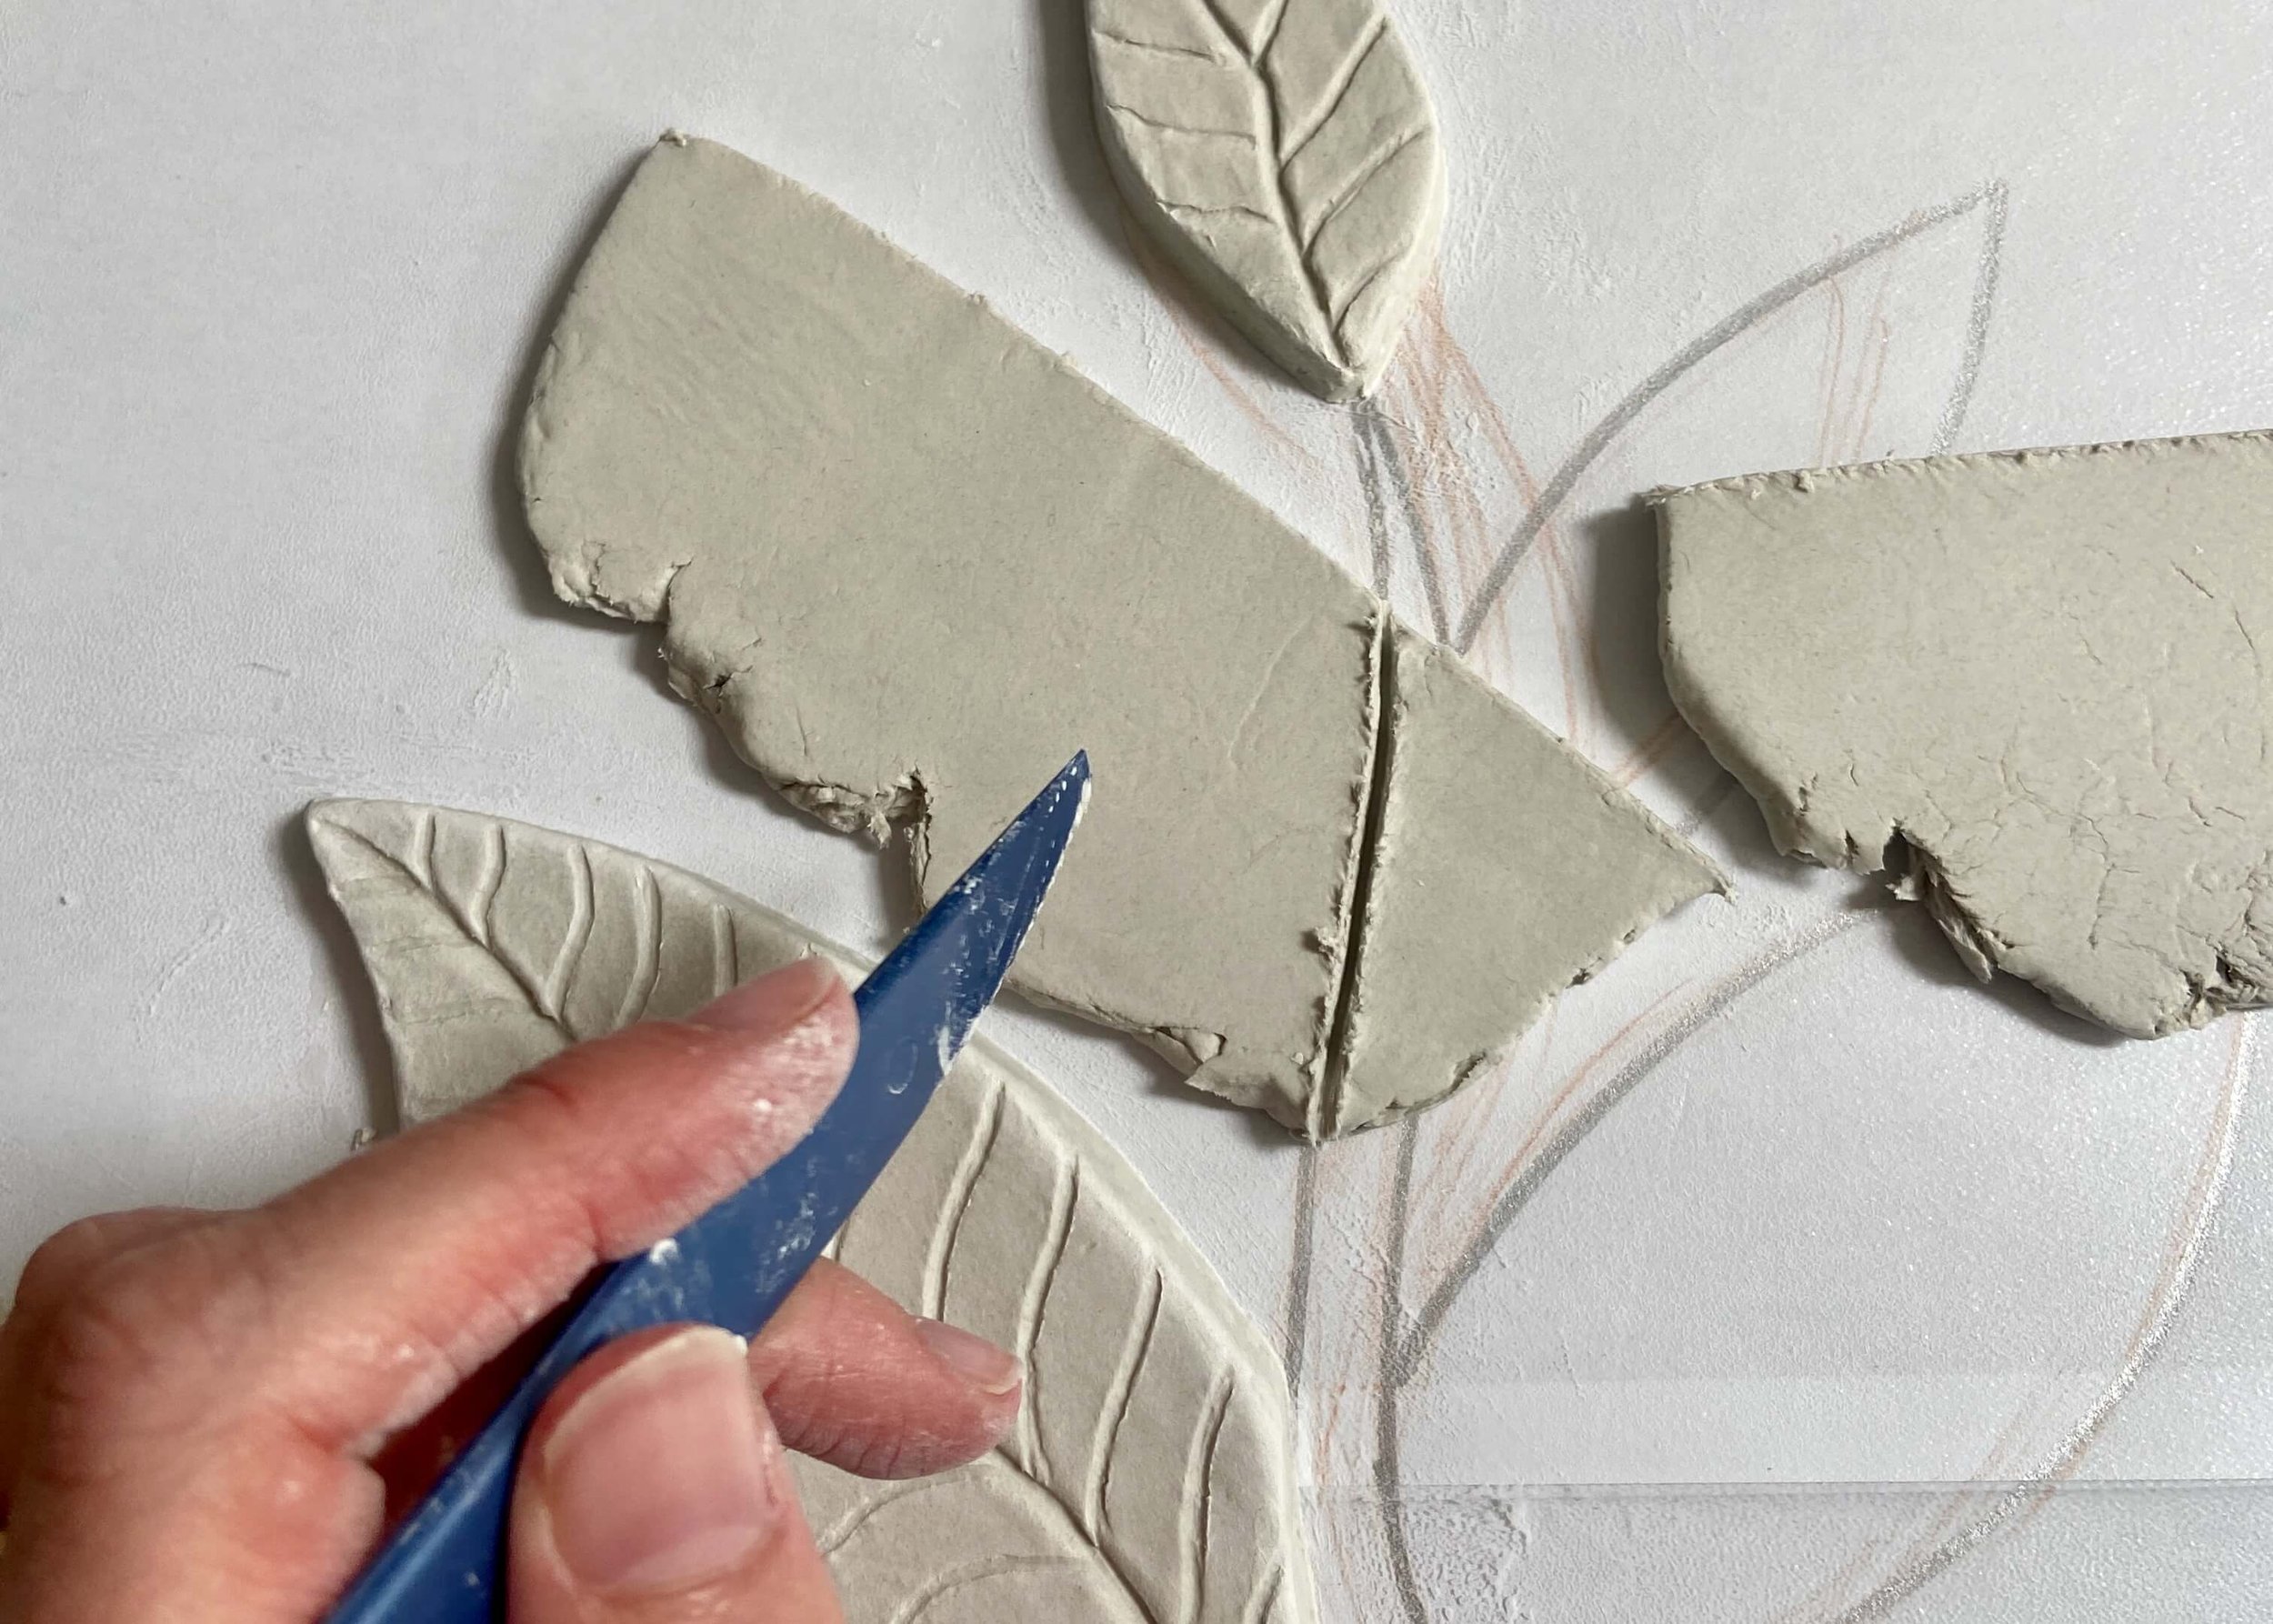
4.

I then placed each piece of clay over each leaf on the plastic and cut them out using a clay scalpel. I smoothed the edges with my finger and some water, and then created details on the leaf using a clay sculpting tool. I kept smoothing any jagged edges with my finger and a little bit of water.

5.

To create the stalk of the plant, I softened and then rolled a piece of air dry clay into a long sausage. I put it in position on my drawing and then cut it where the MDF shelf would sit. I used my sculpting tools, fingers and water to smooth and add some texture to this. I did my best to stick this to the leaves but I wasnt too worried as I planned to adhere each part to the wall seperately for safety anyway.

6.

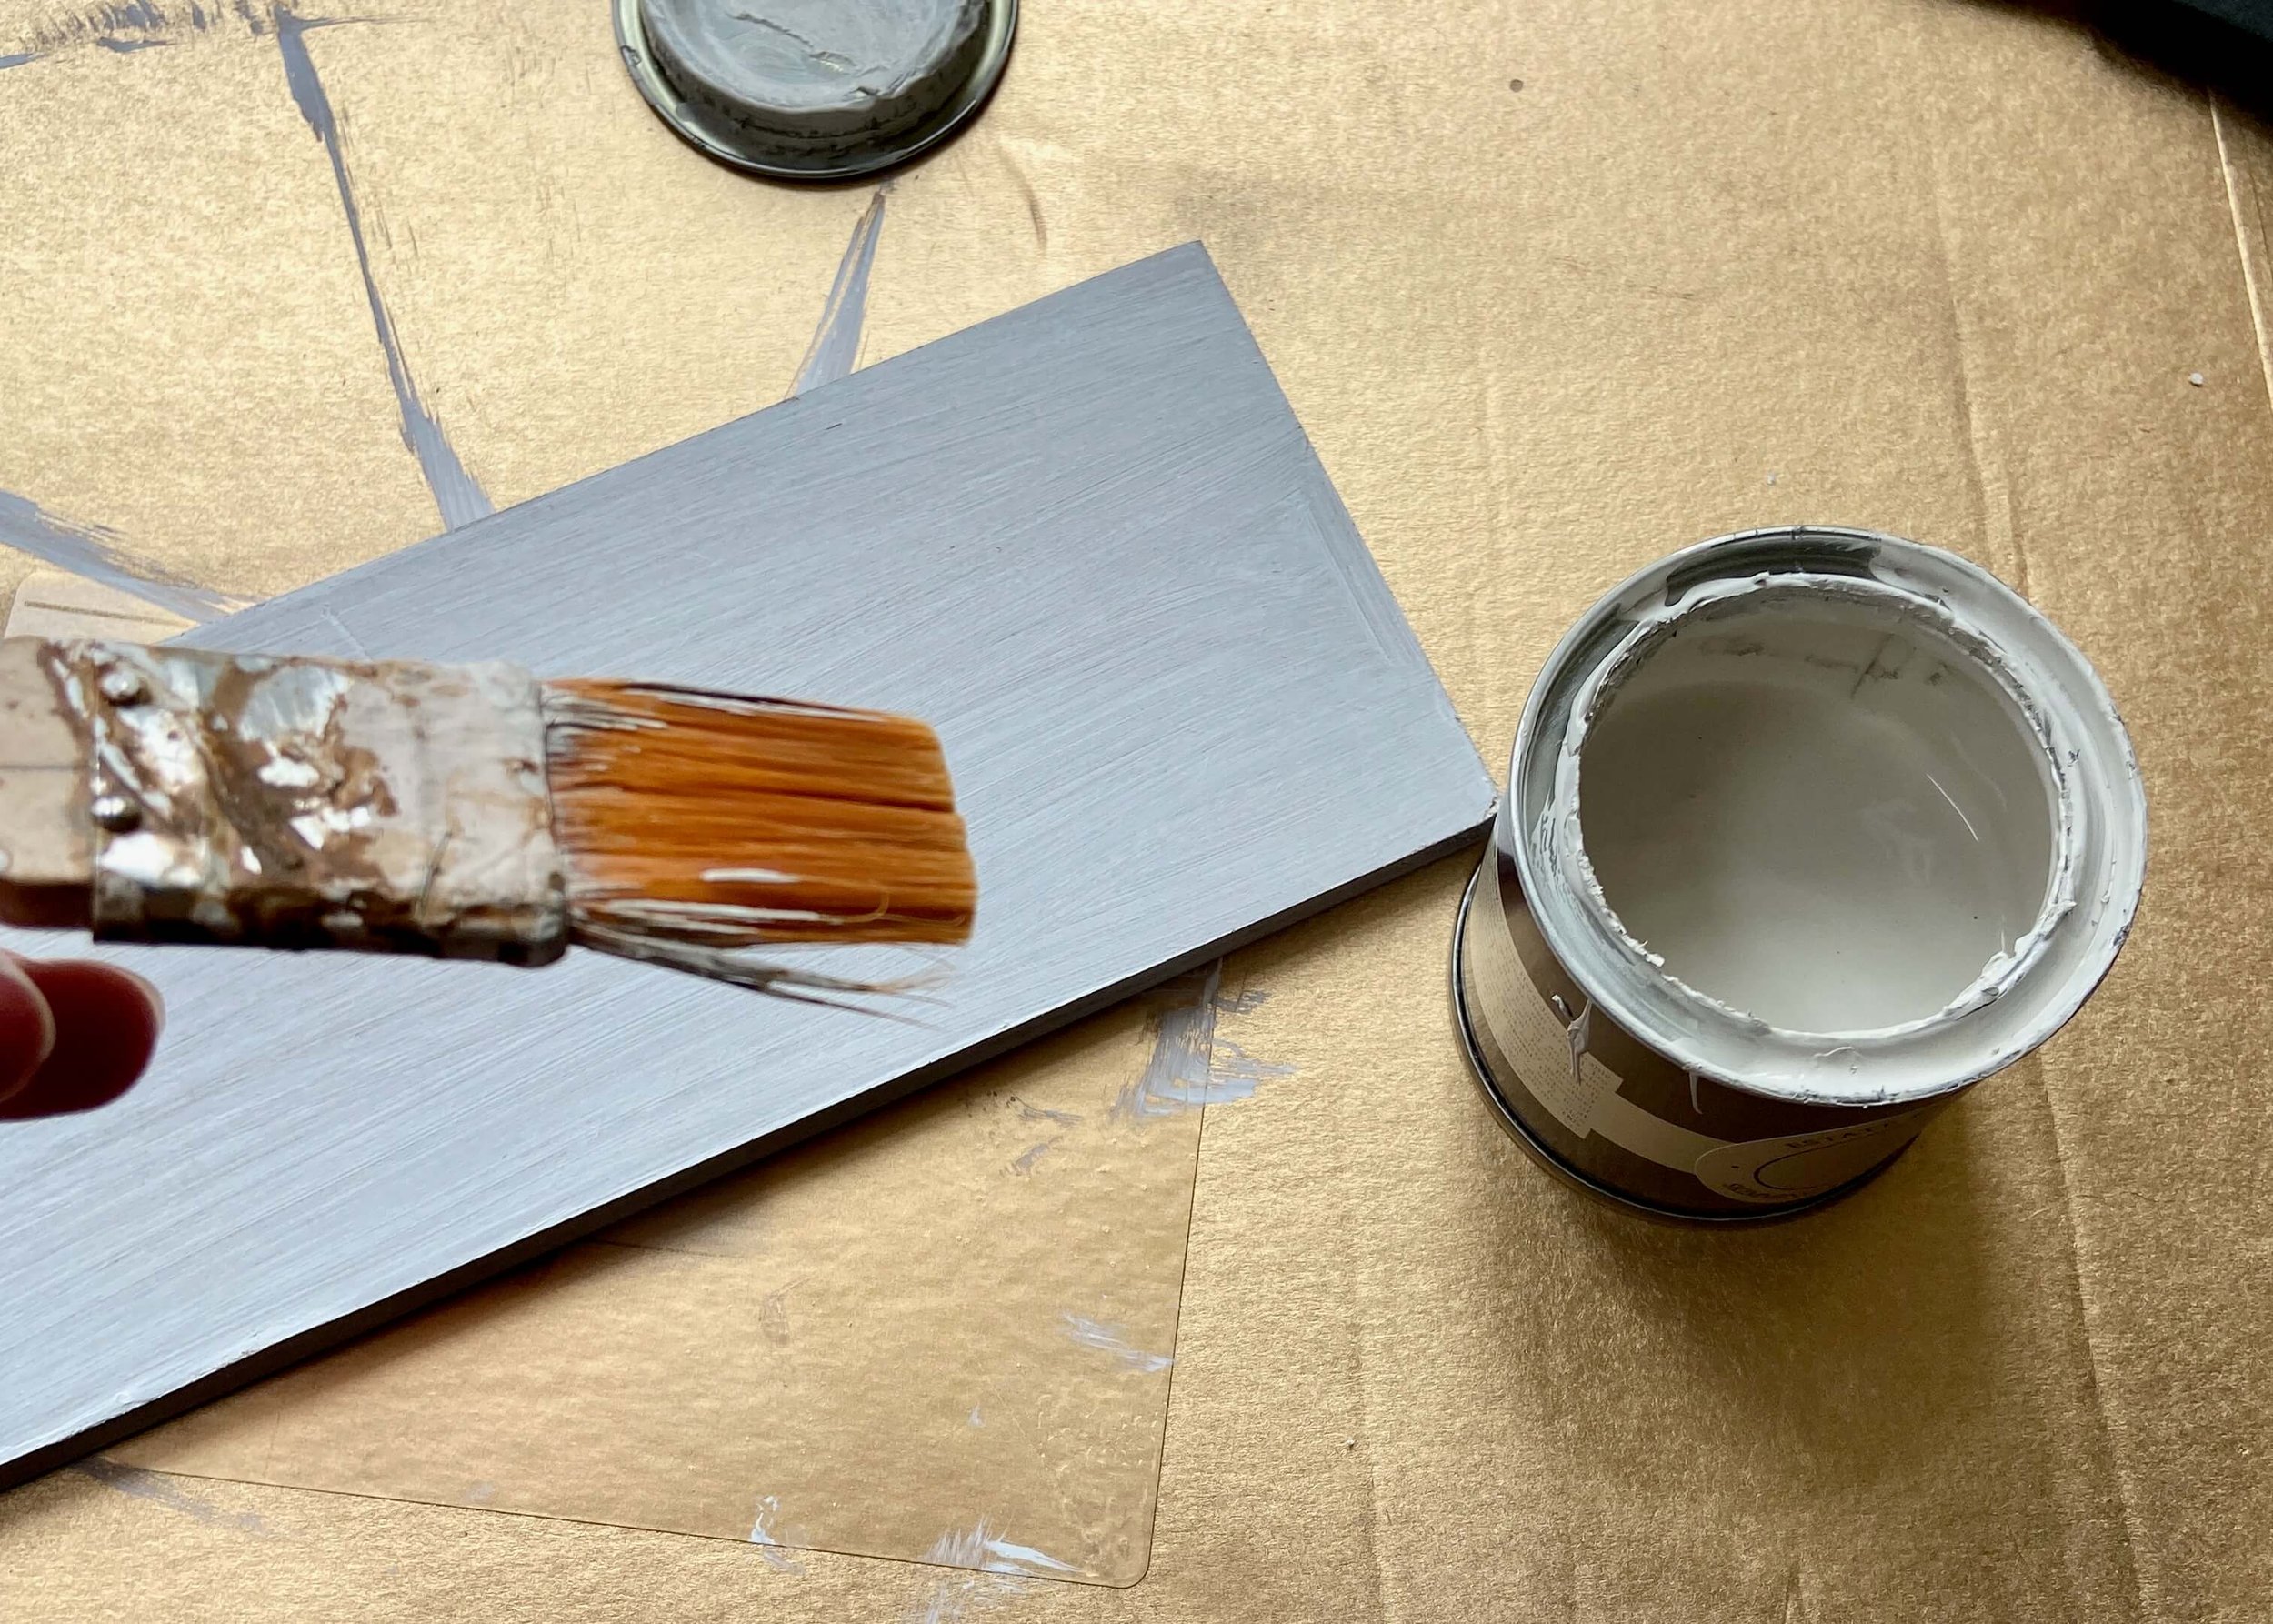
Whilst my clay dried, which took several days, I cut a piece of MDF to length. I then primed it using a special MDF primer and painted two coats on it of Farrow & Ball’s Skimming Stone.

7.

Once everything was dry, I removed the clay pieces from my drawing and put the MDF shelf in place on it. I then popped the shelf bracket against the shelf and where the bottom clay leaf was (as I wanted the bracket to be hidden) and drew onto the shelf where to drill pilot holes.

8.

Next, I screwed the brackets to the shelf and then held up the shelf in position on the wall and marked where to drill pilot holes. We then drilled pilot holes and scrwed the brackets and shelf into the wall.

9.

I then painted my clay pieces in greens and browns, and left the entired thing to dry. The leaves and stalk did break away from each other but I wasn’t too worried about this as I planned to stick each individual piece to the wall for safety anyway.

10.

Using command strips, cut into smaller pieces and stuck all over the back of each part of the clay, I added the leaves and stalk at the bottom. I made sure to position it so that the leaves were over the brackets and the stalk was up touching the shelf.

11.

I then used more command strips to stick the top leaves and stalks to the wall above the shelf. I made sure to line the stalk at the top up with the stalk at the bottom.

…AND THAT’S IT!

this is the alt text
YOU MIGHT ALSO LIKE...
Wooden Mushroom Decor
26 Apr 2025
Wooden Mushroom Decor
26 Apr 2025
26 Apr 2025
Hand-Painted Floral Mural Arch
29 Mar 2025
Hand-Painted Floral Mural Arch
29 Mar 2025
29 Mar 2025
Easy IKEA Antilop Makeover
1 Mar 2025
Easy IKEA Antilop Makeover
1 Mar 2025
1 Mar 2025
Clay Leaf Shelf
29 Jun 2024
Clay Leaf Shelf
29 Jun 2024
29 Jun 2024
Nursery Feature Wall
15 Jun 2024
Nursery Feature Wall
15 Jun 2024
15 Jun 2024
Hallway Wall Niche
8 Jun 2024
Hallway Wall Niche
8 Jun 2024
8 Jun 2024
Ikea Hemnes Drawer Hack
4 May 2024
Ikea Hemnes Drawer Hack
4 May 2024
4 May 2024
Pressed Flower Taper Candle
20 Apr 2024
Pressed Flower Taper Candle
20 Apr 2024
20 Apr 2024
Floral Rabbit Nursery Print
13 Apr 2024
Floral Rabbit Nursery Print
13 Apr 2024
13 Apr 2024
Pressed Flower Egg Ornaments
10 Apr 2024
Pressed Flower Egg Ornaments
10 Apr 2024
10 Apr 2024
In DIY, INTERIORS Tags home, interiors, nursery
← Easy IKEA Antilop MakeoverNursery Feature Wall →
 

Decorating, DIY-ing and doodling my way through life. Have a look around and let’s get creative!

>> FIND OUT MORE <<

Follow
The office is still one of my favourite transformations in the house! 😍

I started by panelling the wall with MDF strips and then painted the wall with a mix of colours. I used three IKEA drawer units for the base of the desk and then secured the de

ART

DIY

LIFE


THE LATEST

Featured
Wooden Mushroom Decor
26 Apr 2025
Wooden Mushroom Decor
26 Apr 2025
26 Apr 2025
Hand-Painted Floral Mural Arch
29 Mar 2025
Hand-Painted Floral Mural Arch
29 Mar 2025
29 Mar 2025
Easy IKEA Antilop Makeover
1 Mar 2025
Easy IKEA Antilop Makeover
1 Mar 2025
1 Mar 2025
Clay Leaf Shelf
29 Jun 2024
Clay Leaf Shelf
29 Jun 2024
29 Jun 2024
Nursery Feature Wall
15 Jun 2024
Nursery Feature Wall
15 Jun 2024
15 Jun 2024


THE GREATEST

Featured
DIY // IKEA LACK TABLE INDUSTRIAL HACK
22 Sept 2020
DIY
DIY // IKEA LACK TABLE INDUSTRIAL HACK
22 Sept 2020
DIY
22 Sept 2020
DIY
DIY // CLAY ALL-SEEING EYE MIRROR
14 Aug 2020
DIY
DIY // CLAY ALL-SEEING EYE MIRROR
14 Aug 2020
DIY
14 Aug 2020
DIY
DIY // CLAY FACE DISH
29 Apr 2020
DIY
DIY // CLAY FACE DISH
29 Apr 2020
DIY
29 Apr 2020
DIY
DIY // ABSTRACT ART FLORAL EGGS
25 Mar 2020
DIY
DIY // ABSTRACT ART FLORAL EGGS
25 Mar 2020
DIY
25 Mar 2020
DIY
DIY // WIRE FACE EARRINGS
16 Feb 2020
DIY
DIY // WIRE FACE EARRINGS
16 Feb 2020
DIY
16 Feb 2020
DIY

Follow
^^ BACK TO TOP
How does Monday come round so quick?!Wishing I could cosy up here today ✨

#mondaymood #storyofmyhome #mydailyhomesquare #interiordesign #budgetdiy #realstylishhomes #ourdiyhomes #femalediycollective #discoverunder5k #myhousethismonth #myhousedownsou
I&rsquo;ve got the day off today (woop!) and although it&rsquo;s not quite warm enough to sit out here yet, the sun is shining and I think a little walk to blow out the cobwebs is exactly what I need. Hope Monday is treating you well! ☀️

#summerdrea
Had such a lovely day seeing one of my besties and her adorable new baby that I completely forgot to share today&rsquo;s new blog post!

Head over to the blog for all the details of this easy DIY ring dish 🔝✨

#diy #diyhomedecor #diyhome #diyvalenti
That sunshine 👌🏻☀️

#mycosyhome #livingroomdecor #livingroominspo #mydiymydecor #homeobsessed #lovemydecor #homeinterioruk #discoverunder5k #diyhome #diyhomedecor #myhousethismonth #myhousedownsouth #realstylishhomes #ourdiyhomes #happythursday #in
A little corner our home on this chilly Tuesday morning ✨
.
.
#interior #homeobsessed #mycosyhome #homeinterioruk #instadecorating #homesofinstagram #happymonday #mondaymotivation #instainteriors #cornersofmyhome #myhousethismonth #myhousedownsouth #

Copyright 2021 isoscella. All rights reserved.

Powered by Squarespace