• ABOUT ME
    • PRIVACY POLICY
  • COLLABORATE
  • BLOG
    • ART
    • WEDDING
    • LIBRARY
    • DECOR
    • JEWELLERY
    • STATIONARY
    • NAIL ART
    • BAKING
    • CHRISTMAS
    • EASTER
    • ART PRINTS
    • WEDDING STATIONARY
  • CONTACT
Menu

ISOSCELLA

Street Address
City, State, Zip
Phone Number

Your Custom Text Here

ISOSCELLA

  • ABOUT
    • ABOUT ME
    • PRIVACY POLICY
  • COLLABORATE
  • BLOG
  • ART
    • ART
    • WEDDING
    • LIBRARY
  • DIY
    • DECOR
    • JEWELLERY
    • STATIONARY
    • NAIL ART
    • BAKING
    • CHRISTMAS
    • EASTER
  • SHOP
    • ART PRINTS
    • WEDDING STATIONARY
  • CONTACT

DIY // FAUX HEALING CRYSTAL PENDANT

February 15, 2016 isoscella

Healing stone and crystal pendants are back in if the collection of Healing Stone Wrap Pendants in Topshop are anything to go by. Although not a big believer in the healing properties of crystals or stones (I just can't get my head around it!), I love how they look and thought I'd have a go at creating my very own faux healing crystal necklace. To keep this post from becoming too long and complicated, I've shown you how I created the crystal out of clay in this post and next week, will share with you how I wire wrapped it and turned it into a necklace.

Air-dry clay  |  Craft knife  |  Acrylic paint  |  Paint brush  |  Sponge  |  Varnish

1. Mould some air-dry clay into a bullet-like shape. Here, I simply cut off a small piece of clay and rolled it between my fingers. At one end, I pinched the end as I rolled it to create a cylindrical pointed tip whilst at the other I gave it a more cuboid shape.

2. Cut down the sides to create a 4-sided rectangular block with a cylindrical tip. Using my craft knife, I positioned the clay so that the bottom was flat against the cutting board and sliced off the edges of the clay from top (excluding the pointed tip) to bottom to give it 4 sides.

3. Slice off the corners of the 4-sided block, creating an octangular shaped block. Again with the bottom flat against the cutting board and using my craft knife, I went around the clay again, slicing from top to bottom (excluding the cylindrical tip), cutting off the angles created in the previous step to introduce 4 more sides to the clay block.

4. Cut the cylindrical tip in line with each face of the block so that the tip has eight flat sides. Next, I used my craft knife to cut the cylindrical tip so that it also had 8 flat sides in line with the 8 side of the rest of the block.

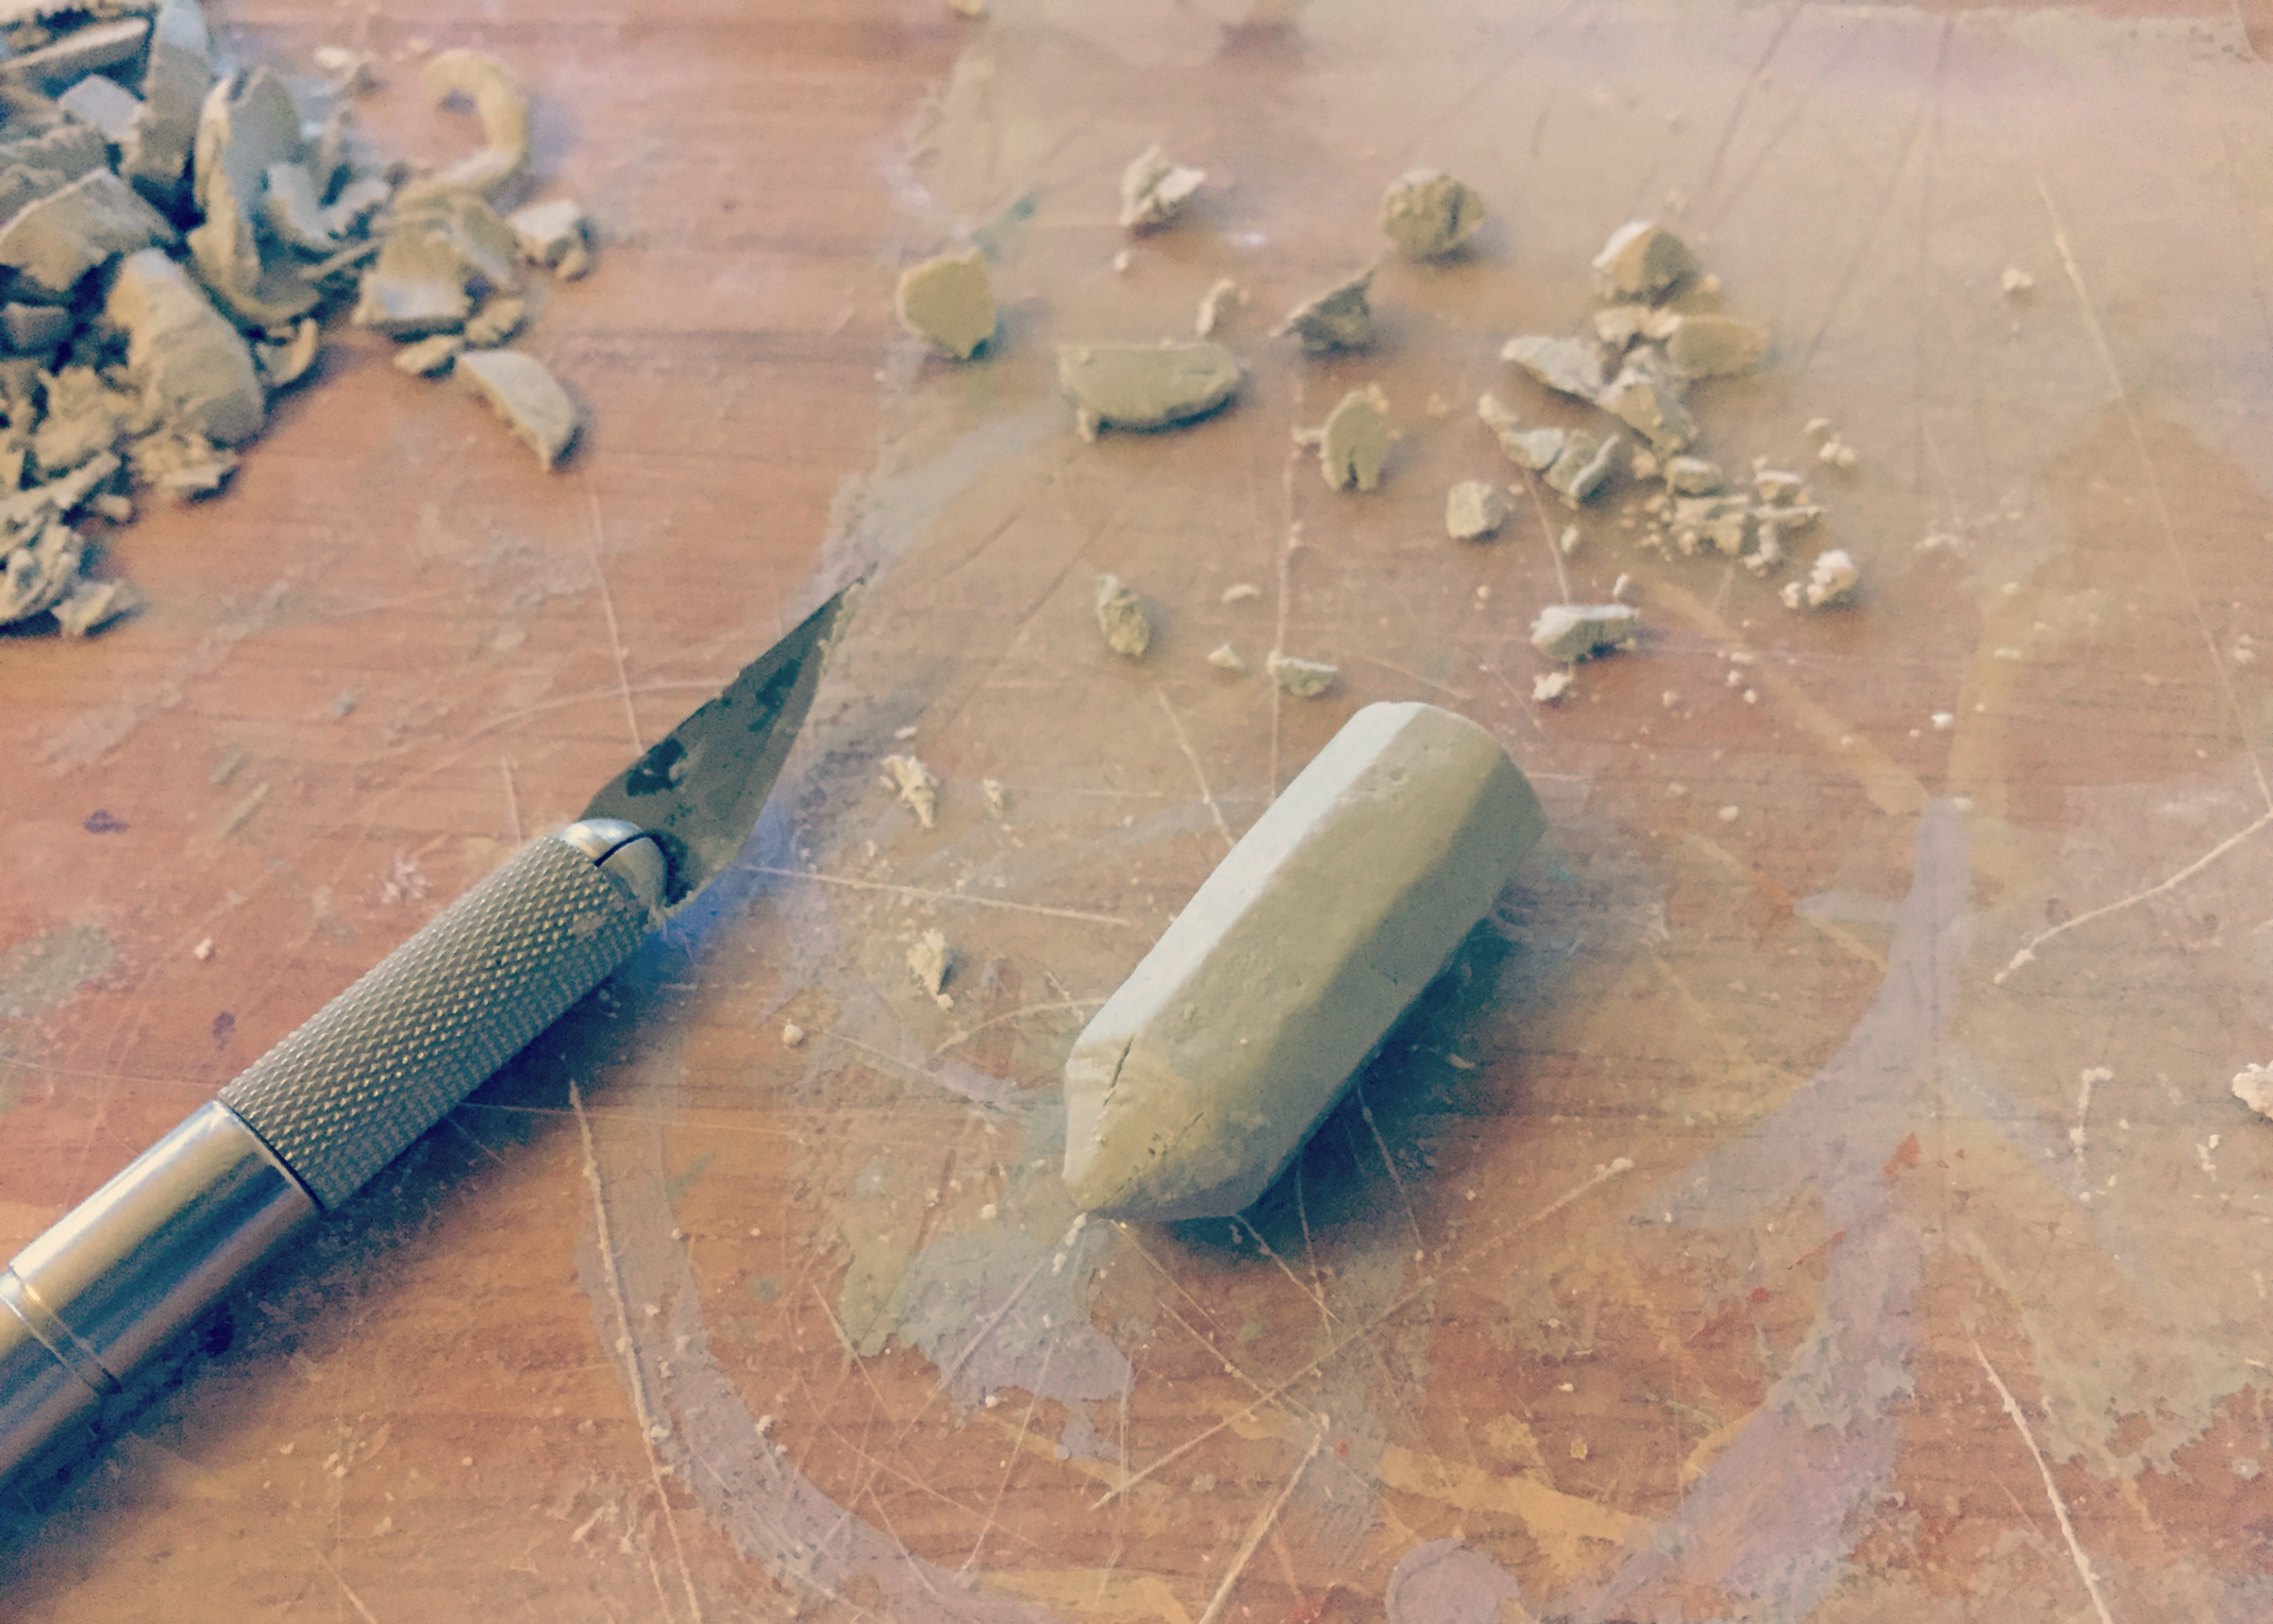
5. Create a hole through the block at the end furthest from the pointed tip and leave to dry. To do this, I pushed a headpin through one side of the block to the other. I did this at the end furthest from the pointed tip and then left the clay block to dry overnight.

6. Once dry, sand each face of the clay (both the tip and the main block). Using small strips of sandpaper (both coarse and fine), I sanded each face of the clay block so that the corners were nice and sharpe and the crystal-like shape more distinct.

7. Using acrylic paint, paint the clay. To create a crystal-like finish, I used both a paintbrush (with a stippling motion) and a sponge. After mixing up a purple shade, I dabbed paint roughly all over the clay. Whilst this and the sponge were still wet, I dabbed a small amount of white paint all over as well as a slightly pinker shade of purple.

8. Once the paint is dry, paint on two coats of varnish. To protect the paint and make the clay a bit more waterproof, it's always a good idea to paint all over a clay project with varnish. In this case, as I wanted the clay to look like a crystal I painted two coats of a gloss varnish to create a lovely crystal-like shine. 

...and that's how you make a healing crystal out of clay!

I was really pleased with the resulting crystal and really quite surprised (though I probably shouldn't admit that!) that it turned out quite so well. With mother's day fast approaching (March 6th here in the UK!) a faux crystal necklace is a thoughtful and affordable little gift!

What do you think of healing stone or crystals jewellery?

Don't forget to follow me on Bloglovin so you don't miss how I wire wrapped this crystal to make a necklace!

♥

In DIY Tags jewellery
← DIY // WIRE-WRAPPED CRYSTAL NECKLACE5 FAVES FRIDAY // VALENTINE'S DIY'S FOR ALL YEAR ROUND →
 

Decorating, DIY-ing and doodling my way through life. Have a look around and let’s get creative!

>> FIND OUT MORE <<

Follow
The office is still one of my favourite transformations in the house! 😍

I started by panelling the wall with MDF strips and then painted the wall with a mix of colours. I used three IKEA drawer units for the base of the desk and then secured the de

ART

DIY

LIFE


THE LATEST

Featured
Wooden Mushroom Decor
Apr 26, 2025
Wooden Mushroom Decor
Apr 26, 2025
Apr 26, 2025
Hand-Painted Floral Mural Arch
Mar 29, 2025
Hand-Painted Floral Mural Arch
Mar 29, 2025
Mar 29, 2025
Easy IKEA Antilop Makeover
Mar 1, 2025
Easy IKEA Antilop Makeover
Mar 1, 2025
Mar 1, 2025
Clay Leaf Shelf
Jun 29, 2024
Clay Leaf Shelf
Jun 29, 2024
Jun 29, 2024
Nursery Feature Wall
Jun 15, 2024
Nursery Feature Wall
Jun 15, 2024
Jun 15, 2024


THE GREATEST

Featured
DIY // IKEA LACK TABLE INDUSTRIAL HACK
Sep 22, 2020
DIY
DIY // IKEA LACK TABLE INDUSTRIAL HACK
Sep 22, 2020
DIY
Sep 22, 2020
DIY
DIY // CLAY ALL-SEEING EYE MIRROR
Aug 14, 2020
DIY
DIY // CLAY ALL-SEEING EYE MIRROR
Aug 14, 2020
DIY
Aug 14, 2020
DIY
DIY // CLAY FACE DISH
Apr 29, 2020
DIY
DIY // CLAY FACE DISH
Apr 29, 2020
DIY
Apr 29, 2020
DIY
DIY // ABSTRACT ART FLORAL EGGS
Mar 25, 2020
DIY
DIY // ABSTRACT ART FLORAL EGGS
Mar 25, 2020
DIY
Mar 25, 2020
DIY
DIY // WIRE FACE EARRINGS
Feb 16, 2020
DIY
DIY // WIRE FACE EARRINGS
Feb 16, 2020
DIY
Feb 16, 2020
DIY

Follow
^^ BACK TO TOP
How does Monday come round so quick?!Wishing I could cosy up here today ✨

#mondaymood #storyofmyhome #mydailyhomesquare #interiordesign #budgetdiy #realstylishhomes #ourdiyhomes #femalediycollective #discoverunder5k #myhousethismonth #myhousedownsou
I&rsquo;ve got the day off today (woop!) and although it&rsquo;s not quite warm enough to sit out here yet, the sun is shining and I think a little walk to blow out the cobwebs is exactly what I need. Hope Monday is treating you well! ☀️

#summerdrea
Had such a lovely day seeing one of my besties and her adorable new baby that I completely forgot to share today&rsquo;s new blog post!

Head over to the blog for all the details of this easy DIY ring dish 🔝✨

#diy #diyhomedecor #diyhome #diyvalenti
That sunshine 👌🏻☀️

#mycosyhome #livingroomdecor #livingroominspo #mydiymydecor #homeobsessed #lovemydecor #homeinterioruk #discoverunder5k #diyhome #diyhomedecor #myhousethismonth #myhousedownsouth #realstylishhomes #ourdiyhomes #happythursday #in
A little corner our home on this chilly Tuesday morning ✨
.
.
#interior #homeobsessed #mycosyhome #homeinterioruk #instadecorating #homesofinstagram #happymonday #mondaymotivation #instainteriors #cornersofmyhome #myhousethismonth #myhousedownsouth #

Copyright 2021 isoscella. All rights reserved.

Powered by Squarespace