• ABOUT ME
    • PRIVACY POLICY
  • COLLABORATE
  • BLOG
    • ART
    • WEDDING
    • LIBRARY
    • DECOR
    • JEWELLERY
    • STATIONARY
    • NAIL ART
    • BAKING
    • CHRISTMAS
    • EASTER
    • ART PRINTS
    • WEDDING STATIONARY
  • CONTACT
Menu

ISOSCELLA

Street Address
City, State, Zip
Phone Number

Your Custom Text Here

ISOSCELLA

  • ABOUT
    • ABOUT ME
    • PRIVACY POLICY
  • COLLABORATE
  • BLOG
  • ART
    • ART
    • WEDDING
    • LIBRARY
  • DIY
    • DECOR
    • JEWELLERY
    • STATIONARY
    • NAIL ART
    • BAKING
    • CHRISTMAS
    • EASTER
  • SHOP
    • ART PRINTS
    • WEDDING STATIONARY
  • CONTACT

DIY // PLASTIC GEOMETRIC NECKLACE

June 13, 2017 Isoscella M
heasder2.jpg

It's been far too long since I made some jewellery and so when I came across some shrink plastic that I've never actually used, I thought I'd give it a go. I'm always admiring the geometric jewellery in Oliver Bonas and so decided to make a more simplistic and minimal version of my own. This necklace was ridiculously easy and I was so shocked at how fast the whole project was to complete. I had so much fun making this and for my first time using shrink plastic think it came out pretty well. Expect to see more shrink plastic projects on here in the future! Keep reading to find out what I used and how I made it...

Shrink Plastic

Bronze Sharpie

Acrylic Paint

Jump Rings

Chain

Trigger Clasp

1. First things first, preheat your oven to the temperature specified on your plastic. I misplaced the packaging for my shrink plastic so ended up using approximately 200C.

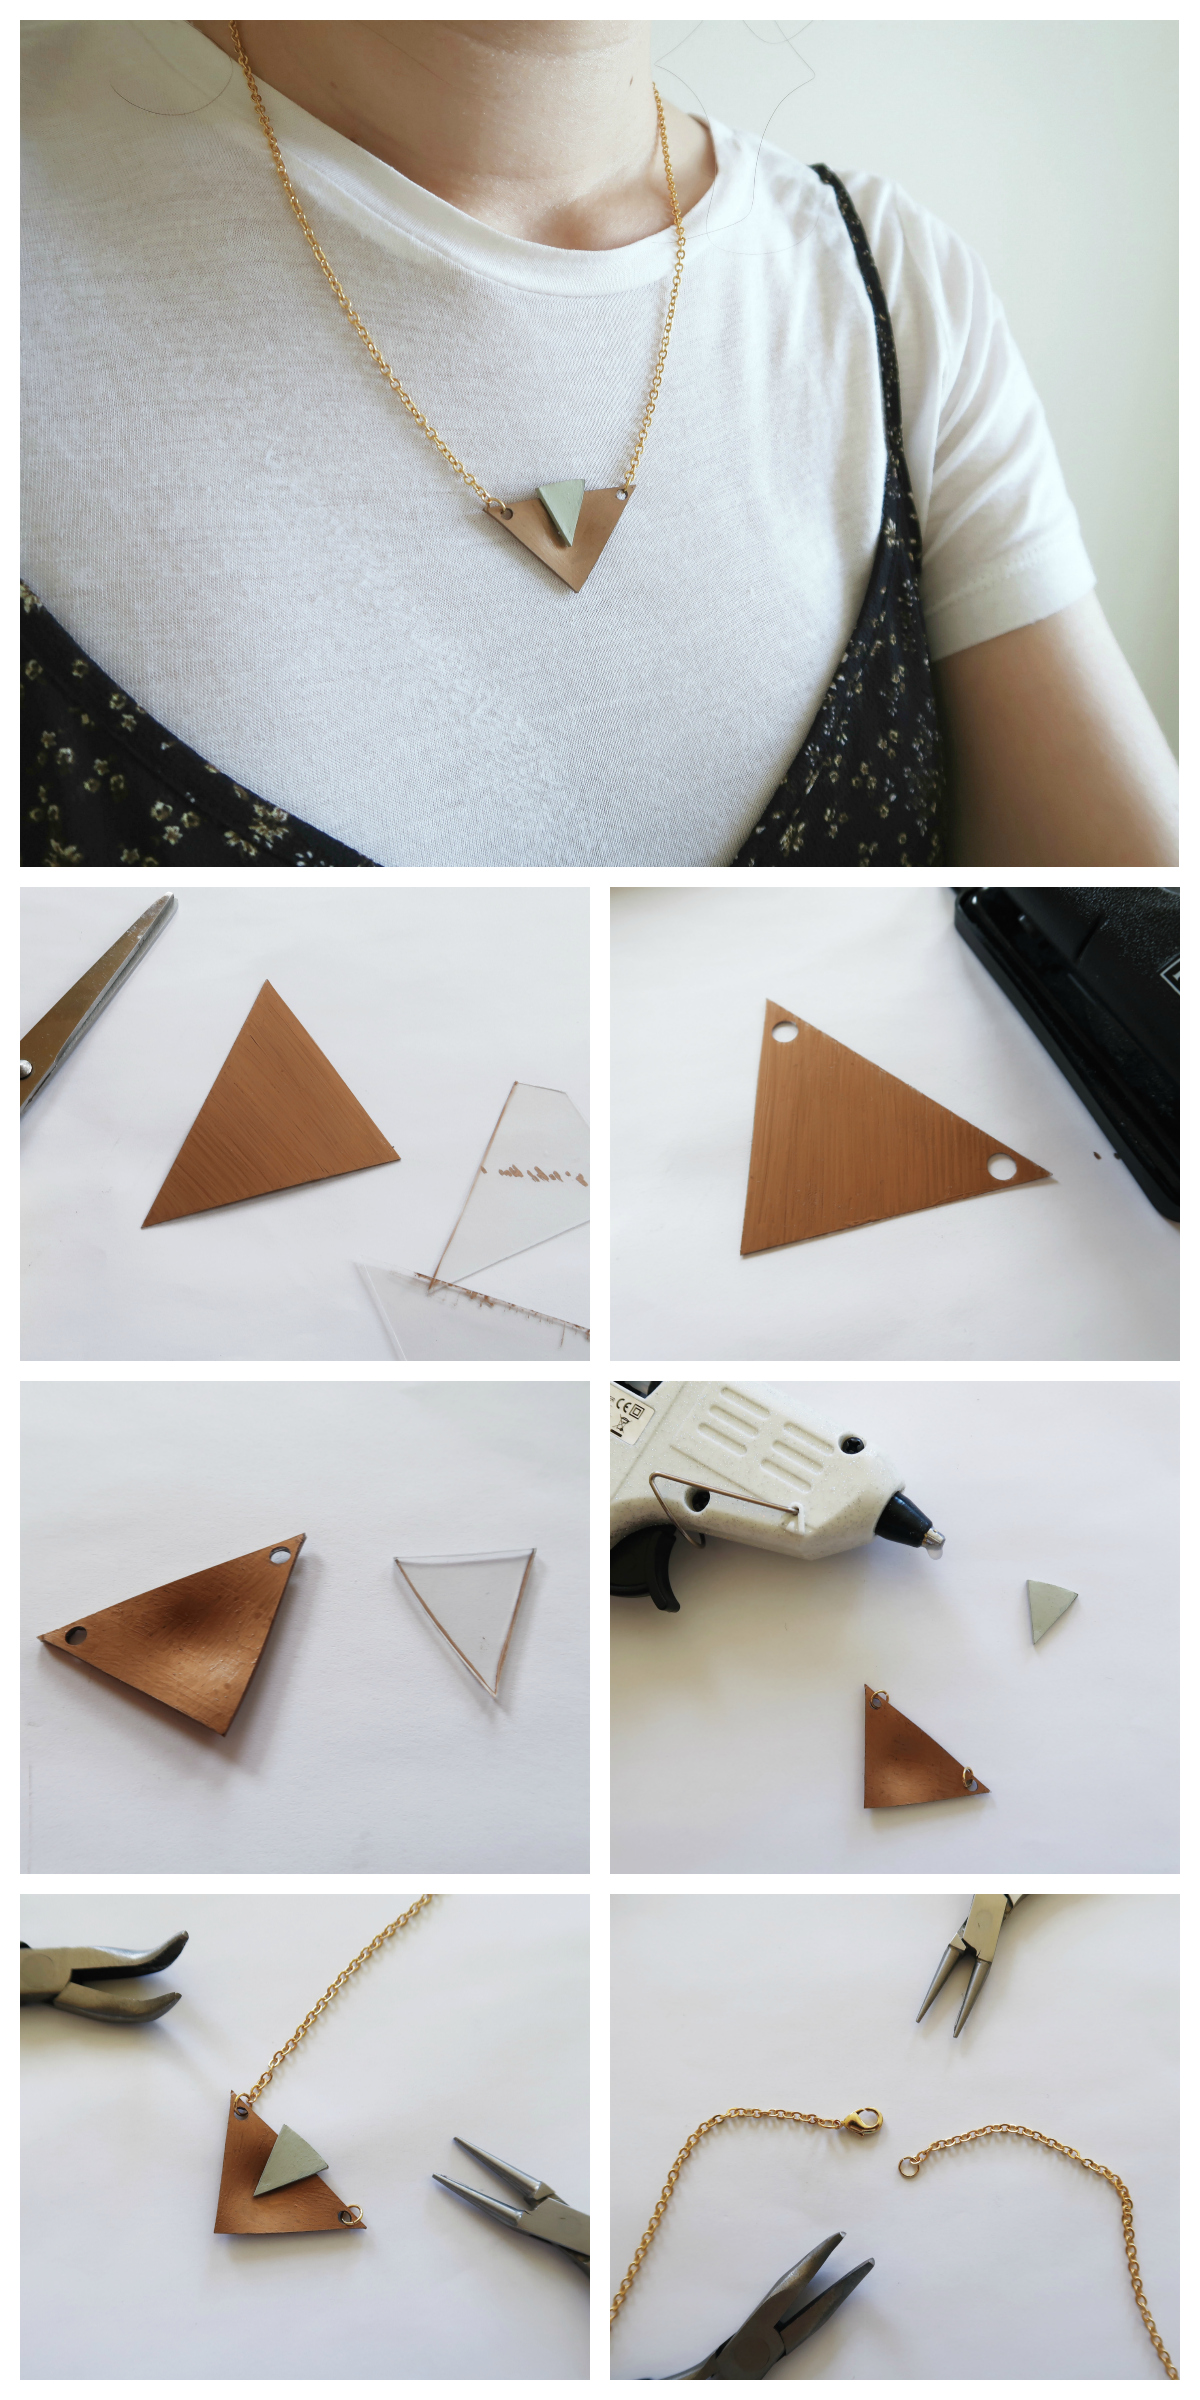
2. Draw out two triangles on a piece of paper. For triangle 1, you want to have a long edge of 8cm and two shorter sides of 6.5cm. For triangle 2, you want one side to be 4cm and two sides 4.5cm.

3. Place your shrink plastic over each triangle and trace them. For this, I used a ruler to keep my lines straight and a permanent bronze sharpie.

4. Colour in the larger triangle using a bronze sharpie. I coloured in one direction for a first layer, let it dry and then coloured in a different direction for the second.

5. Cut out both triangles and add holes to the larger triangle. I used scissors but if you want to be even more precise you could use a scalpel and metal ruler. To add holes, I used a standard hole punch.

6. Pop your triangles into the oven. I did one piece at a time as these things can roll up and

move about a bit so you don't want them to get stuck together. Once you put them in, watch and wait until they are completely flat before removing.

7. Remove them from the oven using oven gloves or tongs. I found mine weren't always perfectly flat so whilst they were still warm I flattened them with the bottom of a glass.

10. When cool, paint the smaller triangle and leave to dry before glueing to the larger triangle. To paint the smaller triangle I used a couple of coats of acrylic paint and glued it to the larger triangle using hot glue.

11. Cut 2 x 22.5cm of chain and attach each of these to the larger triangle. Using pliers cut the chain to length and attach using two jump rings. Open up the jump ring, add the triangle and before closing add in the chain.

12. At the end of one end of triangle attach a jump ring, and at the end of the other a trigger clasp. To attach the trigger clasp, open the jump ring and loop the chain onto it and the trigger clasp before closing.

Papermania A4 10-Piece Plastic Plastic Shrink Sheet, Clear Buy on Amazon
Sharpie Permanent Marker Metallic Bronze Bronze Pack 2 by Sharpie Buy on Amazon

I'd be really interested to hear what you think of this project and of shrink plastic in general so let me know in the comments below! Also, let me know if you'd appreciate some basic jewellery making tutorials in the future (like opening and closing jump rings, etc)!

♥

YOU MIGHT ALSO LIKE...
Wooden Mushroom Decor
Apr 26, 2025
Wooden Mushroom Decor
Apr 26, 2025
Apr 26, 2025
Hand-Painted Floral Mural Arch
Mar 29, 2025
Hand-Painted Floral Mural Arch
Mar 29, 2025
Mar 29, 2025
Easy IKEA Antilop Makeover
Mar 1, 2025
Easy IKEA Antilop Makeover
Mar 1, 2025
Mar 1, 2025
In DIY Tags jewellery, style
← DIY // TOPSHOP INSPIRED DENIM SKIRTDONE LIST // MAY 2017 →
 

Decorating, DIY-ing and doodling my way through life. Have a look around and let’s get creative!

>> FIND OUT MORE <<

Follow
The office is still one of my favourite transformations in the house! 😍

I started by panelling the wall with MDF strips and then painted the wall with a mix of colours. I used three IKEA drawer units for the base of the desk and then secured the de

ART

DIY

LIFE


THE LATEST

Featured
Wooden Mushroom Decor
Apr 26, 2025
Wooden Mushroom Decor
Apr 26, 2025
Apr 26, 2025
Hand-Painted Floral Mural Arch
Mar 29, 2025
Hand-Painted Floral Mural Arch
Mar 29, 2025
Mar 29, 2025
Easy IKEA Antilop Makeover
Mar 1, 2025
Easy IKEA Antilop Makeover
Mar 1, 2025
Mar 1, 2025
Clay Leaf Shelf
Jun 29, 2024
Clay Leaf Shelf
Jun 29, 2024
Jun 29, 2024
Nursery Feature Wall
Jun 15, 2024
Nursery Feature Wall
Jun 15, 2024
Jun 15, 2024


THE GREATEST

Featured
DIY // IKEA LACK TABLE INDUSTRIAL HACK
Sep 22, 2020
DIY
DIY // IKEA LACK TABLE INDUSTRIAL HACK
Sep 22, 2020
DIY
Sep 22, 2020
DIY
DIY // CLAY ALL-SEEING EYE MIRROR
Aug 14, 2020
DIY
DIY // CLAY ALL-SEEING EYE MIRROR
Aug 14, 2020
DIY
Aug 14, 2020
DIY
DIY // CLAY FACE DISH
Apr 29, 2020
DIY
DIY // CLAY FACE DISH
Apr 29, 2020
DIY
Apr 29, 2020
DIY
DIY // ABSTRACT ART FLORAL EGGS
Mar 25, 2020
DIY
DIY // ABSTRACT ART FLORAL EGGS
Mar 25, 2020
DIY
Mar 25, 2020
DIY
DIY // WIRE FACE EARRINGS
Feb 16, 2020
DIY
DIY // WIRE FACE EARRINGS
Feb 16, 2020
DIY
Feb 16, 2020
DIY

Follow
^^ BACK TO TOP
How does Monday come round so quick?!Wishing I could cosy up here today ✨

#mondaymood #storyofmyhome #mydailyhomesquare #interiordesign #budgetdiy #realstylishhomes #ourdiyhomes #femalediycollective #discoverunder5k #myhousethismonth #myhousedownsou
I&rsquo;ve got the day off today (woop!) and although it&rsquo;s not quite warm enough to sit out here yet, the sun is shining and I think a little walk to blow out the cobwebs is exactly what I need. Hope Monday is treating you well! ☀️

#summerdrea
Had such a lovely day seeing one of my besties and her adorable new baby that I completely forgot to share today&rsquo;s new blog post!

Head over to the blog for all the details of this easy DIY ring dish 🔝✨

#diy #diyhomedecor #diyhome #diyvalenti
That sunshine 👌🏻☀️

#mycosyhome #livingroomdecor #livingroominspo #mydiymydecor #homeobsessed #lovemydecor #homeinterioruk #discoverunder5k #diyhome #diyhomedecor #myhousethismonth #myhousedownsouth #realstylishhomes #ourdiyhomes #happythursday #in
A little corner our home on this chilly Tuesday morning ✨
.
.
#interior #homeobsessed #mycosyhome #homeinterioruk #instadecorating #homesofinstagram #happymonday #mondaymotivation #instainteriors #cornersofmyhome #myhousethismonth #myhousedownsouth #

Copyright 2021 isoscella. All rights reserved.

Powered by Squarespace