• ABOUT ME
    • PRIVACY POLICY
  • COLLABORATE
  • BLOG
    • ART
    • WEDDING
    • LIBRARY
    • DECOR
    • JEWELLERY
    • STATIONARY
    • NAIL ART
    • BAKING
    • CHRISTMAS
    • EASTER
    • ART PRINTS
    • WEDDING STATIONARY
  • CONTACT
Menu

ISOSCELLA

Street Address
City, State, Zip
Phone Number

Your Custom Text Here

ISOSCELLA

  • ABOUT
    • ABOUT ME
    • PRIVACY POLICY
  • COLLABORATE
  • BLOG
  • ART
    • ART
    • WEDDING
    • LIBRARY
  • DIY
    • DECOR
    • JEWELLERY
    • STATIONARY
    • NAIL ART
    • BAKING
    • CHRISTMAS
    • EASTER
  • SHOP
    • ART PRINTS
    • WEDDING STATIONARY
  • CONTACT

DIY Faux Fireplace #NotCardBored

October 9, 2021 Isoscella M
IMG_5419.jpeg

Don’t have a fireplace for the upcoming cosy seasons? No problem, make one from cardboard!

There’s a bit of a trend on social media at the moment to make various bits of decor from cardboard. The first I ever saw was an arched shelf by Oh Oh Deco and then an organic mirror by Geneva Vanderzeil. You can find my own version of Geneva’s organic mirror here, as well as lots of other cardboard creations on instagram under #NotCardBored. After trying out Geneva’s mirror, I decided to take my cardboard crafting to the next level. I’ve wanted a fireplace for years, but being in a new build, our current home doesn’t have one. The dream - when we have the spare pennies for it - is to have a faux fireplace built in, but as we’re now saving for a wedding, it isn’t at the top of our priorities, and so instead I opted to make my own from some spare cardboard boxes. Obviously this fireplace is more for decoration than heating, and be sure to only use battery-operated candles or battery-operated lanterns with a fire effect to avoid any accidents. Keep reading to find out how I made it and what I used…

Cardboard box

Plaster of paris or Plaster

Masking tape

Parcel tape

Battery-operated candles

IMG_5429.jpeg
IMG_4492.jpeg

1.

First of all, grab the largest cardboard boxes you have. We had these two large boxes left over from the chairs we got for our new office space. Before you start, remove any tape or rubbish in side.

IMG_4493.jpeg

2.

Open the boxes up so that they are completely flat. I decided I wanted my fireplace 92cm tall and wide, and 18cm deep, so I drew out the front of the fireplace in the centre of the cardboard (92x92) and added a 92x18 rectangle on either side.

IMG_4494.jpeg

3.

Next, work out how big you want the hole in your fireplace to be. I decided I wanted mine 37x60 and so I drew this rectangle out in the centre of the 92x92 square.

IMG_4495.jpeg

4.

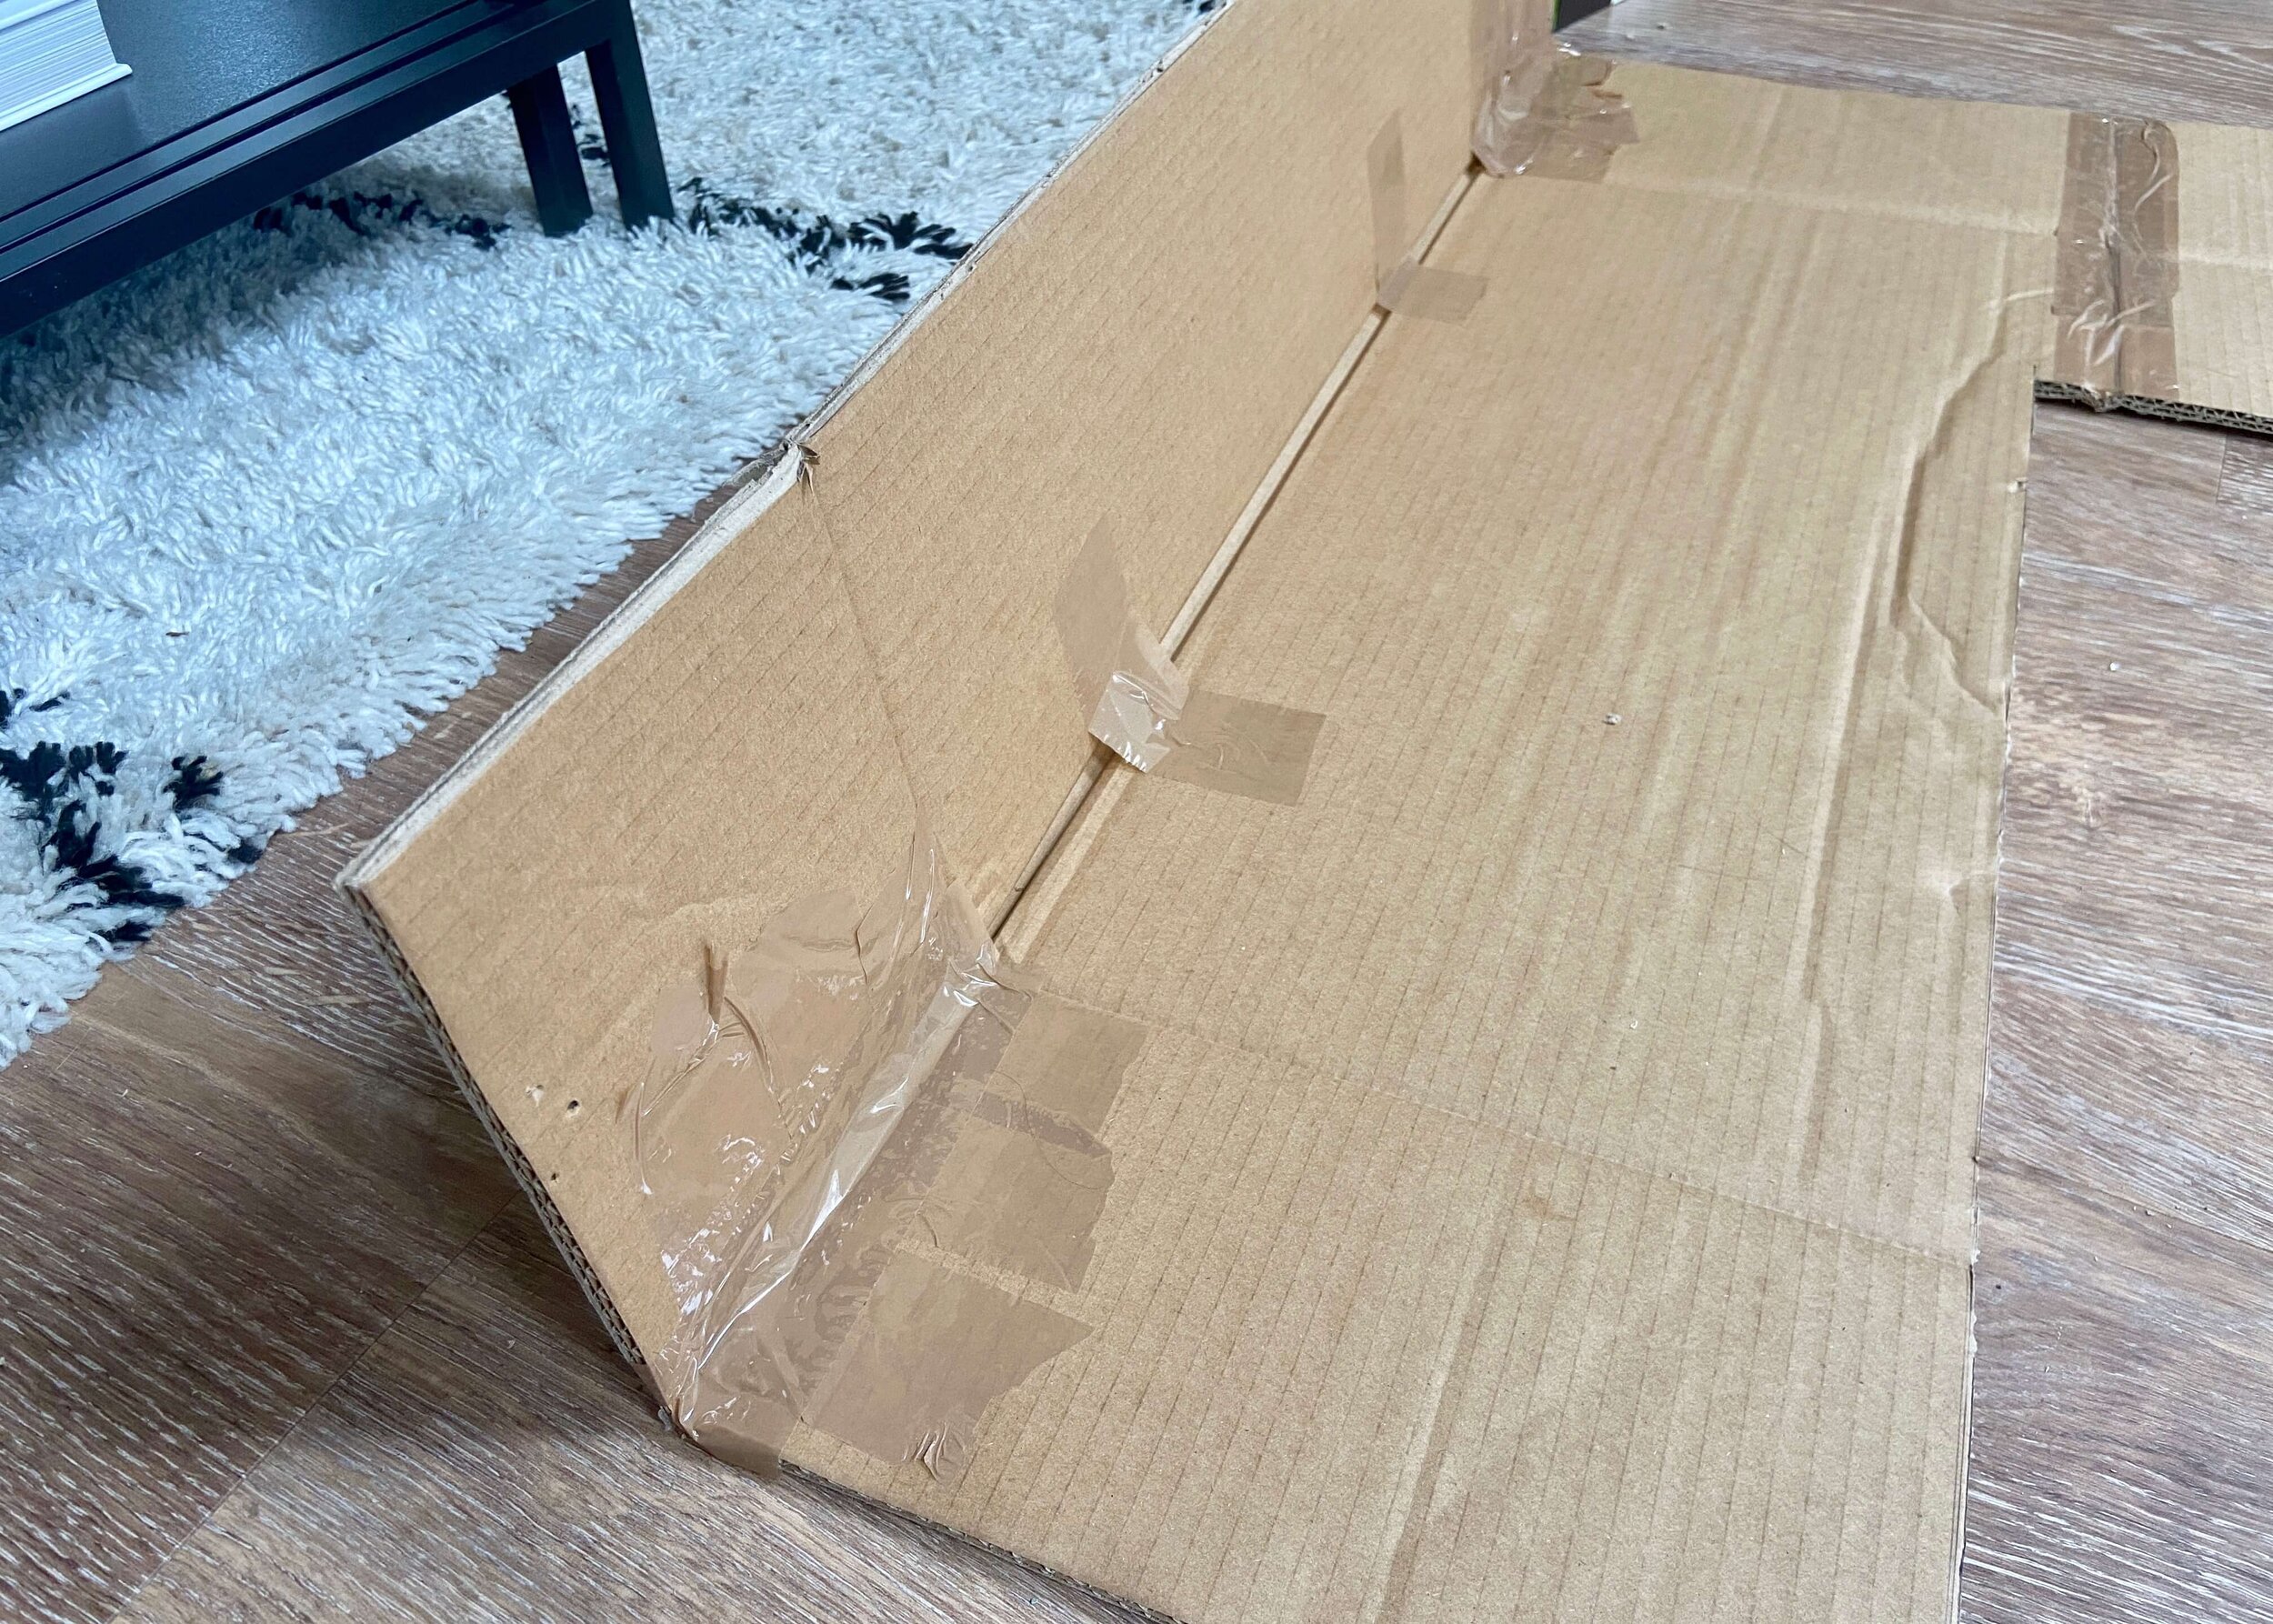
Where there were folds or cuts in the cardboard, I strengthened these with parcel tape, before cutting out the middle of the fireplace and entire thing (leaving the 18x92 sides attached) with a craft knife.

IMG_4506.jpeg

5.

Using the craft knife, score along the 92x18 sides. Fold and secure these at a 90 degree angle from the front of your fireplace with parcel tape. Repeat on the other side.

IMG_4507.jpeg

6.

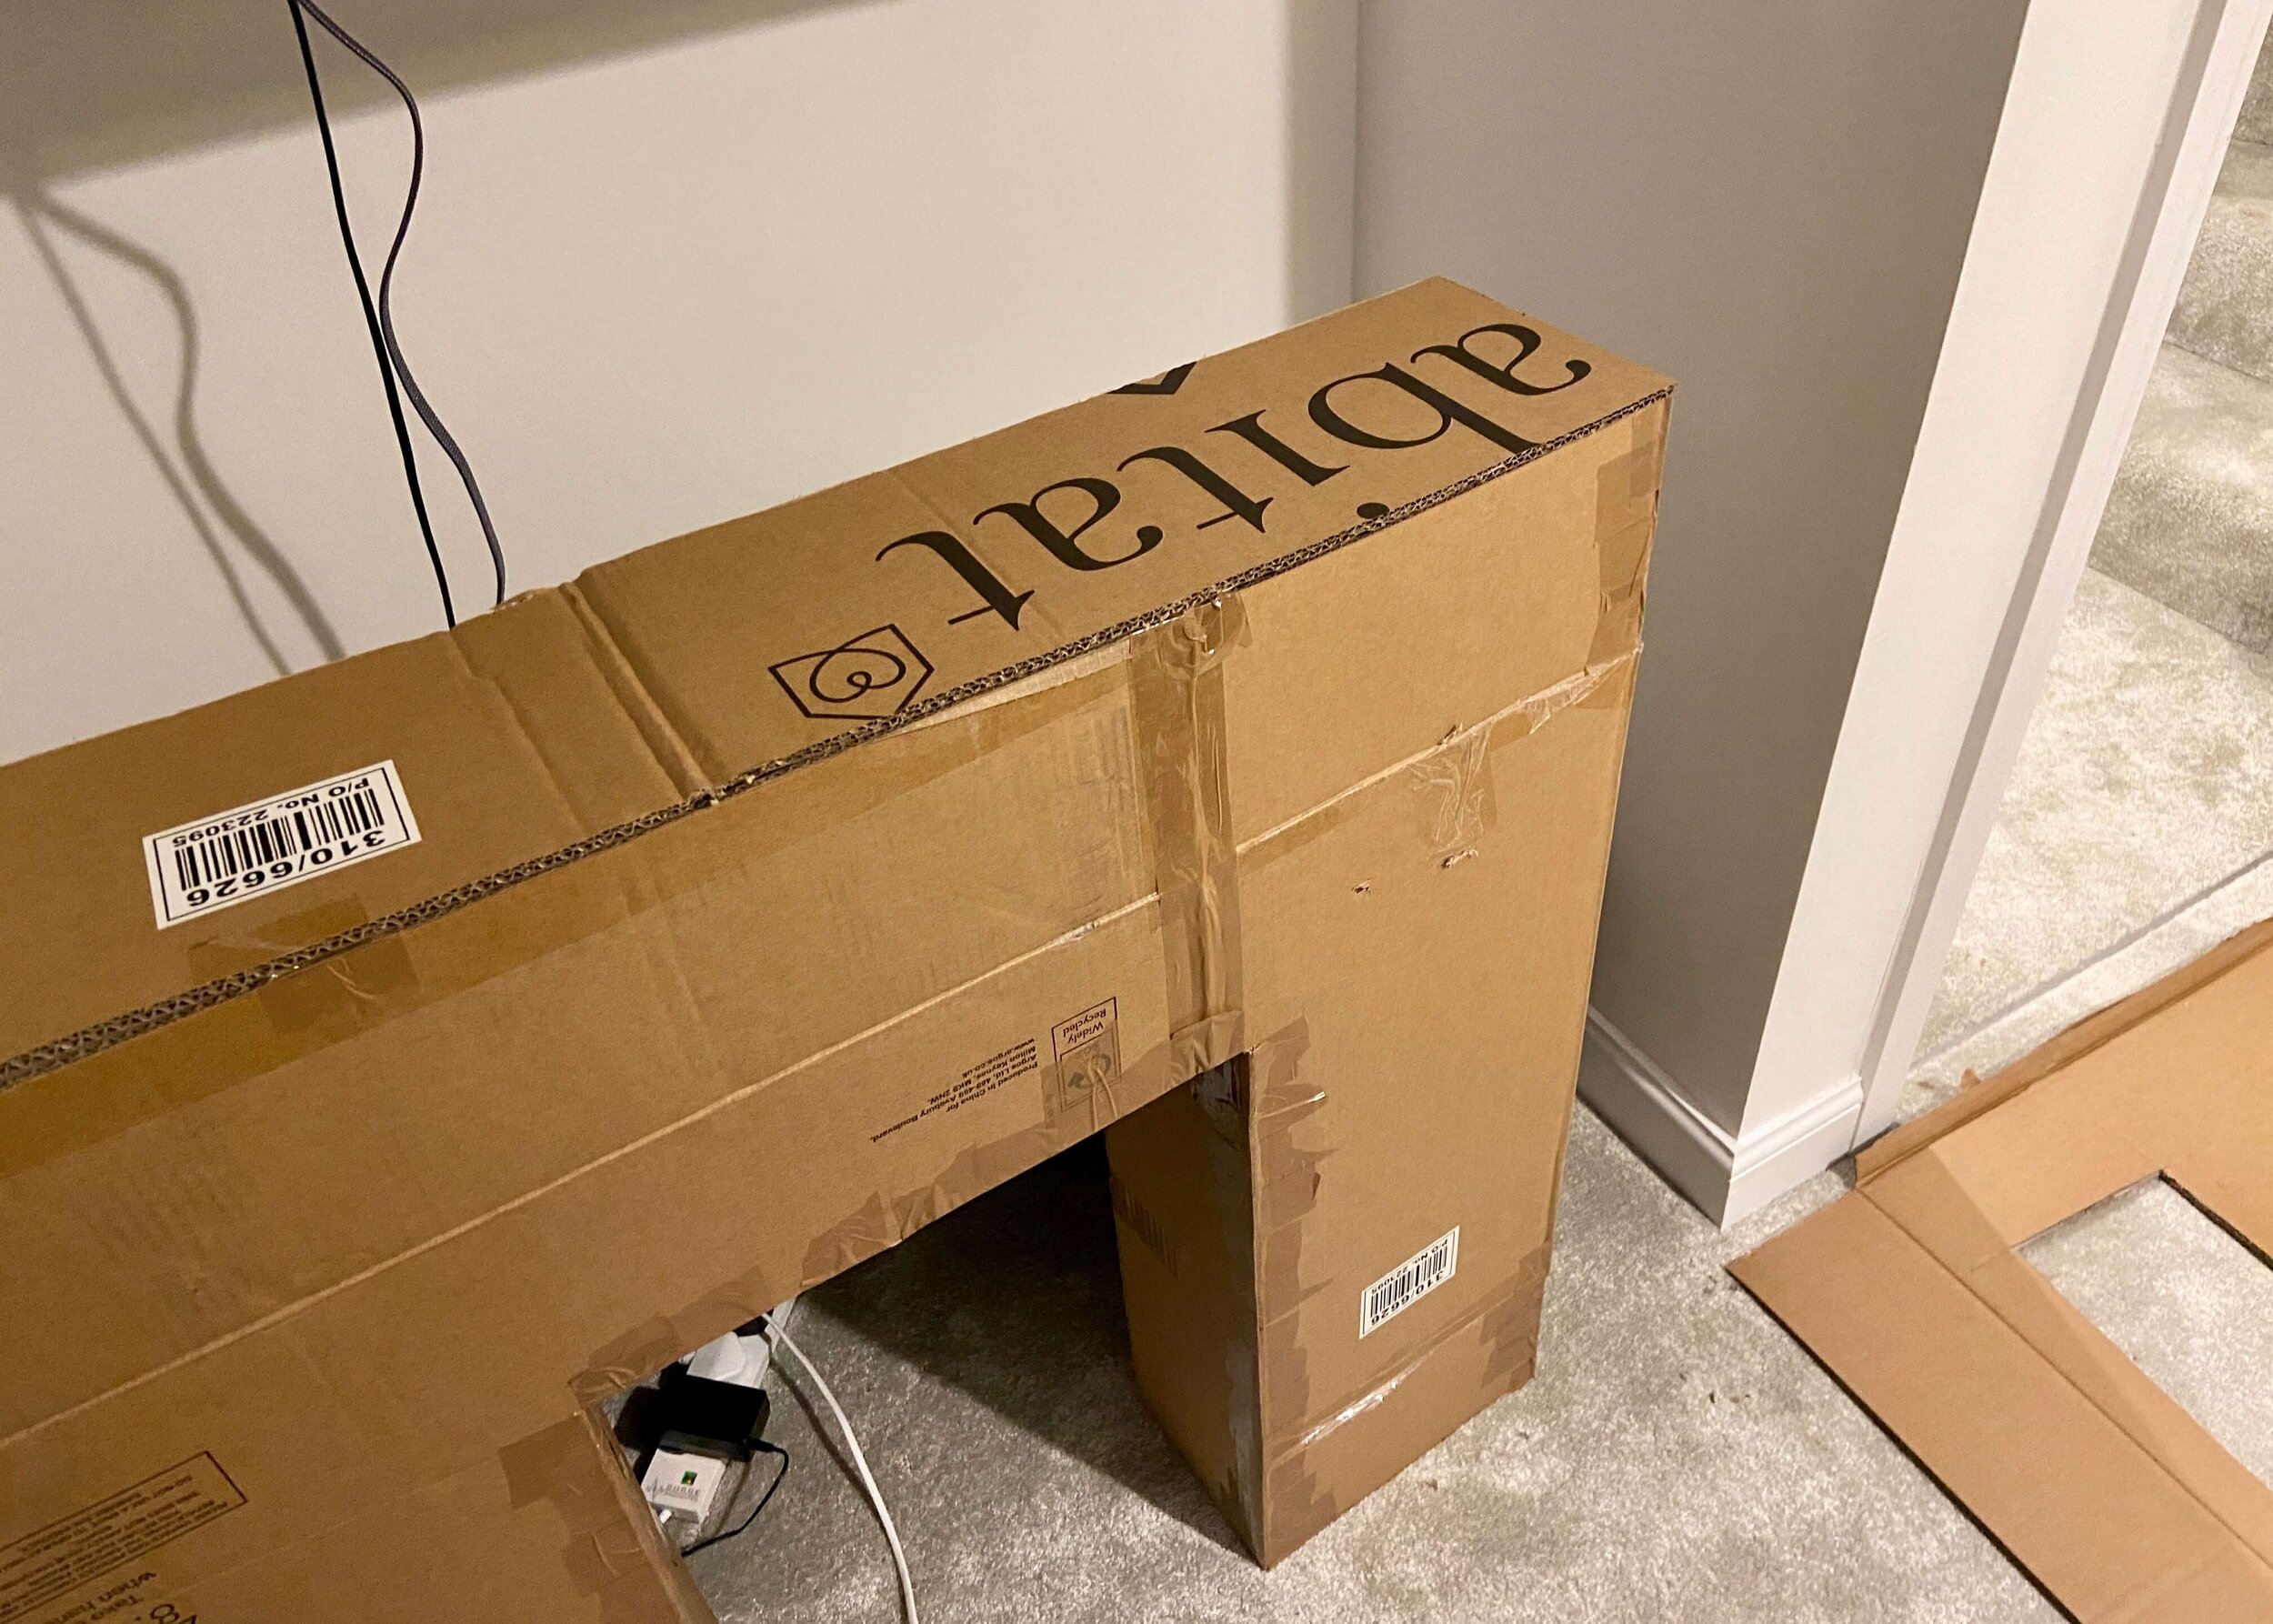
Using some additional cardboard, cut two 60x18cm rectangles and secure these to the sides of the hole. Use tape as well as lengths of cardboard to secure it to the outside of the fireplace.

IMG_4510.jpeg

7.

Stand your cardboard fireplace upright. Cut and add a piece of cardboard (18x37cm) to the top of the hole and secure with tape. On top of this, add two 18x32cm pieces of cardboard to support the top of the fireplace.

IMG_4512.jpeg

8.

Cut the top of the fireplace (a rectangle of 92x18cm) and secure this to the top and sides, as well as the inside supports, with parcel tape.

IMG_4520.jpeg

9.

At this point I painted all the painter’s tape with a difficult surfaces primer, but in retrospect it’s best to cover it all with painter’s tape, to ensure the plaste sticks.

IMG_4523.jpeg

10.

Slowly but surely cover your cardboard with plaster. I used plaster of paris initially as it’s what I had on hand however you really do need to work with small amounts at a time, and it can be pretty time consuming so I swapped in the end to plaster.

11.

First I added plaster to the front, and then the inner sides. I then did the top, and before finishing the outer sides I cut out the shape of the skirting board into the bottom back of the cardboard pieces.

IMG_5389.jpg

12.

Once it is covered in plaster, leave it to dry and if you want a smoother look give it a light sanding. Be sure to wear a proper mask and do this in a well ventilated area.

13.

When you’re happy with the finish, paint it in your desired colour. I wanted to keep mine minimal and so I chose a white matt wall paint. Finally, add some battery operated candles (I didn’t have any on hand for these photos, but do as I say not as I do!).

…AND THAT’S IT!

IMG_5433.jpeg
this is the alt text
YOU MIGHT ALSO LIKE...
Wooden Mushroom Decor
Apr 26, 2025
Wooden Mushroom Decor
Apr 26, 2025
Apr 26, 2025
Hand-Painted Floral Mural Arch
Mar 29, 2025
Hand-Painted Floral Mural Arch
Mar 29, 2025
Mar 29, 2025
Easy IKEA Antilop Makeover
Mar 1, 2025
Easy IKEA Antilop Makeover
Mar 1, 2025
Mar 1, 2025
Clay Leaf Shelf
Jun 29, 2024
Clay Leaf Shelf
Jun 29, 2024
Jun 29, 2024
Nursery Feature Wall
Jun 15, 2024
Nursery Feature Wall
Jun 15, 2024
Jun 15, 2024
Hallway Wall Niche
Jun 8, 2024
Hallway Wall Niche
Jun 8, 2024
Jun 8, 2024
Ikea Hemnes Drawer Hack
May 4, 2024
Ikea Hemnes Drawer Hack
May 4, 2024
May 4, 2024
Pressed Flower Taper Candle
Apr 20, 2024
Pressed Flower Taper Candle
Apr 20, 2024
Apr 20, 2024
Floral Rabbit Nursery Print
Apr 13, 2024
Floral Rabbit Nursery Print
Apr 13, 2024
Apr 13, 2024
Pressed Flower Egg Ornaments
Apr 10, 2024
Pressed Flower Egg Ornaments
Apr 10, 2024
Apr 10, 2024
In DIY Tags home
← DIY Scented Clay LeafFaux Minimal Brick Wall →
 

Decorating, DIY-ing and doodling my way through life. Have a look around and let’s get creative!

>> FIND OUT MORE <<

Follow
The office is still one of my favourite transformations in the house! 😍

I started by panelling the wall with MDF strips and then painted the wall with a mix of colours. I used three IKEA drawer units for the base of the desk and then secured the de

ART

DIY

LIFE


THE LATEST

Featured
Wooden Mushroom Decor
Apr 26, 2025
Wooden Mushroom Decor
Apr 26, 2025
Apr 26, 2025
Hand-Painted Floral Mural Arch
Mar 29, 2025
Hand-Painted Floral Mural Arch
Mar 29, 2025
Mar 29, 2025
Easy IKEA Antilop Makeover
Mar 1, 2025
Easy IKEA Antilop Makeover
Mar 1, 2025
Mar 1, 2025
Clay Leaf Shelf
Jun 29, 2024
Clay Leaf Shelf
Jun 29, 2024
Jun 29, 2024
Nursery Feature Wall
Jun 15, 2024
Nursery Feature Wall
Jun 15, 2024
Jun 15, 2024


THE GREATEST

Featured
DIY // IKEA LACK TABLE INDUSTRIAL HACK
Sep 22, 2020
DIY
DIY // IKEA LACK TABLE INDUSTRIAL HACK
Sep 22, 2020
DIY
Sep 22, 2020
DIY
DIY // CLAY ALL-SEEING EYE MIRROR
Aug 14, 2020
DIY
DIY // CLAY ALL-SEEING EYE MIRROR
Aug 14, 2020
DIY
Aug 14, 2020
DIY
DIY // CLAY FACE DISH
Apr 29, 2020
DIY
DIY // CLAY FACE DISH
Apr 29, 2020
DIY
Apr 29, 2020
DIY
DIY // ABSTRACT ART FLORAL EGGS
Mar 25, 2020
DIY
DIY // ABSTRACT ART FLORAL EGGS
Mar 25, 2020
DIY
Mar 25, 2020
DIY
DIY // WIRE FACE EARRINGS
Feb 16, 2020
DIY
DIY // WIRE FACE EARRINGS
Feb 16, 2020
DIY
Feb 16, 2020
DIY

Follow
^^ BACK TO TOP
How does Monday come round so quick?!Wishing I could cosy up here today ✨

#mondaymood #storyofmyhome #mydailyhomesquare #interiordesign #budgetdiy #realstylishhomes #ourdiyhomes #femalediycollective #discoverunder5k #myhousethismonth #myhousedownsou
I&rsquo;ve got the day off today (woop!) and although it&rsquo;s not quite warm enough to sit out here yet, the sun is shining and I think a little walk to blow out the cobwebs is exactly what I need. Hope Monday is treating you well! ☀️

#summerdrea
Had such a lovely day seeing one of my besties and her adorable new baby that I completely forgot to share today&rsquo;s new blog post!

Head over to the blog for all the details of this easy DIY ring dish 🔝✨

#diy #diyhomedecor #diyhome #diyvalenti
That sunshine 👌🏻☀️

#mycosyhome #livingroomdecor #livingroominspo #mydiymydecor #homeobsessed #lovemydecor #homeinterioruk #discoverunder5k #diyhome #diyhomedecor #myhousethismonth #myhousedownsouth #realstylishhomes #ourdiyhomes #happythursday #in
A little corner our home on this chilly Tuesday morning ✨
.
.
#interior #homeobsessed #mycosyhome #homeinterioruk #instadecorating #homesofinstagram #happymonday #mondaymotivation #instainteriors #cornersofmyhome #myhousethismonth #myhousedownsouth #

Copyright 2021 isoscella. All rights reserved.

Powered by Squarespace