• ABOUT ME
    • PRIVACY POLICY
  • COLLABORATE
  • BLOG
    • ART
    • WEDDING
    • LIBRARY
    • DECOR
    • JEWELLERY
    • STATIONARY
    • NAIL ART
    • BAKING
    • CHRISTMAS
    • EASTER
    • ART PRINTS
    • WEDDING STATIONARY
  • CONTACT
Menu

ISOSCELLA

Street Address
City, State, Zip
Phone Number

Your Custom Text Here

ISOSCELLA

  • ABOUT
    • ABOUT ME
    • PRIVACY POLICY
  • COLLABORATE
  • BLOG
  • ART
    • ART
    • WEDDING
    • LIBRARY
  • DIY
    • DECOR
    • JEWELLERY
    • STATIONARY
    • NAIL ART
    • BAKING
    • CHRISTMAS
    • EASTER
  • SHOP
    • ART PRINTS
    • WEDDING STATIONARY
  • CONTACT

DIY // MINIMAL MAP ART PRINT

July 9, 2020 Isoscella M
DIY Minimal Map Art Print by Isoscella

Make your own custom map art print with these 5 steps!

Map prints are all over instagram and Pinterest, and like lots of other people, I’ve been wanting my very own. Companies like Mapiful are well known for making really lovely looking and fully customisable map posters, but with all that loveliness comes a pretty hefty price tag. Being the crafty person that I am, I saw this as a digital art/DIY challenge, and so after lots of researching had a go at making my own. When I was researching, I came across some tutorials that were far too complicated for me but a video by The Swedish Maker really stood out. He not only explained how to do it in simple steps, he also shared a fully customisable Photoshop file that you can use to make your own. I wanted mine to be slightly different from the Mapiful style, which he very cleverly replicates, and so I deviated slightly from what he did when I got to editing my map in Photoshop. If you fancy having a go at making this minimal map art print, then keep reading for the step by step tutorial…
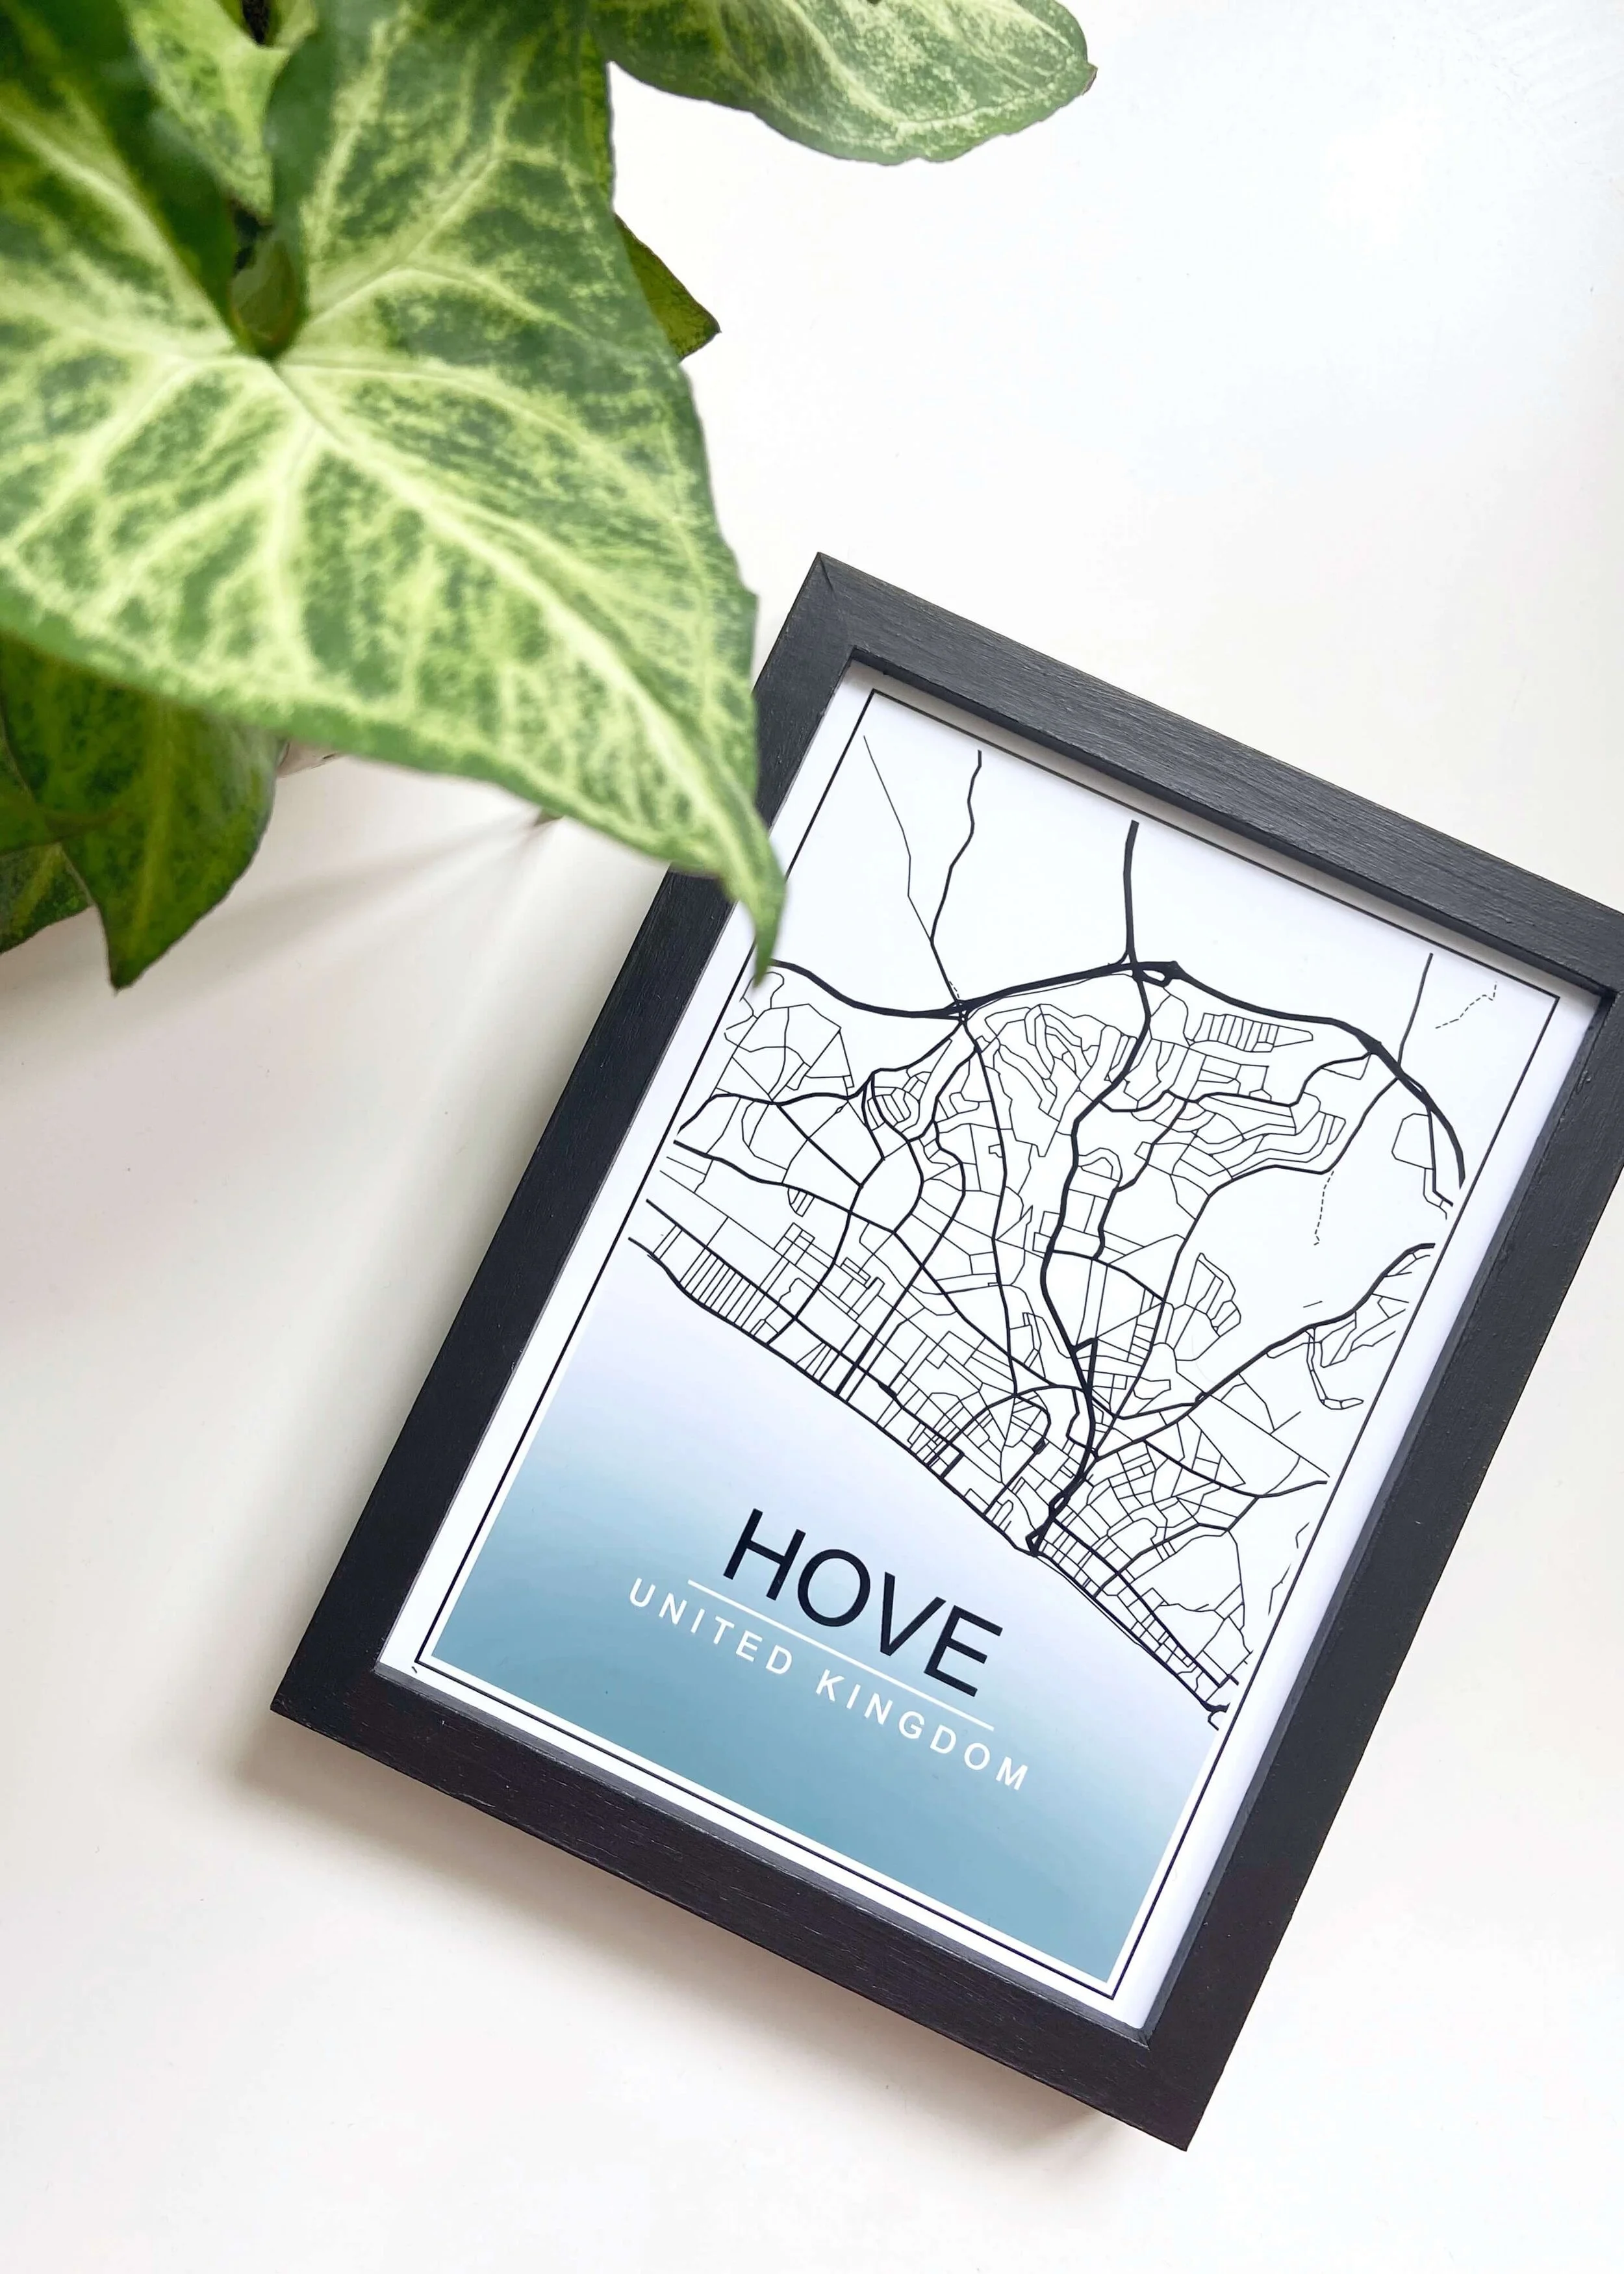
DIY Minimal Map Art Print by Isoscella
the What.jpg

Adobe Photoshop Elements

Photo Paper

Printer

Dash.jpg
DIY Minimal Map Art Print by Isoscella
The How Header.jpg
  1. First of all, head to SnazzyMaps.com and sign up for a free account. Snazzy Maps uses Google Maps but as the name suggests, makes them snazzy!

    • To make your map in SnazzyMaps, head to https://snazzymaps.com/style/95/roadie

    • Select the location you want your map to be of, and then click on the green image icon to download the map.

    • On the ‘Download image’ page, choose the dimensions of your image, how close you want your map to be using the zoom function and fine tune the map position by clicking and dragging the image.

    • Once you’re happy, click ‘download image’ and the map will be downloaded to your computer.

  2. Next open your map in Adobe Photoshop and edit it. I used Adobe Photoshop Elements 6 and so this is where what I did deviates slightly from The Swedish Maker.

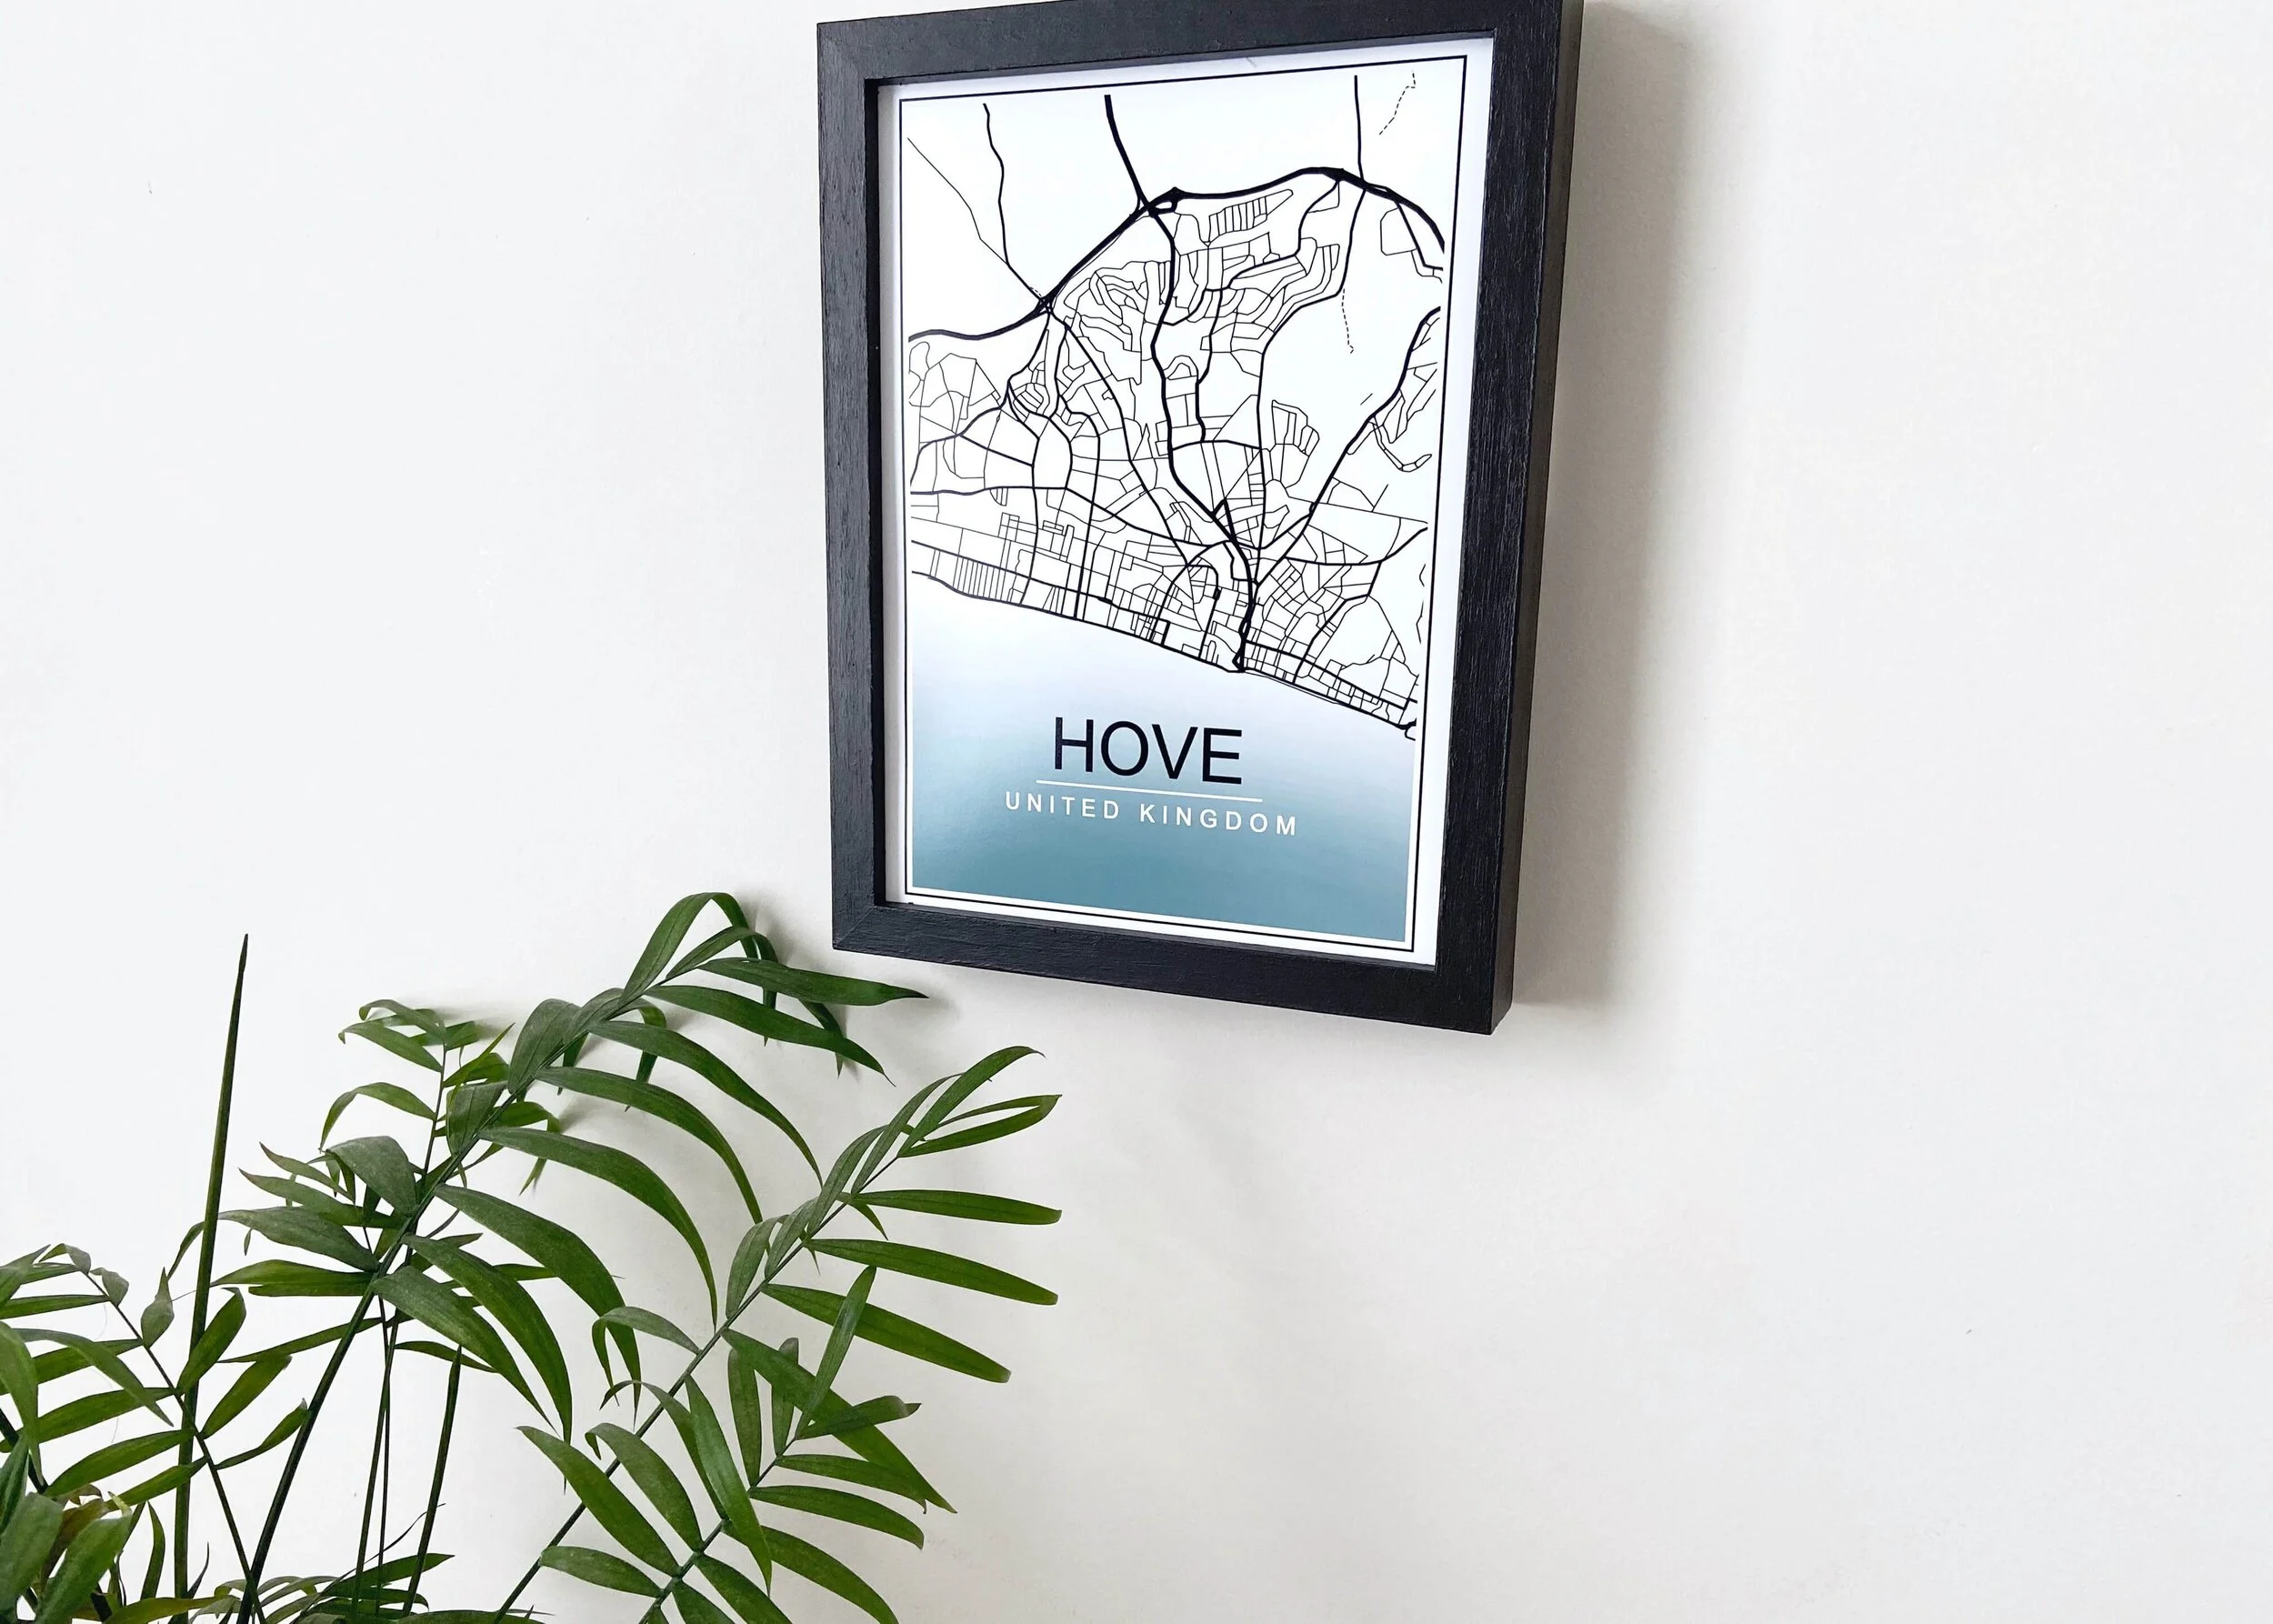
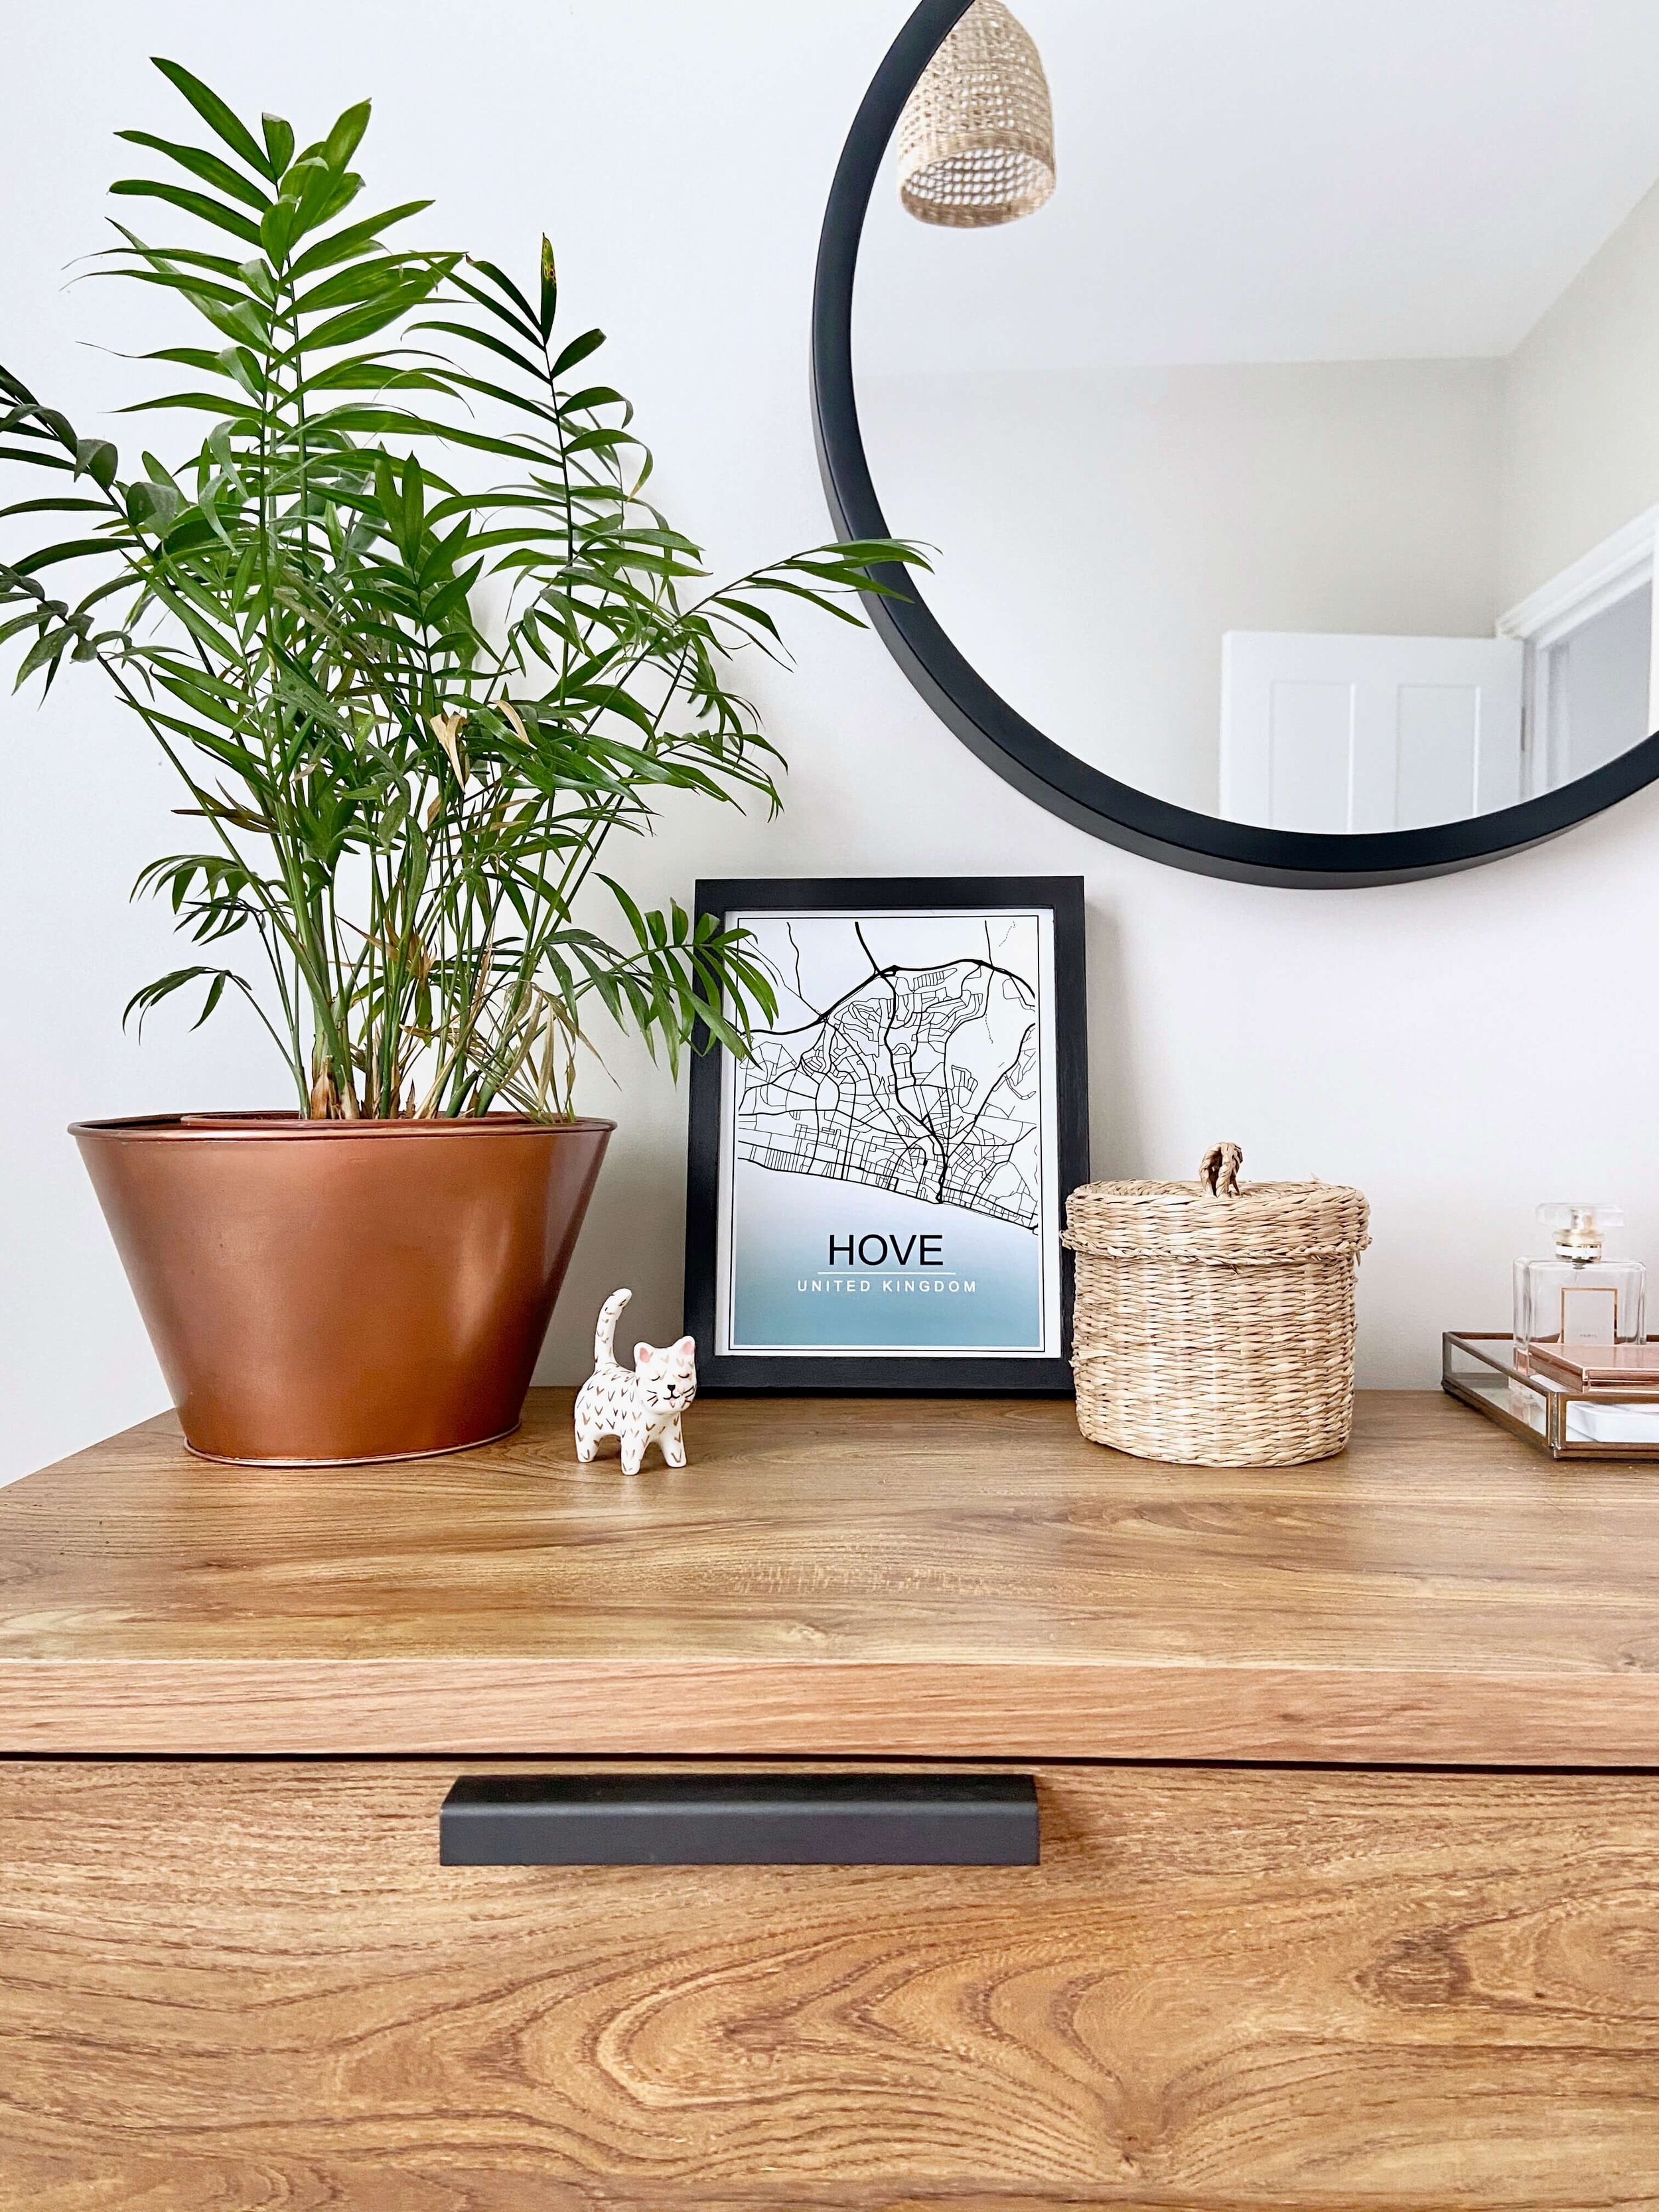
    • First of all, I went to the ‘Image’ drop down menu and cropped it to 21cm by 29.7cm.

    • Next, use the ‘magic wand tool’ to select the white space around the map and click delete. You should now have your map outline on a transparent background.

    • Add a ‘solid colour’ layer in white below the map layer.

    • On the left hand side, change the foreground colour to the colour that you want the gradient behind your map to be. I went for a dark green.

    • Next, add a ‘gradient layer’, underneath the map layer and above the white layer. Ensure the gradient is set to go from ‘foreground to transparent’, the style is ‘linear’, and angle is ‘90”. On your image, drag the gradient to where you want the colour to fade into the transparent background. Click 'ok’.

    • In the layer panel, merge all three layers by clicking on ‘merge visible’. Double click on the lock of the resulting layer.

  3. Next, add some borders around the edited map image using the ‘Stroke’ function in Photoshop.

    • To do this, select the layer, and click on ‘Stroke (outline) selection’ from the ‘Edit’ drop down menu. Select the width you want the border to be, choose the colour white and select the location as ‘inside’. Click ‘ok’. You should now have a white border around your image.

    • Next add a black line on the outside of this by using the ‘Stroke’ feature again. In the options, set the width to be smaller (i.e. 20px) and select black as the colour. Again use ‘inside’ as the location, and click ‘ok’. You should now have a thicker white border, and a thinner black border on the outside of the map image.

    • Open up a new blank file with A4 dimensions and a white background. Drag the map image onto the blank file and position it so that it is slightly smaller than the background layer, so there is white space around the outside of the layer. You should now have a white border, black line and white border. Merge all layers again.

  4. Add your location name, country and a decorative line on top.

    • To add your location name, use the ‘horizontal type tool’. I used decided to do my location name in black and Arial font. Choose a size font that suits the length of your location name.

    • Next, add a line underneath this in white using the ‘line tool’.

    • Then add the country your location is in underneath the line, in white, and in a slightly smaller font size.

  5. Finally, save your image and print it out onto photo quality paper.

…AND THAT’S IT!

DIY Minimal Map Art Print by Isoscella
YOU MIGHT ALSO LIKE...
Wooden Mushroom Decor
Apr 26, 2025
Wooden Mushroom Decor
Apr 26, 2025
Apr 26, 2025
Hand-Painted Floral Mural Arch
Mar 29, 2025
Hand-Painted Floral Mural Arch
Mar 29, 2025
Mar 29, 2025
Easy IKEA Antilop Makeover
Mar 1, 2025
Easy IKEA Antilop Makeover
Mar 1, 2025
Mar 1, 2025
Clay Leaf Shelf
Jun 29, 2024
Clay Leaf Shelf
Jun 29, 2024
Jun 29, 2024
Nursery Feature Wall
Jun 15, 2024
Nursery Feature Wall
Jun 15, 2024
Jun 15, 2024
Hallway Wall Niche
Jun 8, 2024
Hallway Wall Niche
Jun 8, 2024
Jun 8, 2024
Ikea Hemnes Drawer Hack
May 4, 2024
Ikea Hemnes Drawer Hack
May 4, 2024
May 4, 2024
Pressed Flower Taper Candle
Apr 20, 2024
Pressed Flower Taper Candle
Apr 20, 2024
Apr 20, 2024
Floral Rabbit Nursery Print
Apr 13, 2024
Floral Rabbit Nursery Print
Apr 13, 2024
Apr 13, 2024
Pressed Flower Egg Ornaments
Apr 10, 2024
Pressed Flower Egg Ornaments
Apr 10, 2024
Apr 10, 2024
In DIY Tags home, art
← 5 MINUTE DIY // BOHO TREE RING ARTDIY // IKEA ISALA DESK HACK →
 

Decorating, DIY-ing and doodling my way through life. Have a look around and let’s get creative!

>> FIND OUT MORE <<

Follow
The office is still one of my favourite transformations in the house! 😍

I started by panelling the wall with MDF strips and then painted the wall with a mix of colours. I used three IKEA drawer units for the base of the desk and then secured the de

ART

DIY

LIFE


THE LATEST

Featured
Wooden Mushroom Decor
Apr 26, 2025
Wooden Mushroom Decor
Apr 26, 2025
Apr 26, 2025
Hand-Painted Floral Mural Arch
Mar 29, 2025
Hand-Painted Floral Mural Arch
Mar 29, 2025
Mar 29, 2025
Easy IKEA Antilop Makeover
Mar 1, 2025
Easy IKEA Antilop Makeover
Mar 1, 2025
Mar 1, 2025
Clay Leaf Shelf
Jun 29, 2024
Clay Leaf Shelf
Jun 29, 2024
Jun 29, 2024
Nursery Feature Wall
Jun 15, 2024
Nursery Feature Wall
Jun 15, 2024
Jun 15, 2024


THE GREATEST

Featured
DIY // IKEA LACK TABLE INDUSTRIAL HACK
Sep 22, 2020
DIY
DIY // IKEA LACK TABLE INDUSTRIAL HACK
Sep 22, 2020
DIY
Sep 22, 2020
DIY
DIY // CLAY ALL-SEEING EYE MIRROR
Aug 14, 2020
DIY
DIY // CLAY ALL-SEEING EYE MIRROR
Aug 14, 2020
DIY
Aug 14, 2020
DIY
DIY // CLAY FACE DISH
Apr 29, 2020
DIY
DIY // CLAY FACE DISH
Apr 29, 2020
DIY
Apr 29, 2020
DIY
DIY // ABSTRACT ART FLORAL EGGS
Mar 25, 2020
DIY
DIY // ABSTRACT ART FLORAL EGGS
Mar 25, 2020
DIY
Mar 25, 2020
DIY
DIY // WIRE FACE EARRINGS
Feb 16, 2020
DIY
DIY // WIRE FACE EARRINGS
Feb 16, 2020
DIY
Feb 16, 2020
DIY

Follow
^^ BACK TO TOP
How does Monday come round so quick?!Wishing I could cosy up here today ✨

#mondaymood #storyofmyhome #mydailyhomesquare #interiordesign #budgetdiy #realstylishhomes #ourdiyhomes #femalediycollective #discoverunder5k #myhousethismonth #myhousedownsou
I&rsquo;ve got the day off today (woop!) and although it&rsquo;s not quite warm enough to sit out here yet, the sun is shining and I think a little walk to blow out the cobwebs is exactly what I need. Hope Monday is treating you well! ☀️

#summerdrea
Had such a lovely day seeing one of my besties and her adorable new baby that I completely forgot to share today&rsquo;s new blog post!

Head over to the blog for all the details of this easy DIY ring dish 🔝✨

#diy #diyhomedecor #diyhome #diyvalenti
That sunshine 👌🏻☀️

#mycosyhome #livingroomdecor #livingroominspo #mydiymydecor #homeobsessed #lovemydecor #homeinterioruk #discoverunder5k #diyhome #diyhomedecor #myhousethismonth #myhousedownsouth #realstylishhomes #ourdiyhomes #happythursday #in
A little corner our home on this chilly Tuesday morning ✨
.
.
#interior #homeobsessed #mycosyhome #homeinterioruk #instadecorating #homesofinstagram #happymonday #mondaymotivation #instainteriors #cornersofmyhome #myhousethismonth #myhousedownsouth #

Copyright 2021 isoscella. All rights reserved.

Powered by Squarespace