• ABOUT ME
    • PRIVACY POLICY
  • COLLABORATE
  • BLOG
    • ART
    • WEDDING
    • LIBRARY
    • DECOR
    • JEWELLERY
    • STATIONARY
    • NAIL ART
    • BAKING
    • CHRISTMAS
    • EASTER
    • ART PRINTS
    • WEDDING STATIONARY
  • CONTACT
Menu

ISOSCELLA

Street Address
City, State, Zip
Phone Number

Your Custom Text Here

ISOSCELLA

  • ABOUT
    • ABOUT ME
    • PRIVACY POLICY
  • COLLABORATE
  • BLOG
  • ART
    • ART
    • WEDDING
    • LIBRARY
  • DIY
    • DECOR
    • JEWELLERY
    • STATIONARY
    • NAIL ART
    • BAKING
    • CHRISTMAS
    • EASTER
  • SHOP
    • ART PRINTS
    • WEDDING STATIONARY
  • CONTACT

DIY Scandi Peg Rack

August 7, 2021 Isoscella M
ZGzZcGkDR1qfB9QQBRaqag_thumb_a5bf.jpg

Create this minimal scandi peg rack in just 12 steps

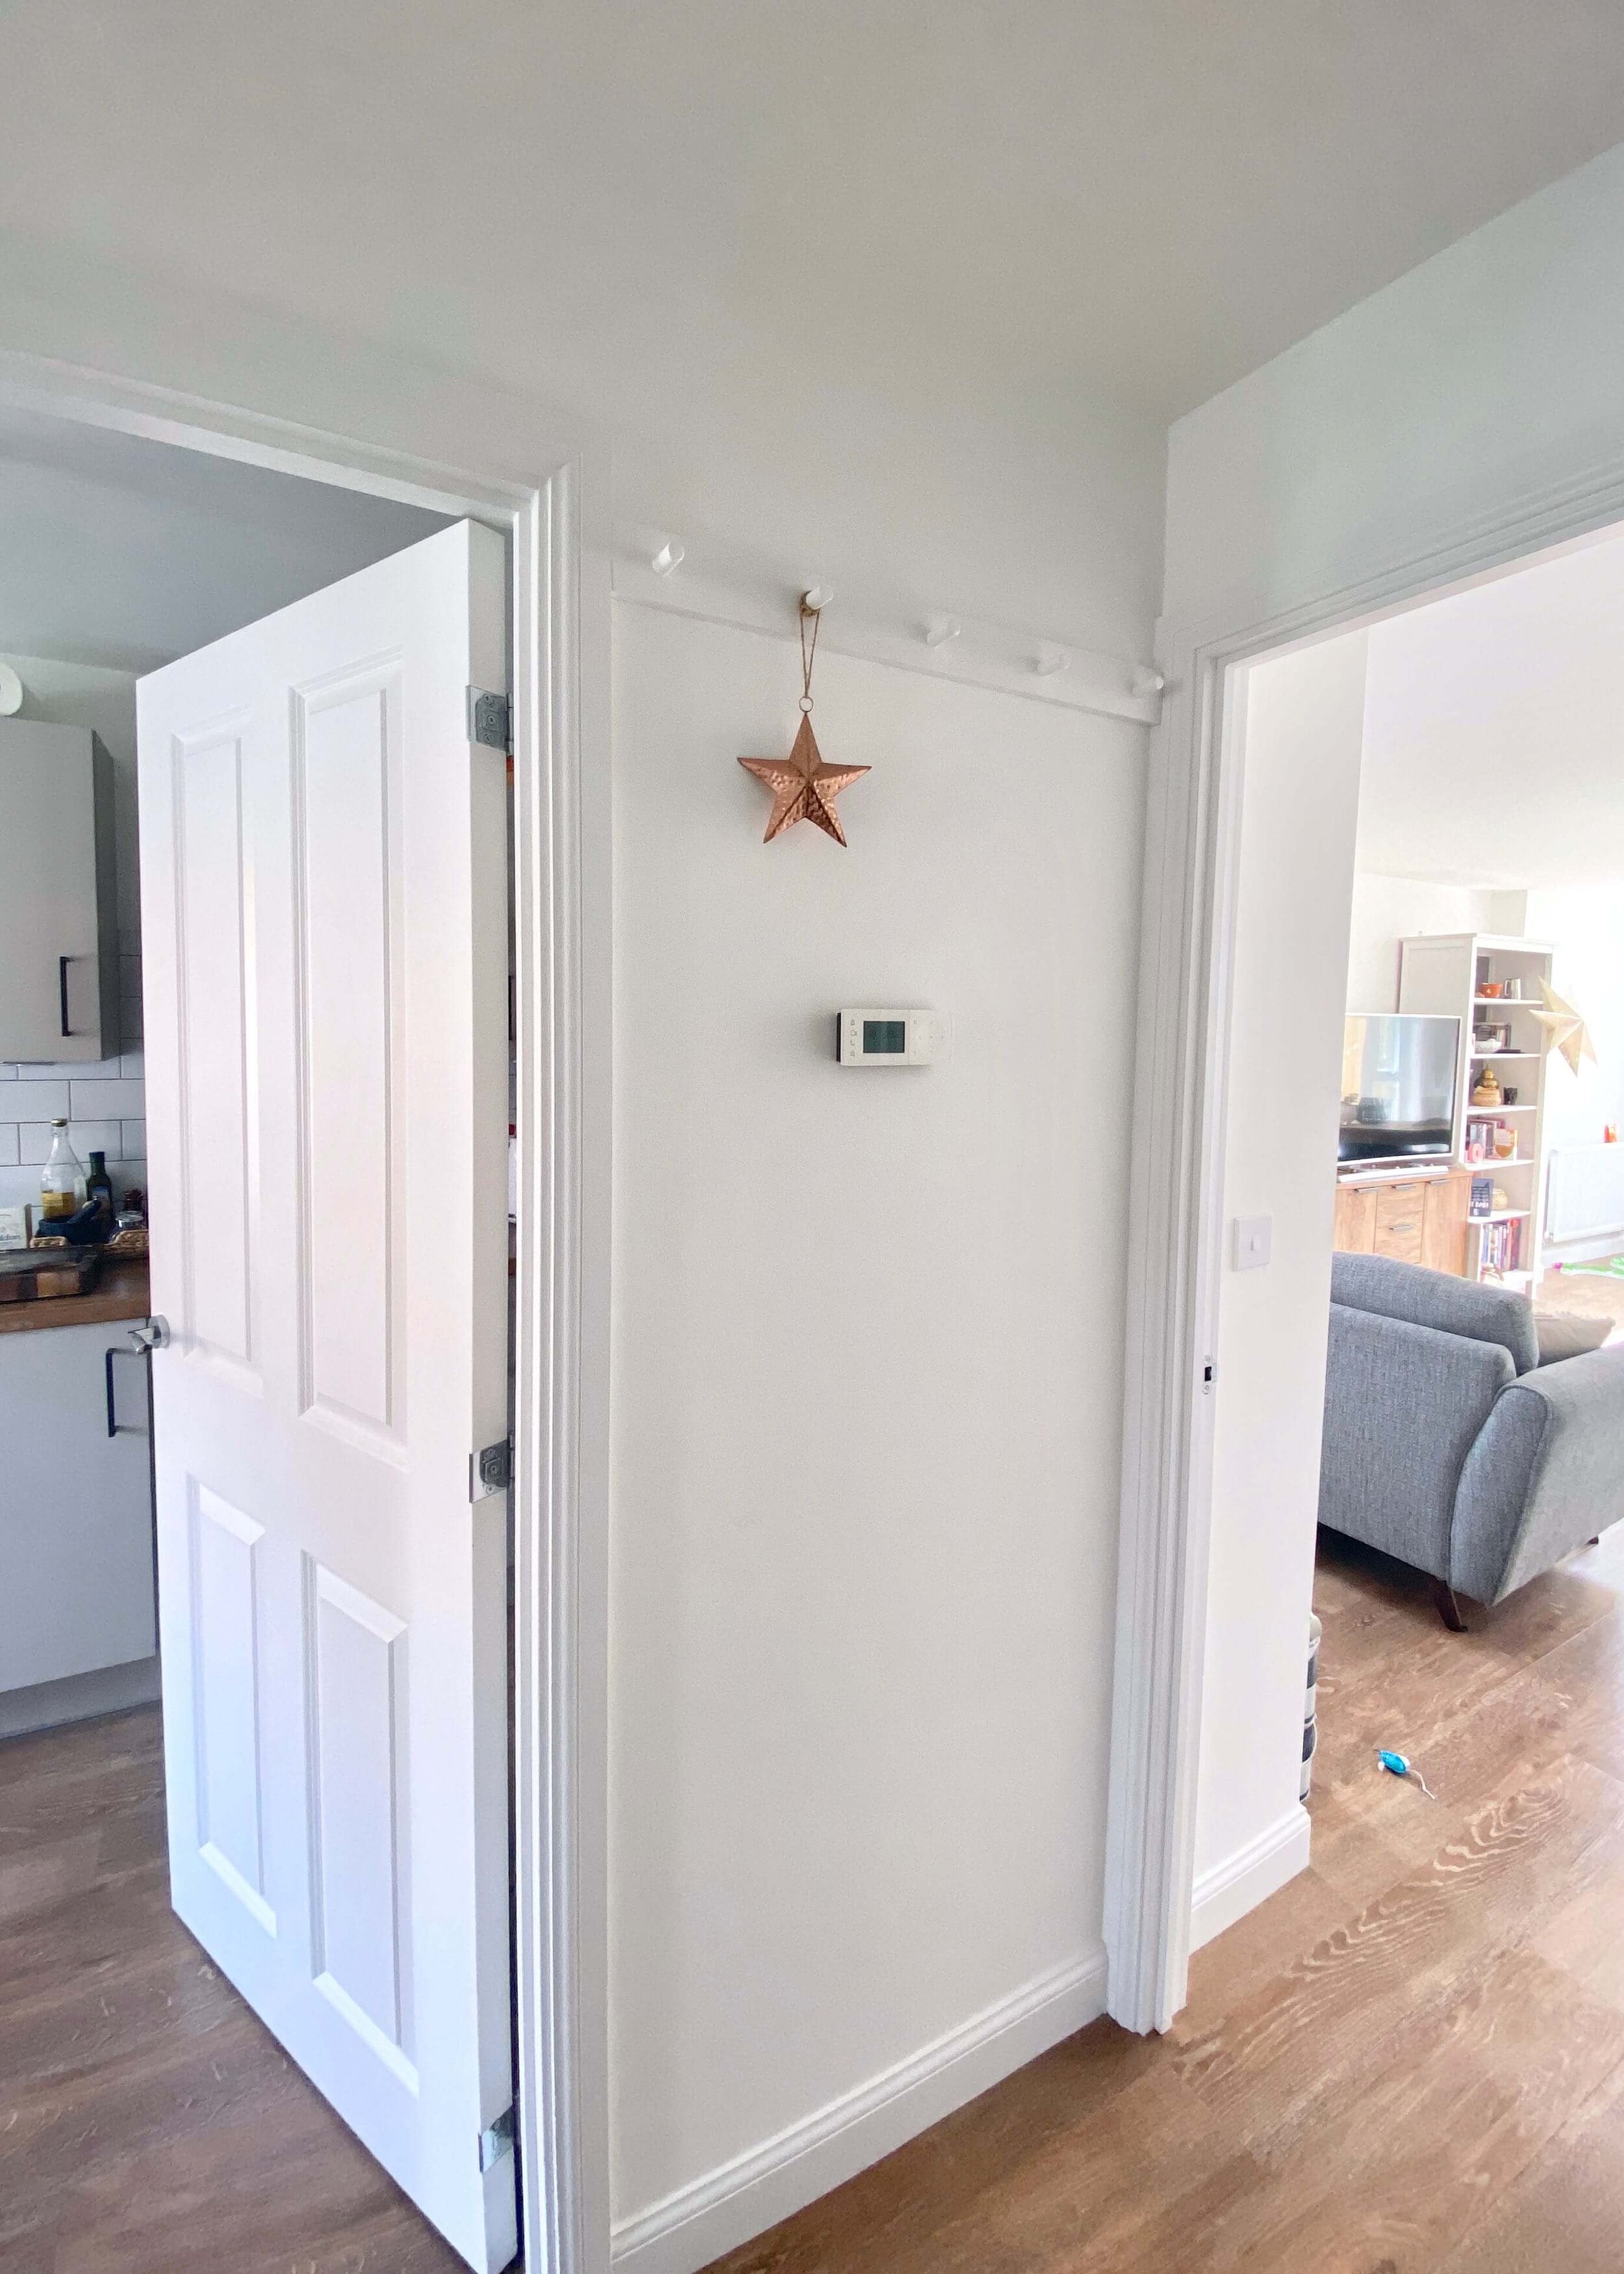
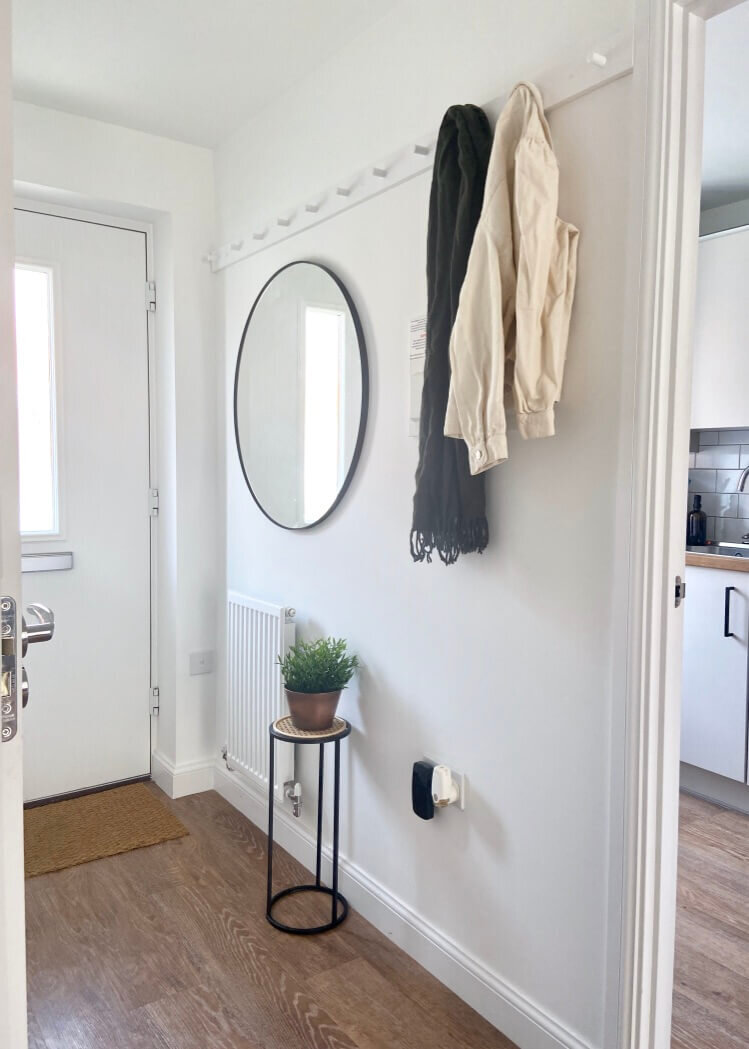
I’ve been trying to work out how to cover the fuse box we have in the middle of the wall in our hallway since we moved in. Who knows why the developers didn’t put it somewhere more discrete, but it is what it is, and I knew I had to work with it. After seeing so many peg racks or rails around, I got thinking about how it could be the perfect way to add texture and storage to the hallway whilst giving us a way of hiding the box without the stereotypical fuse box cover. I couldn’t quite find exactly what I was looking for though, and it seemed a waste to buy something to then change it, so I decided to have a go at making my own minimal peg rack from start to finish. I didn’t want it to stand out too much, it was important to me that it was the same colour as the walls and the pegs weren’t too big or bulky. I’m really pleased with how it turned out, and it’s proving so handy for hanging those extra coats and jackets when we have guests over. Keep reading to find out what I used and how I did it…

Stripwood (64mm x 18mm x 2400mm)

No More Nails

Pine dowel (18mm x 900mm)

18mm Holesaw

Saw

Wood filler

Wood primer

Wood paint

VKNnYFKjQmSEjcL00FtA6A_thumb_a59b.jpg

1.

First of all, decide where you want your peg rack and measure how long your peg rack needs to be. Cut your stripwood to this length and sand the cut edges so they are smooth.

CFeEEOJDSRqlxuR3SiU0hw_thumb_a59d.jpg

2.

Decide how many peg hooks you would like along your length of wood, and divide the total length of your stripwood by this number. This is the distance between each of your pegs. Use a tape measure to measure along and mark where each peg will go.

bzE5YS2MSWqeX0SRWAUPJw_thumb_a59e.jpg

3.

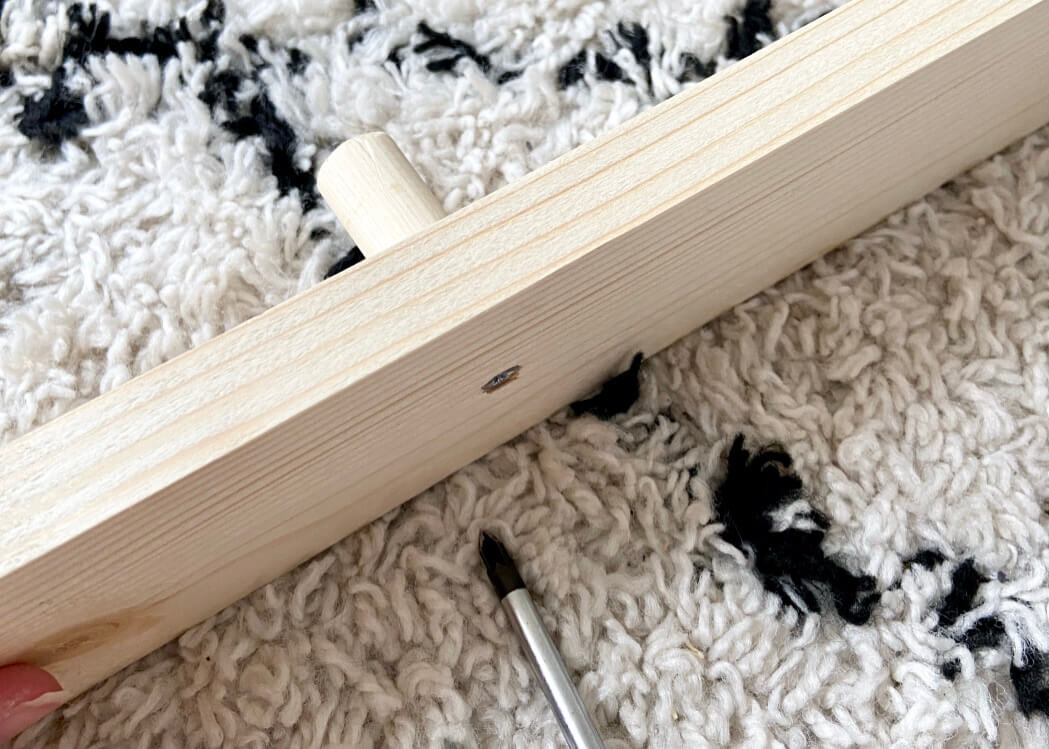
Cut your dowel to shorter lengths. I cut each of mine to around 2 inches, taking into account that a couple of centimetres will be lost in fixing the peg to the rack.

mVZWwAC%Sp2FaFOPPNmVZQ_thumb_a5a2.jpg

4.

Using a holesaw drill bit that is the same diameter of the dowel, drill holes along the stripwood in the places that you marked in step 2. When drilling these holes, don’t go all the way through the depth of wood, leave around 0.5cm.

fNo7Q961Rp6RF3ix1DwCrA_thumb_a5a6.jpg

5.

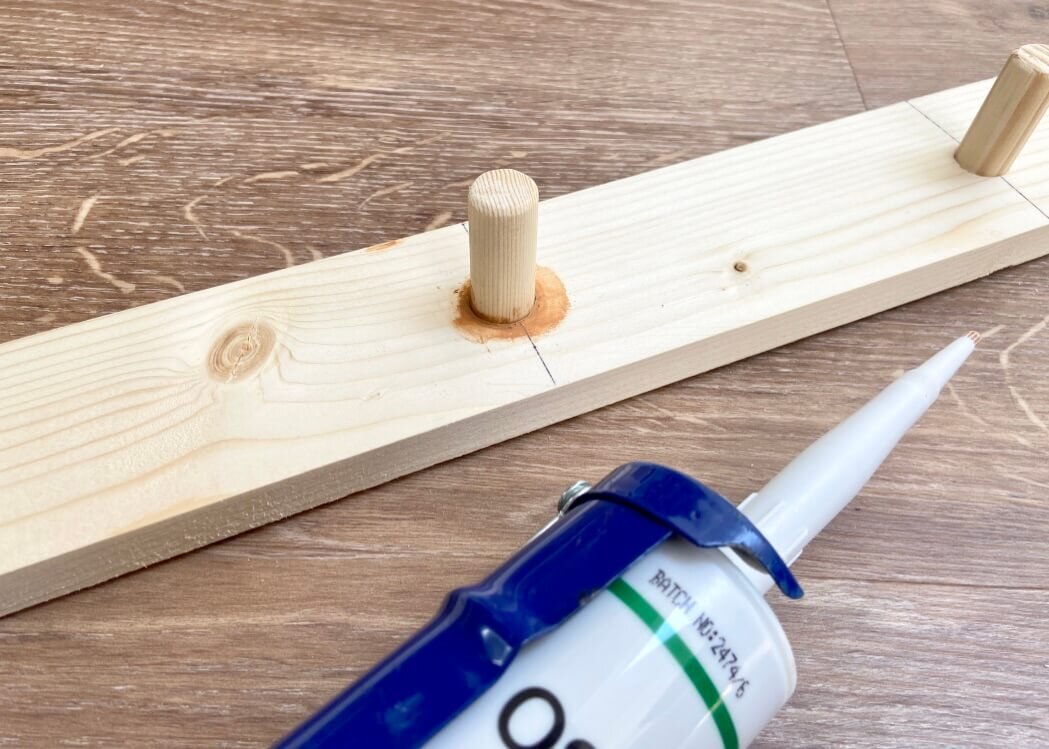
Put some No More Nails or wood glue into the holes and hammer each dowel into the holes. Use a screw on the bottom of the stripwood into the dowels to secure in place.

Htcathr7SymdA1GjMuATzA_thumb_a5ae.jpg

6.

I found I still had some gaps between the dowel and the edge of the hole of the stripwood, so I filled these with woodfiller.

6Ss0pOwiRNSfHtV0LGYFkw_thumb_a5b2.jpg

7.

Once the woodfiller was dry, I painted the entire rack with a white wood primer.

aUouJxs0Sdi0HwizuOIiIQ_thumb_a5af.jpg

8.

Once the primer is dry, sand down any rough patches of wood and then paint with another coat of primer. Sand any rough patches again.

aUouJxs0Sdi0HwizuOIiIQ_thumb_a5af.jpg

9.

Once dry and smooth, paint the rack with wood paint in your desired colour. I went for the same paint that the wood in our house is painted in, which was is a White Satinwood by Dulux. I did two coats of this, leaving each to completely dry in between.

aNrUxSRmRJ++dFpJsA+U3w_thumb_a5ba.jpg

10.

Once completely dry, ask someone else to hold your rack in position, make sure it is level and use a small drill bit to drill through the rack into the wall. Remove the rack, and then use an appropriately sized drill bit to enlarge these holes so that your wall plugs fit. Hammer these in, then place your rack in place and screw the rack into the wall plugs.

6ygv%Hk%R36KE4boUpavsQ_thumb_a5b6.jpg

11.

Screw the screws further in than the top of the wood and then fill these holes with wood filler or decorators caulk. Leave this to dry and then sand down so that it’s level.

12.

Finally, paint over the filler/caulk with your wood paint. You may need to do a couple of layers.

…AND THAT’S IT!

this is the alt text
YOU MIGHT ALSO LIKE...
Wooden Mushroom Decor
Apr 26, 2025
Wooden Mushroom Decor
Apr 26, 2025
Apr 26, 2025
Hand-Painted Floral Mural Arch
Mar 29, 2025
Hand-Painted Floral Mural Arch
Mar 29, 2025
Mar 29, 2025
Easy IKEA Antilop Makeover
Mar 1, 2025
Easy IKEA Antilop Makeover
Mar 1, 2025
Mar 1, 2025
Clay Leaf Shelf
Jun 29, 2024
Clay Leaf Shelf
Jun 29, 2024
Jun 29, 2024
Nursery Feature Wall
Jun 15, 2024
Nursery Feature Wall
Jun 15, 2024
Jun 15, 2024
Hallway Wall Niche
Jun 8, 2024
Hallway Wall Niche
Jun 8, 2024
Jun 8, 2024
Ikea Hemnes Drawer Hack
May 4, 2024
Ikea Hemnes Drawer Hack
May 4, 2024
May 4, 2024
Pressed Flower Taper Candle
Apr 20, 2024
Pressed Flower Taper Candle
Apr 20, 2024
Apr 20, 2024
Floral Rabbit Nursery Print
Apr 13, 2024
Floral Rabbit Nursery Print
Apr 13, 2024
Apr 13, 2024
Pressed Flower Egg Ornaments
Apr 10, 2024
Pressed Flower Egg Ornaments
Apr 10, 2024
Apr 10, 2024
In DIY Tags home
← DIY Gold Arch EarringsDIY Rattan Votive →
 

Decorating, DIY-ing and doodling my way through life. Have a look around and let’s get creative!

>> FIND OUT MORE <<

Follow
The office is still one of my favourite transformations in the house! 😍

I started by panelling the wall with MDF strips and then painted the wall with a mix of colours. I used three IKEA drawer units for the base of the desk and then secured the de

ART

DIY

LIFE


THE LATEST

Featured
Wooden Mushroom Decor
Apr 26, 2025
Wooden Mushroom Decor
Apr 26, 2025
Apr 26, 2025
Hand-Painted Floral Mural Arch
Mar 29, 2025
Hand-Painted Floral Mural Arch
Mar 29, 2025
Mar 29, 2025
Easy IKEA Antilop Makeover
Mar 1, 2025
Easy IKEA Antilop Makeover
Mar 1, 2025
Mar 1, 2025
Clay Leaf Shelf
Jun 29, 2024
Clay Leaf Shelf
Jun 29, 2024
Jun 29, 2024
Nursery Feature Wall
Jun 15, 2024
Nursery Feature Wall
Jun 15, 2024
Jun 15, 2024


THE GREATEST

Featured
DIY // IKEA LACK TABLE INDUSTRIAL HACK
Sep 22, 2020
DIY
DIY // IKEA LACK TABLE INDUSTRIAL HACK
Sep 22, 2020
DIY
Sep 22, 2020
DIY
DIY // CLAY ALL-SEEING EYE MIRROR
Aug 14, 2020
DIY
DIY // CLAY ALL-SEEING EYE MIRROR
Aug 14, 2020
DIY
Aug 14, 2020
DIY
DIY // CLAY FACE DISH
Apr 29, 2020
DIY
DIY // CLAY FACE DISH
Apr 29, 2020
DIY
Apr 29, 2020
DIY
DIY // ABSTRACT ART FLORAL EGGS
Mar 25, 2020
DIY
DIY // ABSTRACT ART FLORAL EGGS
Mar 25, 2020
DIY
Mar 25, 2020
DIY
DIY // WIRE FACE EARRINGS
Feb 16, 2020
DIY
DIY // WIRE FACE EARRINGS
Feb 16, 2020
DIY
Feb 16, 2020
DIY

Follow
^^ BACK TO TOP
How does Monday come round so quick?!Wishing I could cosy up here today ✨

#mondaymood #storyofmyhome #mydailyhomesquare #interiordesign #budgetdiy #realstylishhomes #ourdiyhomes #femalediycollective #discoverunder5k #myhousethismonth #myhousedownsou
I&rsquo;ve got the day off today (woop!) and although it&rsquo;s not quite warm enough to sit out here yet, the sun is shining and I think a little walk to blow out the cobwebs is exactly what I need. Hope Monday is treating you well! ☀️

#summerdrea
Had such a lovely day seeing one of my besties and her adorable new baby that I completely forgot to share today&rsquo;s new blog post!

Head over to the blog for all the details of this easy DIY ring dish 🔝✨

#diy #diyhomedecor #diyhome #diyvalenti
That sunshine 👌🏻☀️

#mycosyhome #livingroomdecor #livingroominspo #mydiymydecor #homeobsessed #lovemydecor #homeinterioruk #discoverunder5k #diyhome #diyhomedecor #myhousethismonth #myhousedownsouth #realstylishhomes #ourdiyhomes #happythursday #in
A little corner our home on this chilly Tuesday morning ✨
.
.
#interior #homeobsessed #mycosyhome #homeinterioruk #instadecorating #homesofinstagram #happymonday #mondaymotivation #instainteriors #cornersofmyhome #myhousethismonth #myhousedownsouth #

Copyright 2021 isoscella. All rights reserved.

Powered by Squarespace