• ABOUT ME
    • PRIVACY POLICY
  • COLLABORATE
  • BLOG
    • ART
    • WEDDING
    • LIBRARY
    • DECOR
    • JEWELLERY
    • STATIONARY
    • NAIL ART
    • BAKING
    • CHRISTMAS
    • EASTER
    • ART PRINTS
    • WEDDING STATIONARY
  • CONTACT
Menu

ISOSCELLA

Street Address
City, State, Zip
Phone Number

Your Custom Text Here

ISOSCELLA

  • ABOUT
    • ABOUT ME
    • PRIVACY POLICY
  • COLLABORATE
  • BLOG
  • ART
    • ART
    • WEDDING
    • LIBRARY
  • DIY
    • DECOR
    • JEWELLERY
    • STATIONARY
    • NAIL ART
    • BAKING
    • CHRISTMAS
    • EASTER
  • SHOP
    • ART PRINTS
    • WEDDING STATIONARY
  • CONTACT

Slatted Wood Christmas Tree Skirt

December 17, 2022 Isoscella M
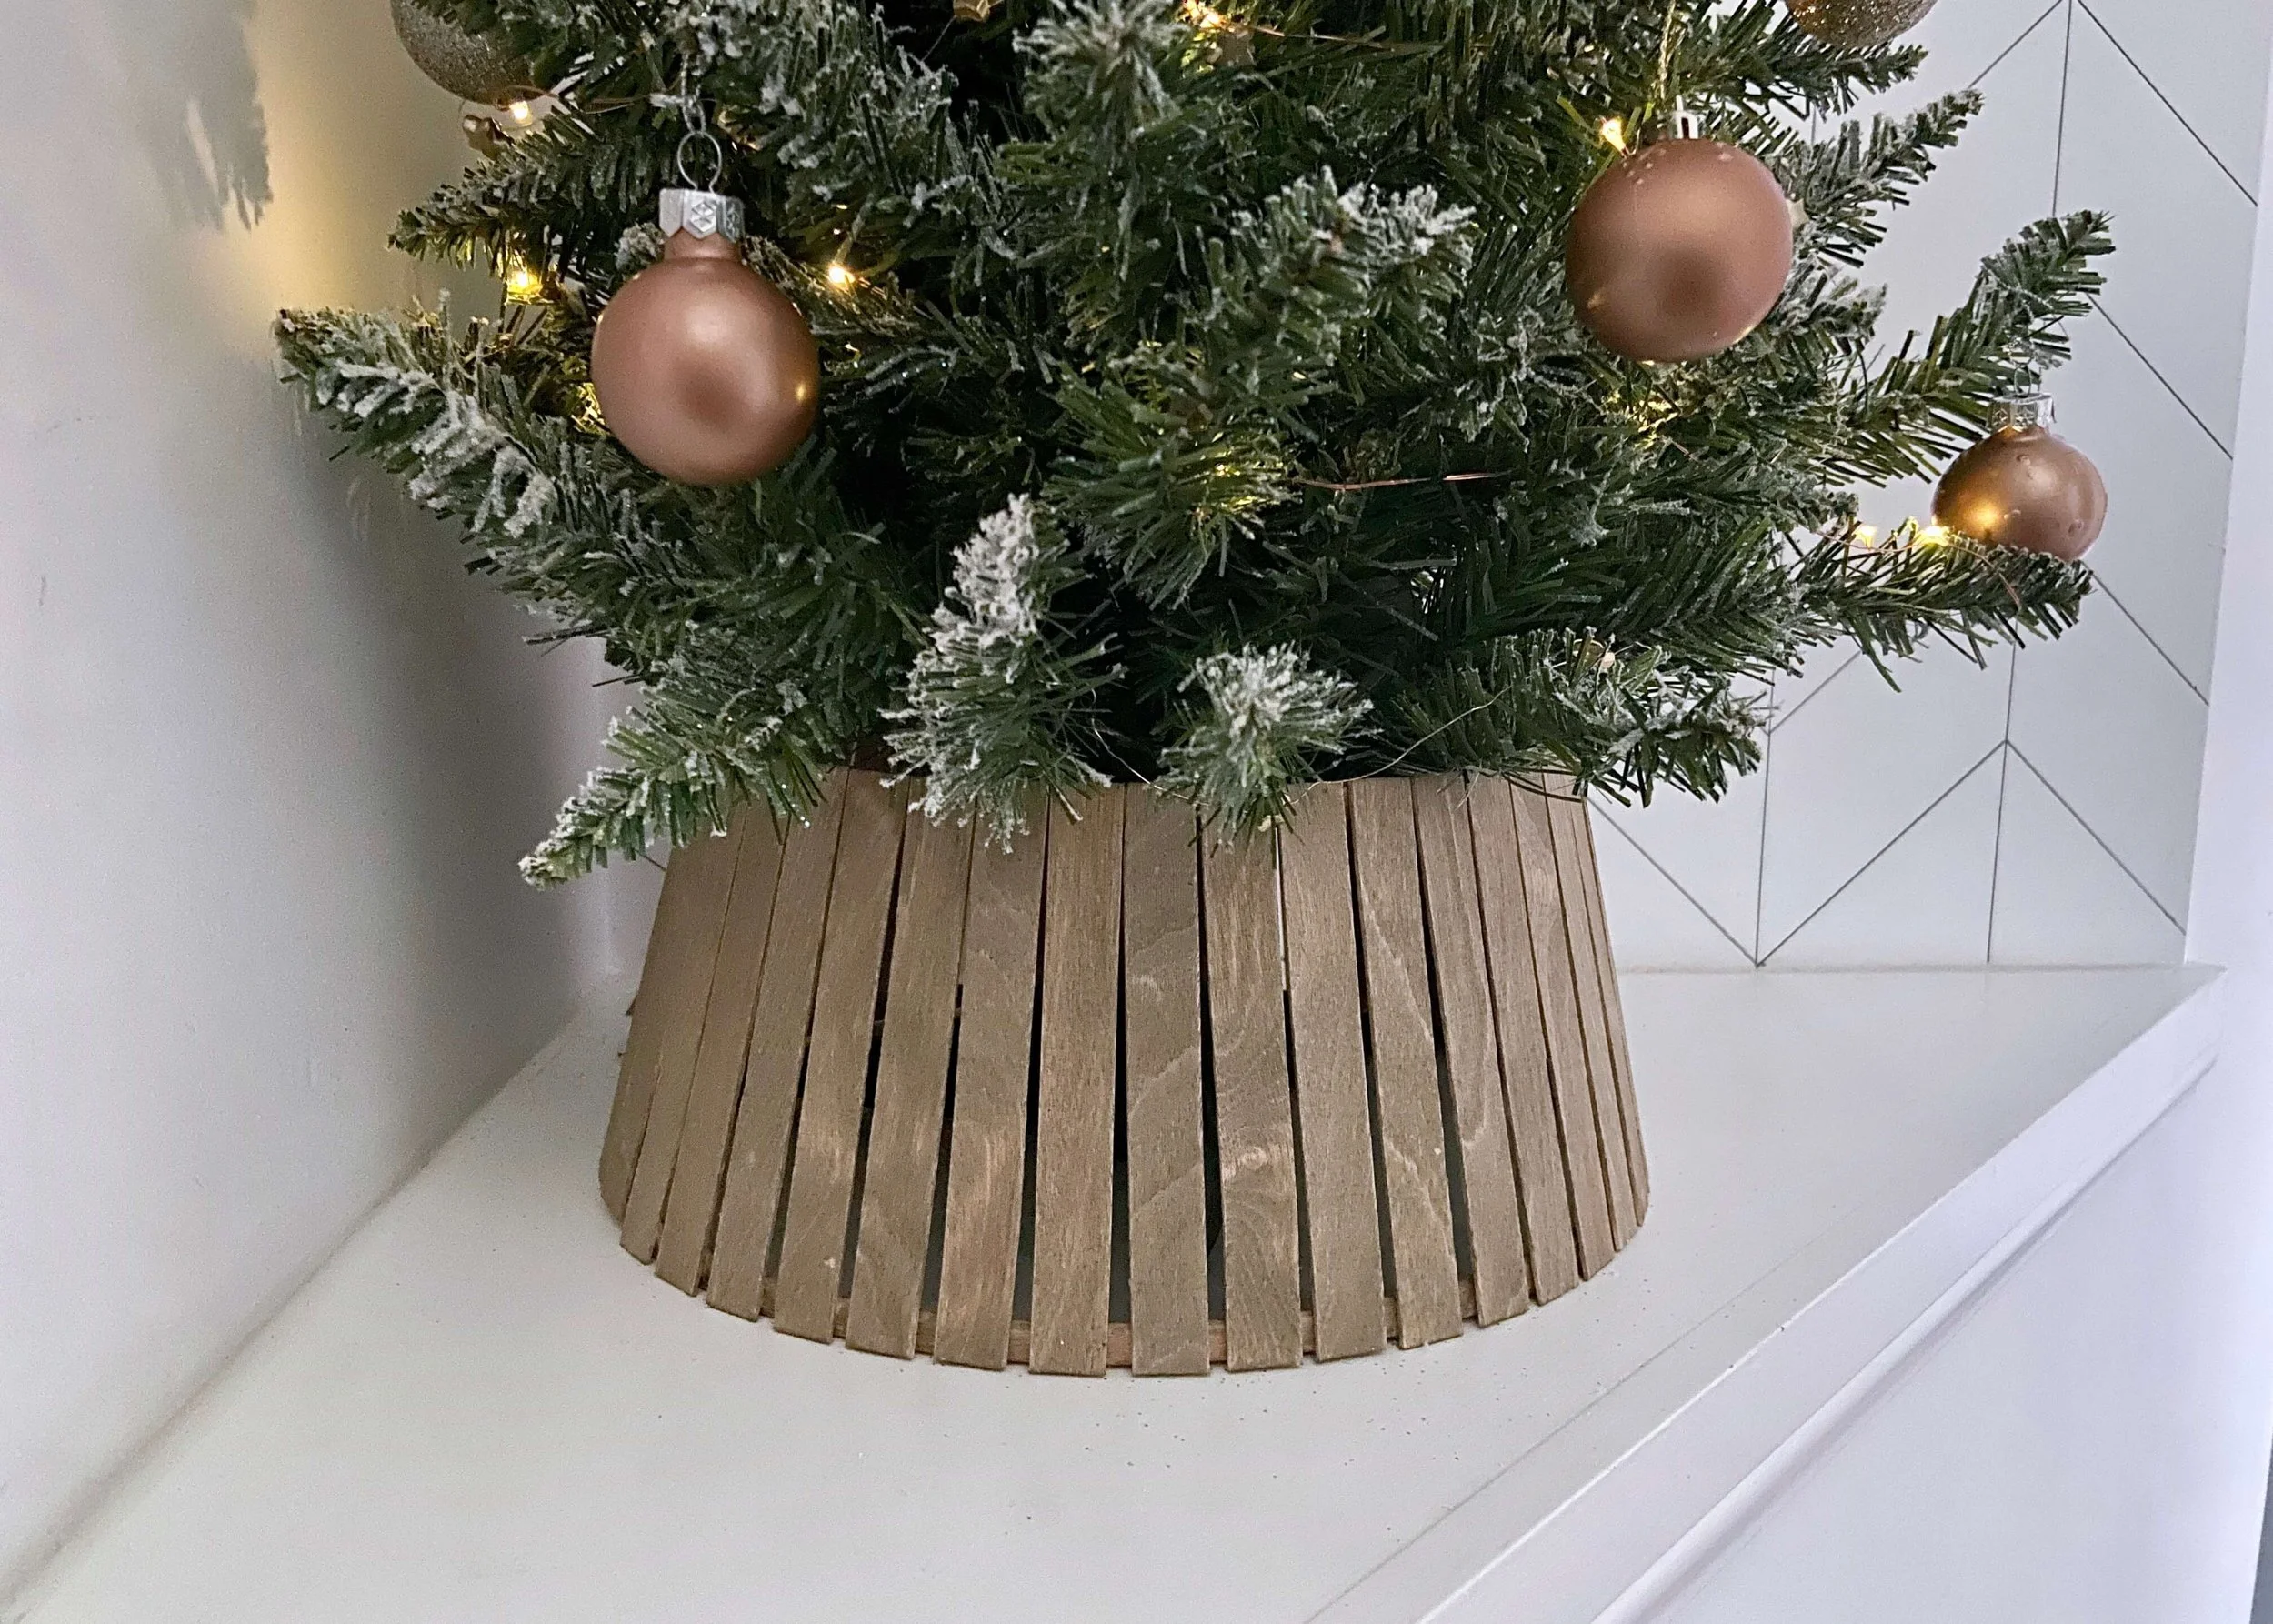
Slatted wood tree skirt

Create a slatted wood Christmas tree skirt in 10 steps!

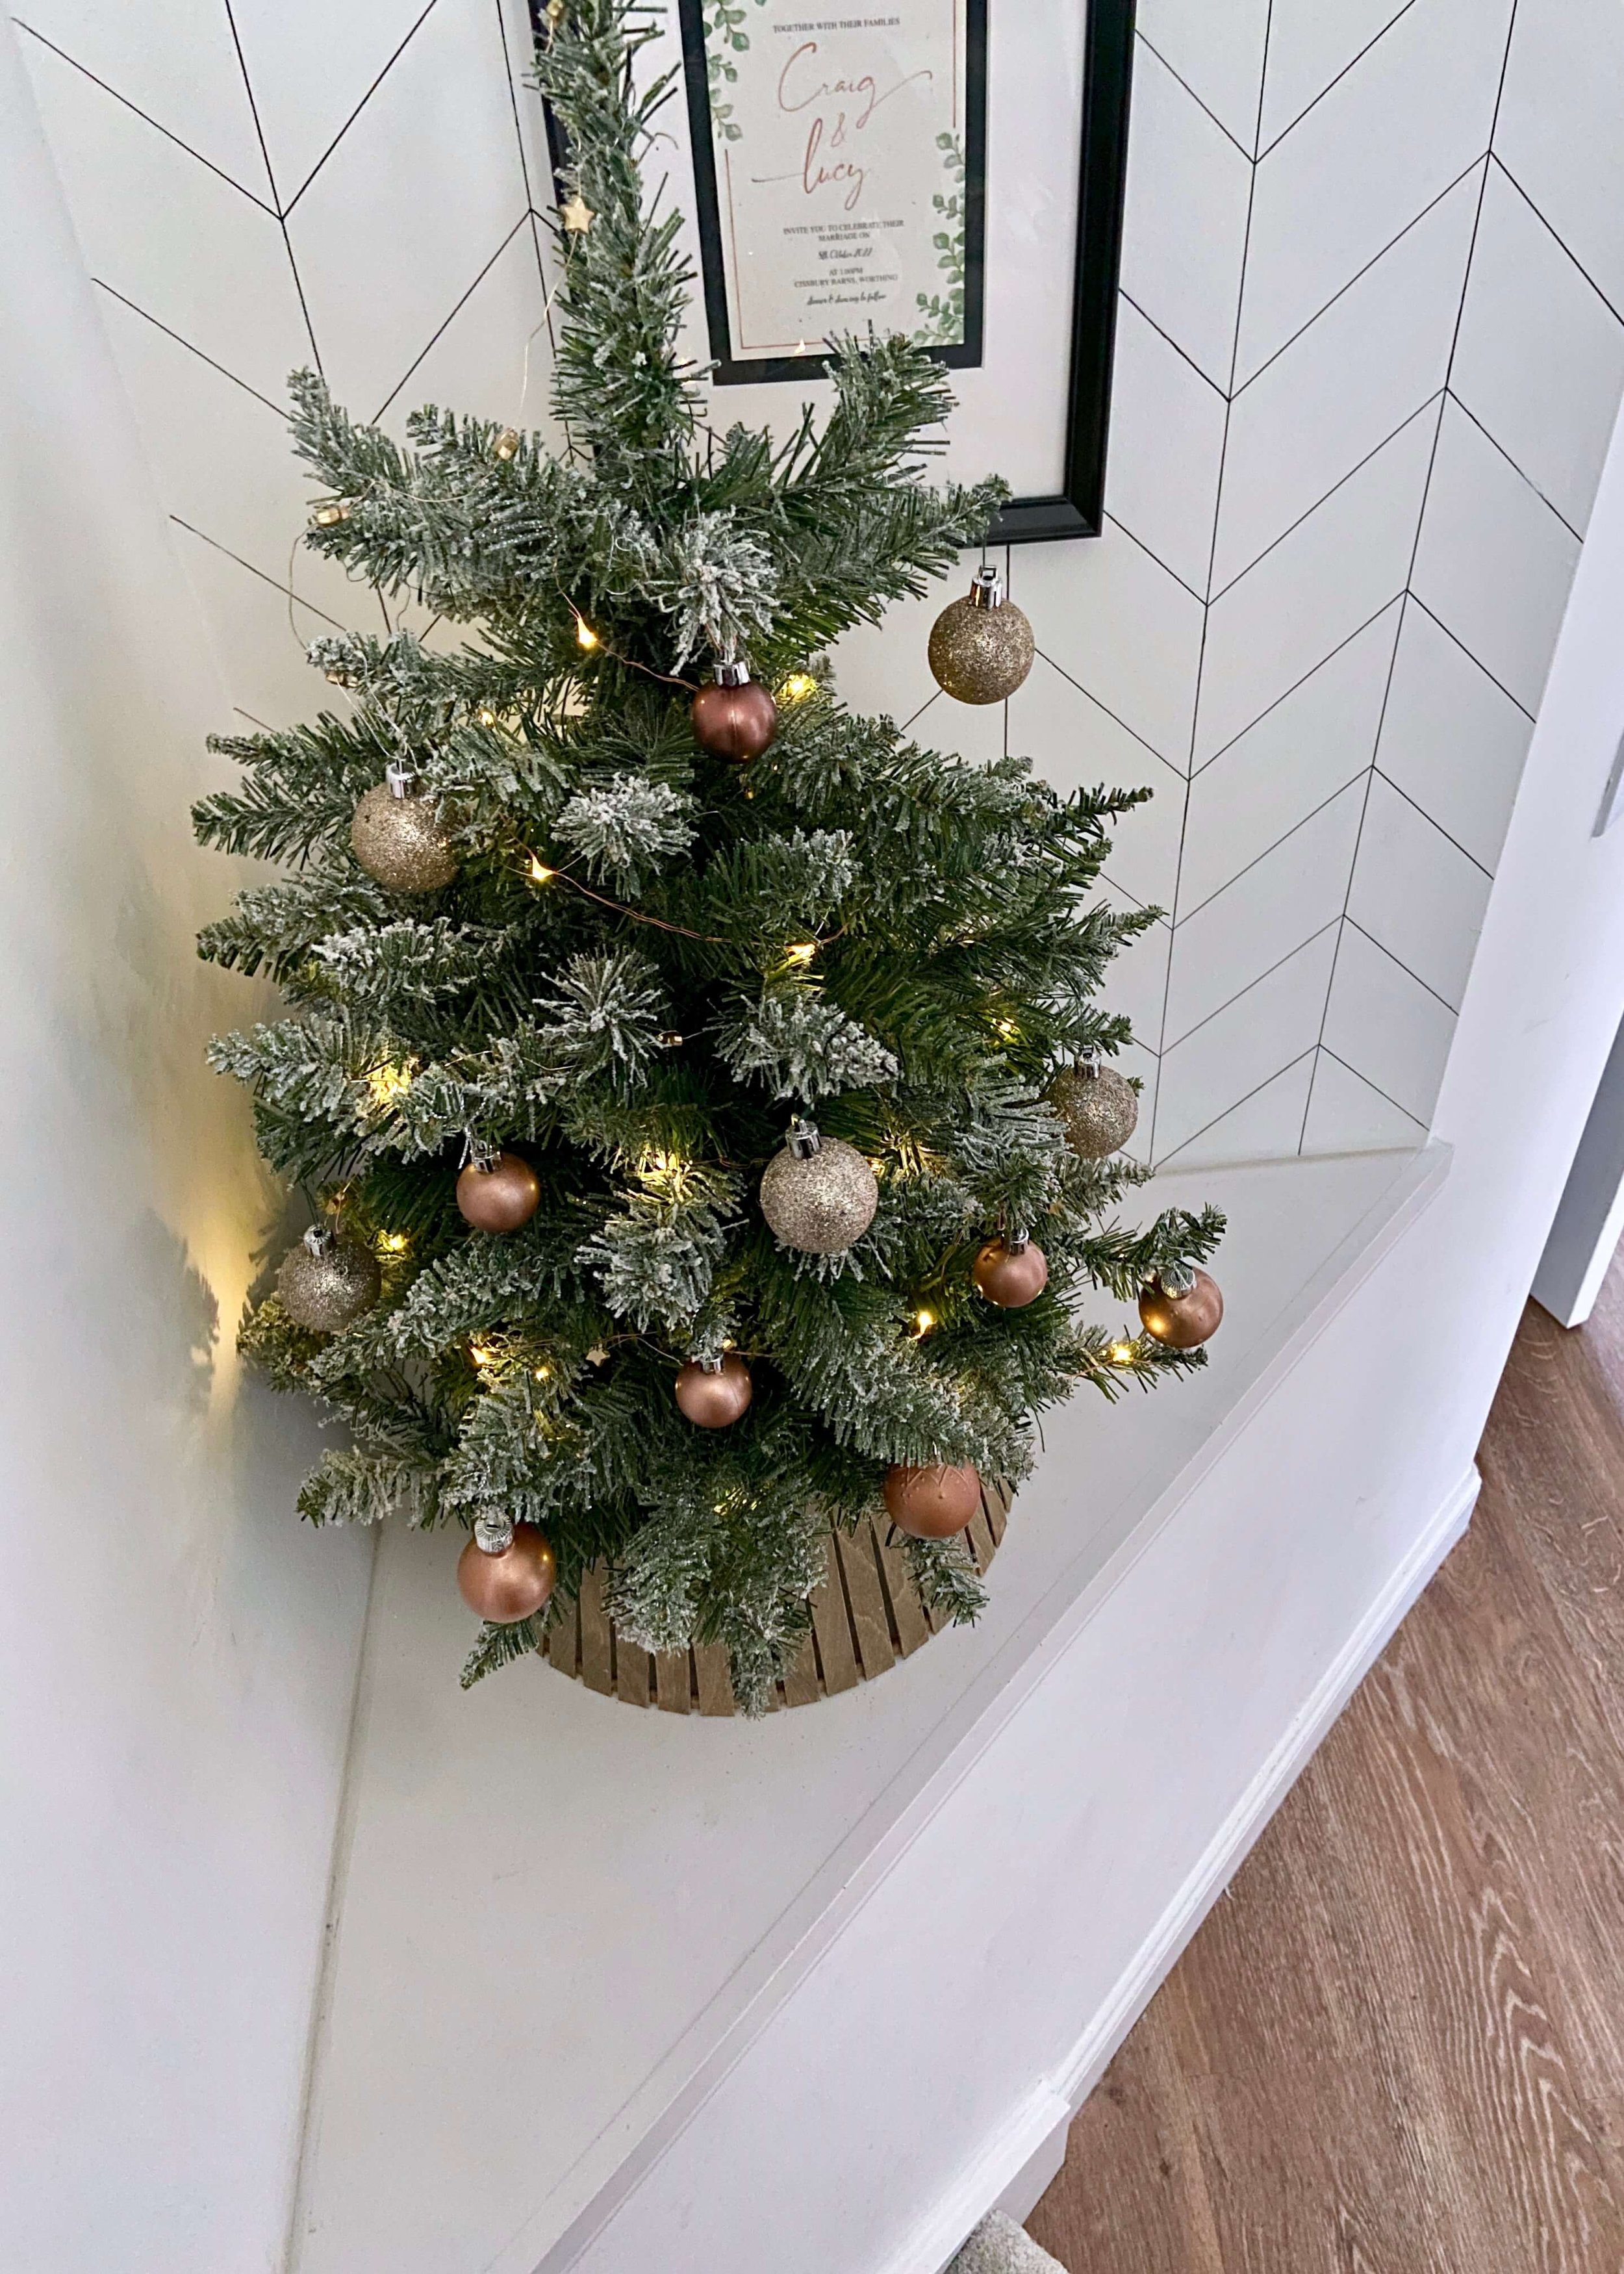
When we first looked at the style of house we eventually went on to buy, I knew straight away that this little nook in the hallway was destined to have small Christmas tree in it. After moving in, my parents kindly donated to us an old artificial tree they had previously had in their hallway, and so since moving in, 2 year ago now, it has sat happily in this space each Christmas. This year for some reason, I really noticed the base of it. Our main tree has a lovely wicker tree skirt around it, bought for us by my husband’s nan, so this tree started to look a bit too bare.

As I was thinking about what I could do, I did contemplate drilling a hole in the bottom of a copper plant pot, The Sorry Girls posted a DIY on Youtube where they made a wooden tree skirt from scratch. That provided much of my inspiration for this project, but as I was doing it on a much smaller scale, I found myself two small wooden rings online, and calculated I could use jumbo lollipop sticks as my slats instead of needing to buy and cut lengths of wood. I don’t have a nail gun (yet!), which would have made this project much faster, but I found glue worked really well. I’m so pleased with how this has turned out. The tree now feels complete to me, and I love that the stain I chose goes well with our flooring and other wooden features of the house. Let me know what you think below and don’t forget to follow and share!

Large Lollipop Sticks

Two wooden rings (1 larger than the other)

Sanding block and paper

Wood glue or No More Nails

Wood stain

Measure floor to branches

1.

Before ordering my supplies. I first measured the base of my tree, and also the height from the ground to where the branches started. Based on these measurements, I then ordered two wooden rings (one larger than the base and the other about the same size) and large lollipop sticks that were longer than the distance between the ground and the branches.

Sanding wooden hoop

2.

Next, I grabbed some sanding paper and a sanding block, and sanded the outside top edge of the larger wooden ring at an angle. This was to give a flat surface for the lollipop sticks to adhere to.

Cutting sticks to size

3.

I then trimmed off the top and bottom rounded edges of the large lollipop sticks with scissors to make each slat my desired length. I made sure that they were all equal in length.

Glueing sticks to hoops

4.

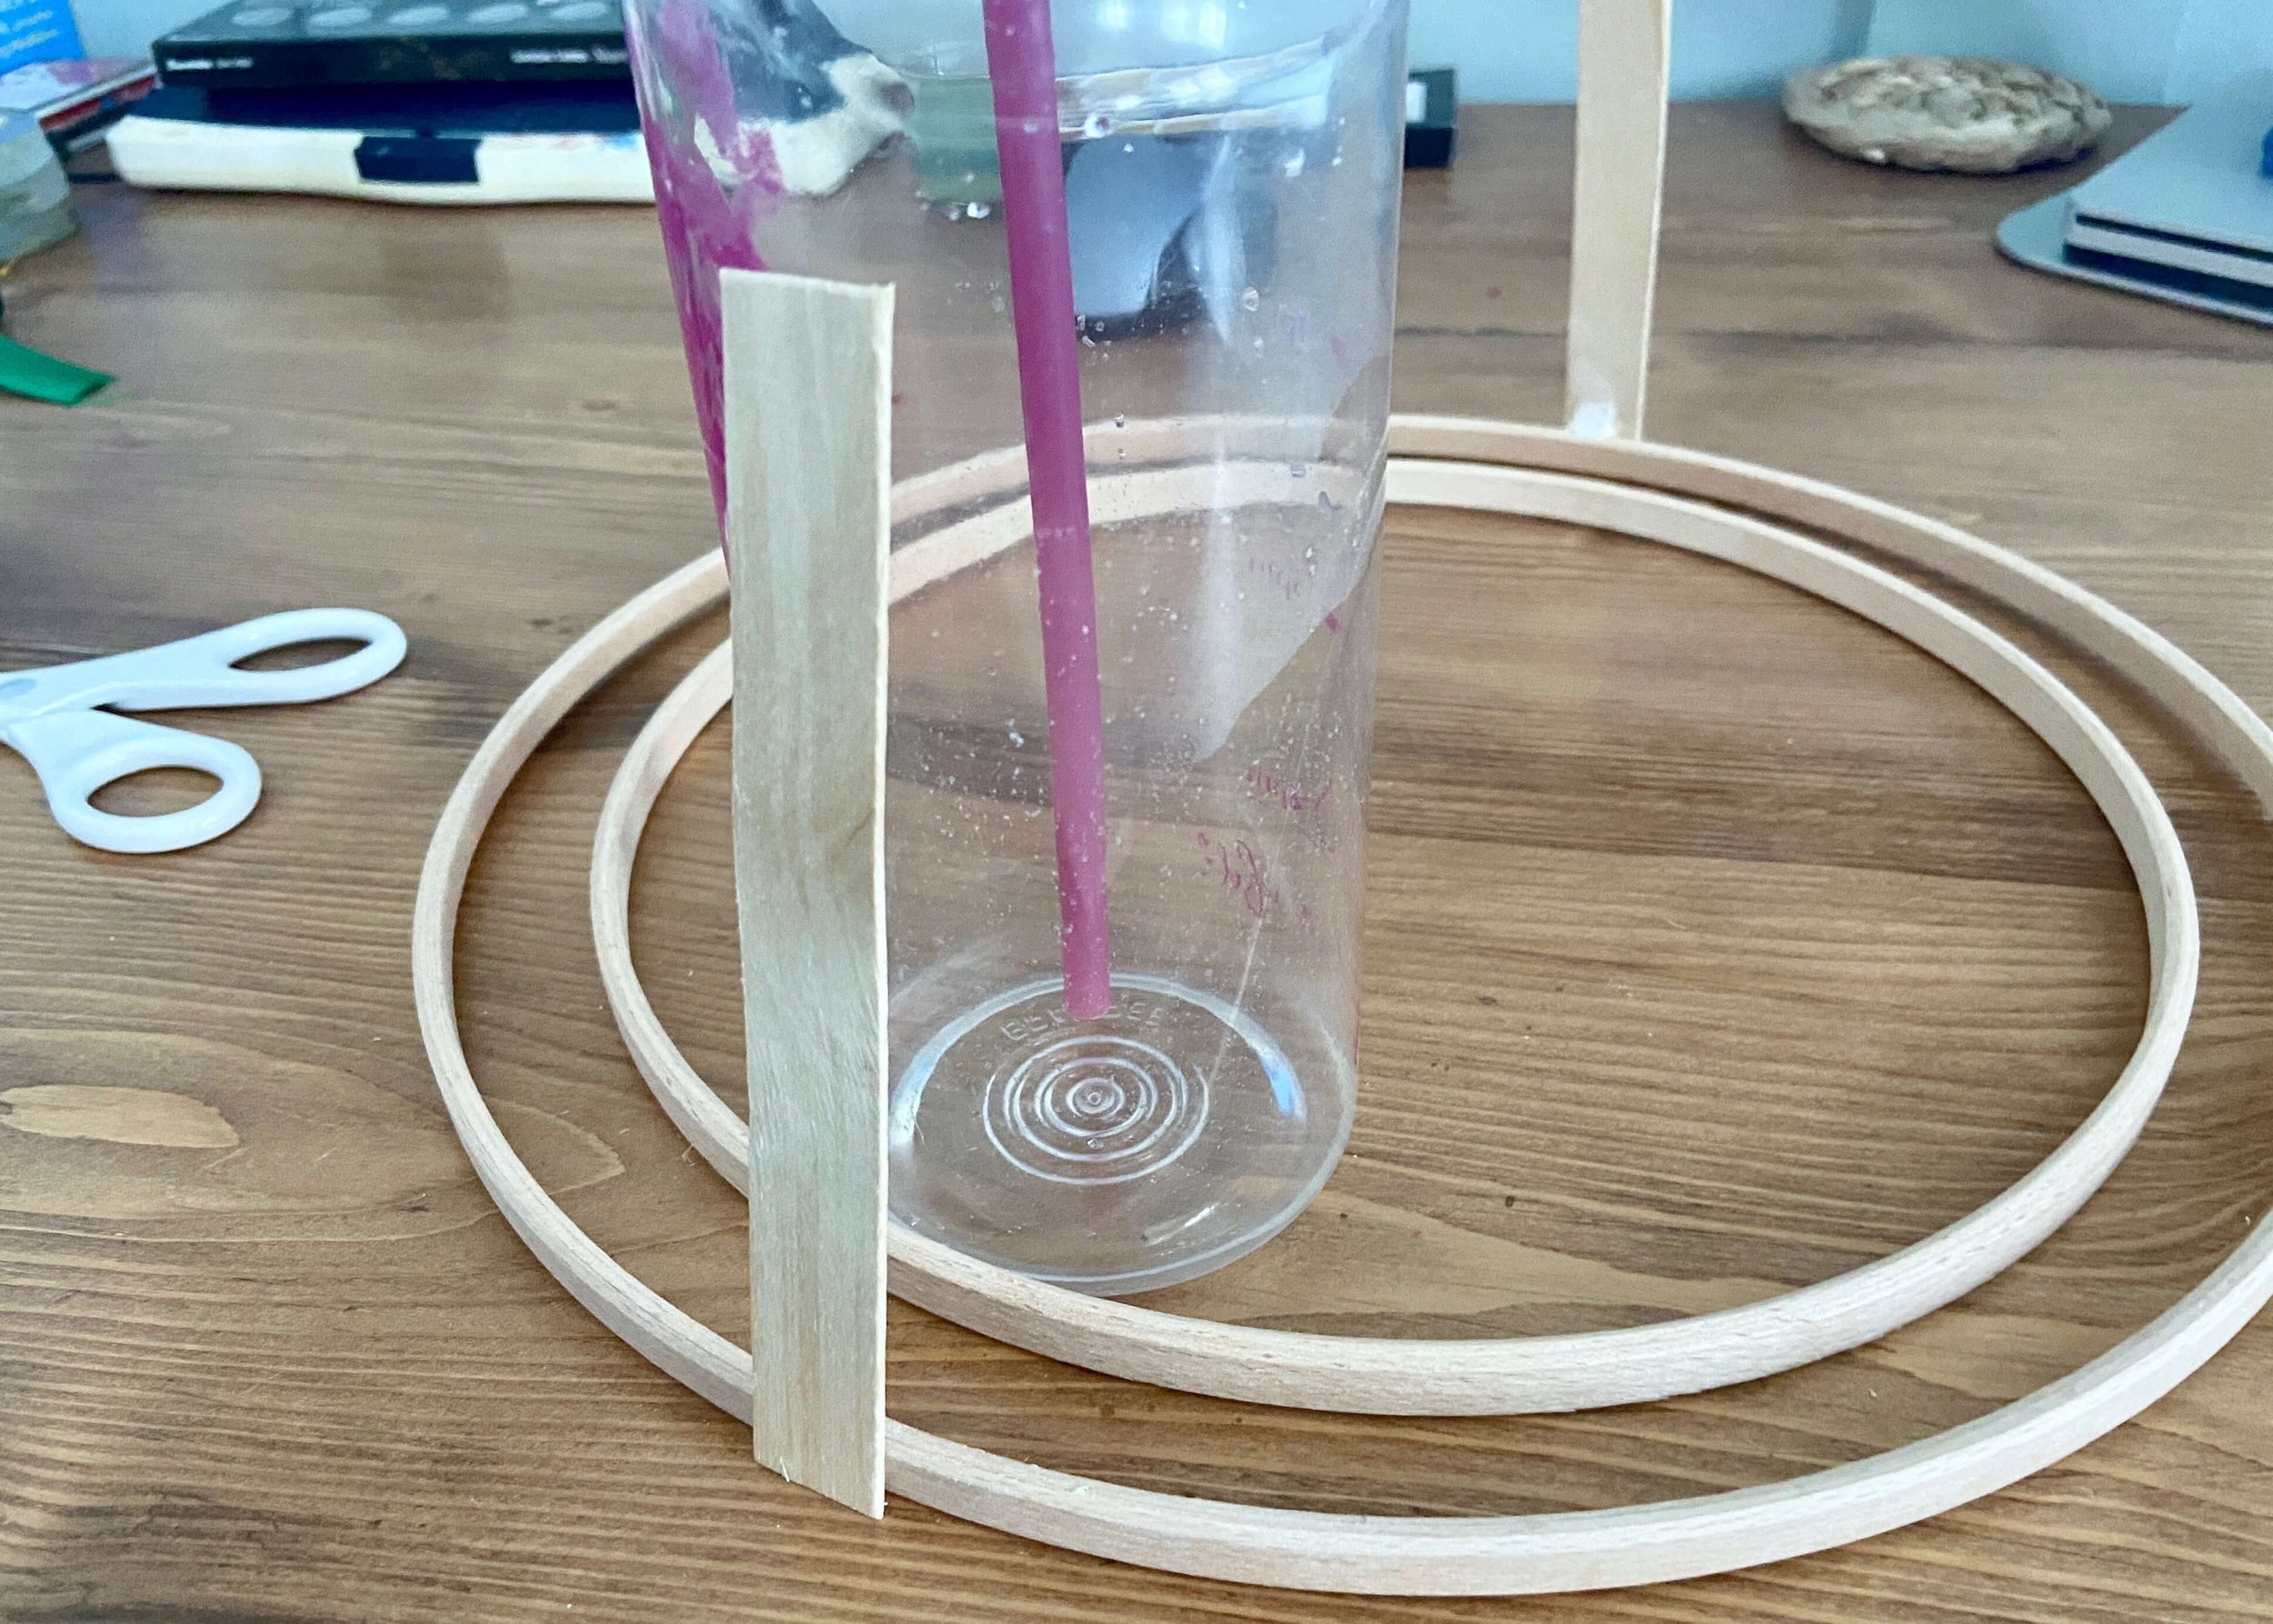
I then positioned my small wooden ring on the inside of large ring with an equal gap around it. Using glue, I then stuck a slat on the larger ring, with it tilted forwards and leaning against my water bottle which was positioned where the smaller ring was. I left it to set in place, and then repeated this directly on the other side of the rings.

Gluing sticks to hoops

5.

Once I had two slats attached to the larger bottom ring, I balanced the smaller ring on various objects so that it was the right height to stick to the top end of the slats. I used glue to do this, and left it to set. Once set, I began adding more slats beside my support slats.

Gluing sticks to hoops

6.

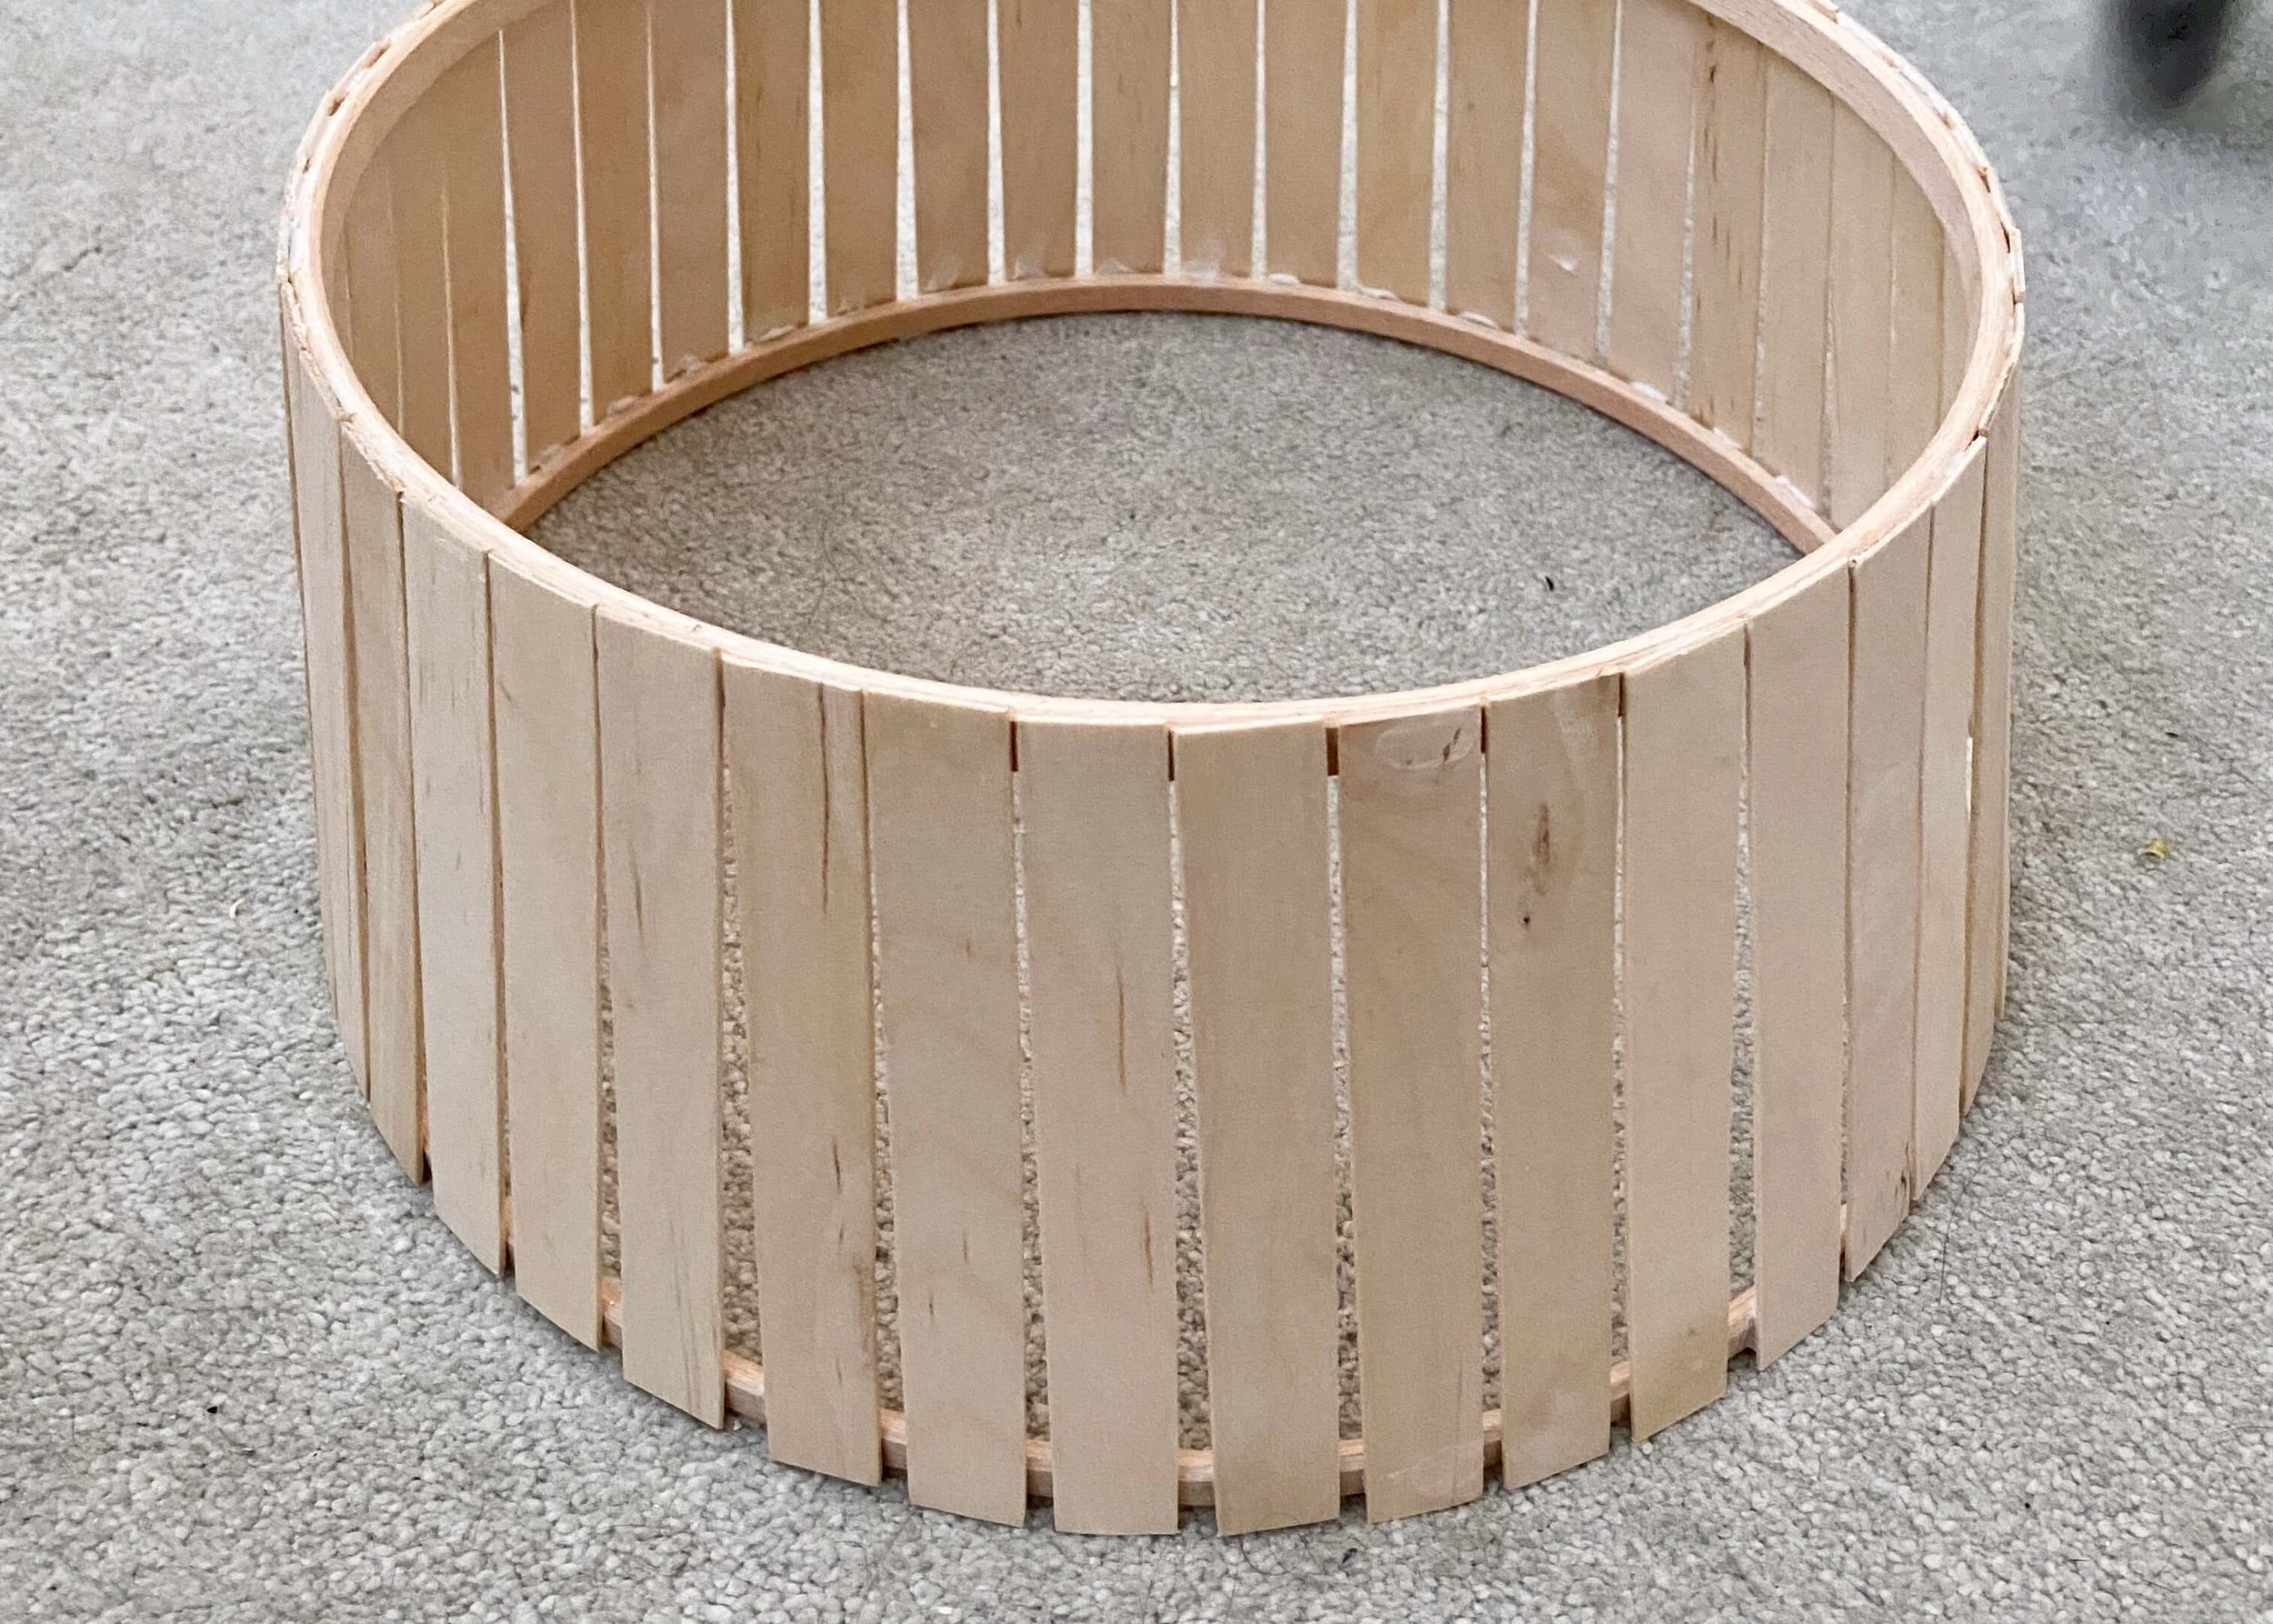
I then worked my way around the rings, glueing the slats to the top and bottom ring. I found I had to angle these slightly so that there was less of a gap between the top of the slats than the bottom to keep each slat straight.

Wood slat tree skirt

7.

I then left the entire thing to dry and set overnight. If you have any uneven edges or places where you got glue, you can use some sanding paper to fix it.

Stain wood

8.

I then used a pet friendly water-based wood stain and a paintbrush to give the outside slats a medium oak colour. I started with one coat all the way round and made sure to paint any of the exposed wooden ring in between.

Stain wood

9.

Once dry, I painted the top and underside of the tree skirt so that any exposed areas would also be a medium oak colour. I then chose to stain the inside of my tree skirt though you don’t need to do this if you can’t see the inside with the tree in it.

Wood stain dry

10.

Finally, I gave the outside of my tree a second coat of stain and left it to dry.

…AND THAT’S IT!

this is the alt text
YOU MIGHT ALSO LIKE...
Mushroom Fairy Lights
Dec 16, 2023
Mushroom Fairy Lights
Dec 16, 2023
Dec 16, 2023
3D Plaster Star Ornaments
Dec 9, 2023
3D Plaster Star Ornaments
Dec 9, 2023
Dec 9, 2023
How to Make Christmas Decor with Toilet Rolls
Dec 2, 2023
How to Make Christmas Decor with Toilet Rolls
Dec 2, 2023
Dec 2, 2023
Faux Stone Moon Ornaments
Nov 25, 2023
Faux Stone Moon Ornaments
Nov 25, 2023
Nov 25, 2023
Minimal Christmas Tablescape
Nov 18, 2023
Minimal Christmas Tablescape
Nov 18, 2023
Nov 18, 2023
Snowy Forest Boho Baubles
Nov 11, 2023
Snowy Forest Boho Baubles
Nov 11, 2023
Nov 11, 2023
23 Christmas DIY Ideas
Nov 4, 2023
23 Christmas DIY Ideas
Nov 4, 2023
Nov 4, 2023
Handmade Gift Box
Dec 24, 2022
Handmade Gift Box
Dec 24, 2022
Dec 24, 2022
Slatted Wood Christmas Tree Skirt
Dec 17, 2022
Slatted Wood Christmas Tree Skirt
Dec 17, 2022
Dec 17, 2022
Nordic House Gift Wrapping
Dec 14, 2022
Nordic House Gift Wrapping
Dec 14, 2022
Dec 14, 2022
In DIY Tags home, christmas
← Handmade Gift BoxNordic House Gift Wrapping →
 

Decorating, DIY-ing and doodling my way through life. Have a look around and let’s get creative!

>> FIND OUT MORE <<

Follow
The office is still one of my favourite transformations in the house! 😍

I started by panelling the wall with MDF strips and then painted the wall with a mix of colours. I used three IKEA drawer units for the base of the desk and then secured the de

ART

DIY

LIFE


THE LATEST

Featured
Wooden Mushroom Decor
Apr 26, 2025
Wooden Mushroom Decor
Apr 26, 2025
Apr 26, 2025
Hand-Painted Floral Mural Arch
Mar 29, 2025
Hand-Painted Floral Mural Arch
Mar 29, 2025
Mar 29, 2025
Easy IKEA Antilop Makeover
Mar 1, 2025
Easy IKEA Antilop Makeover
Mar 1, 2025
Mar 1, 2025
Clay Leaf Shelf
Jun 29, 2024
Clay Leaf Shelf
Jun 29, 2024
Jun 29, 2024
Nursery Feature Wall
Jun 15, 2024
Nursery Feature Wall
Jun 15, 2024
Jun 15, 2024


THE GREATEST

Featured
DIY // IKEA LACK TABLE INDUSTRIAL HACK
Sep 22, 2020
DIY
DIY // IKEA LACK TABLE INDUSTRIAL HACK
Sep 22, 2020
DIY
Sep 22, 2020
DIY
DIY // CLAY ALL-SEEING EYE MIRROR
Aug 14, 2020
DIY
DIY // CLAY ALL-SEEING EYE MIRROR
Aug 14, 2020
DIY
Aug 14, 2020
DIY
DIY // CLAY FACE DISH
Apr 29, 2020
DIY
DIY // CLAY FACE DISH
Apr 29, 2020
DIY
Apr 29, 2020
DIY
DIY // ABSTRACT ART FLORAL EGGS
Mar 25, 2020
DIY
DIY // ABSTRACT ART FLORAL EGGS
Mar 25, 2020
DIY
Mar 25, 2020
DIY
DIY // WIRE FACE EARRINGS
Feb 16, 2020
DIY
DIY // WIRE FACE EARRINGS
Feb 16, 2020
DIY
Feb 16, 2020
DIY

Follow
^^ BACK TO TOP
How does Monday come round so quick?!Wishing I could cosy up here today ✨

#mondaymood #storyofmyhome #mydailyhomesquare #interiordesign #budgetdiy #realstylishhomes #ourdiyhomes #femalediycollective #discoverunder5k #myhousethismonth #myhousedownsou
I&rsquo;ve got the day off today (woop!) and although it&rsquo;s not quite warm enough to sit out here yet, the sun is shining and I think a little walk to blow out the cobwebs is exactly what I need. Hope Monday is treating you well! ☀️

#summerdrea
Had such a lovely day seeing one of my besties and her adorable new baby that I completely forgot to share today&rsquo;s new blog post!

Head over to the blog for all the details of this easy DIY ring dish 🔝✨

#diy #diyhomedecor #diyhome #diyvalenti
That sunshine 👌🏻☀️

#mycosyhome #livingroomdecor #livingroominspo #mydiymydecor #homeobsessed #lovemydecor #homeinterioruk #discoverunder5k #diyhome #diyhomedecor #myhousethismonth #myhousedownsouth #realstylishhomes #ourdiyhomes #happythursday #in
A little corner our home on this chilly Tuesday morning ✨
.
.
#interior #homeobsessed #mycosyhome #homeinterioruk #instadecorating #homesofinstagram #happymonday #mondaymotivation #instainteriors #cornersofmyhome #myhousethismonth #myhousedownsouth #

Copyright 2021 isoscella. All rights reserved.

Powered by Squarespace