• ABOUT ME
    • PRIVACY POLICY
  • COLLABORATE
  • BLOG
    • ART
    • WEDDING
    • LIBRARY
    • DECOR
    • JEWELLERY
    • STATIONARY
    • NAIL ART
    • BAKING
    • CHRISTMAS
    • EASTER
    • ART PRINTS
    • WEDDING STATIONARY
  • CONTACT
Menu

ISOSCELLA

Street Address
City, State, Zip
Phone Number

Your Custom Text Here

ISOSCELLA

  • ABOUT
    • ABOUT ME
    • PRIVACY POLICY
  • COLLABORATE
  • BLOG
  • ART
    • ART
    • WEDDING
    • LIBRARY
  • DIY
    • DECOR
    • JEWELLERY
    • STATIONARY
    • NAIL ART
    • BAKING
    • CHRISTMAS
    • EASTER
  • SHOP
    • ART PRINTS
    • WEDDING STATIONARY
  • CONTACT

DIY // MARBLE STAR CANDLE PIN

December 17, 2017 Isoscella M
DIY Marble Star Clay Pin by Isoscella
DIY Marble Star Candle Pin by Isoscella

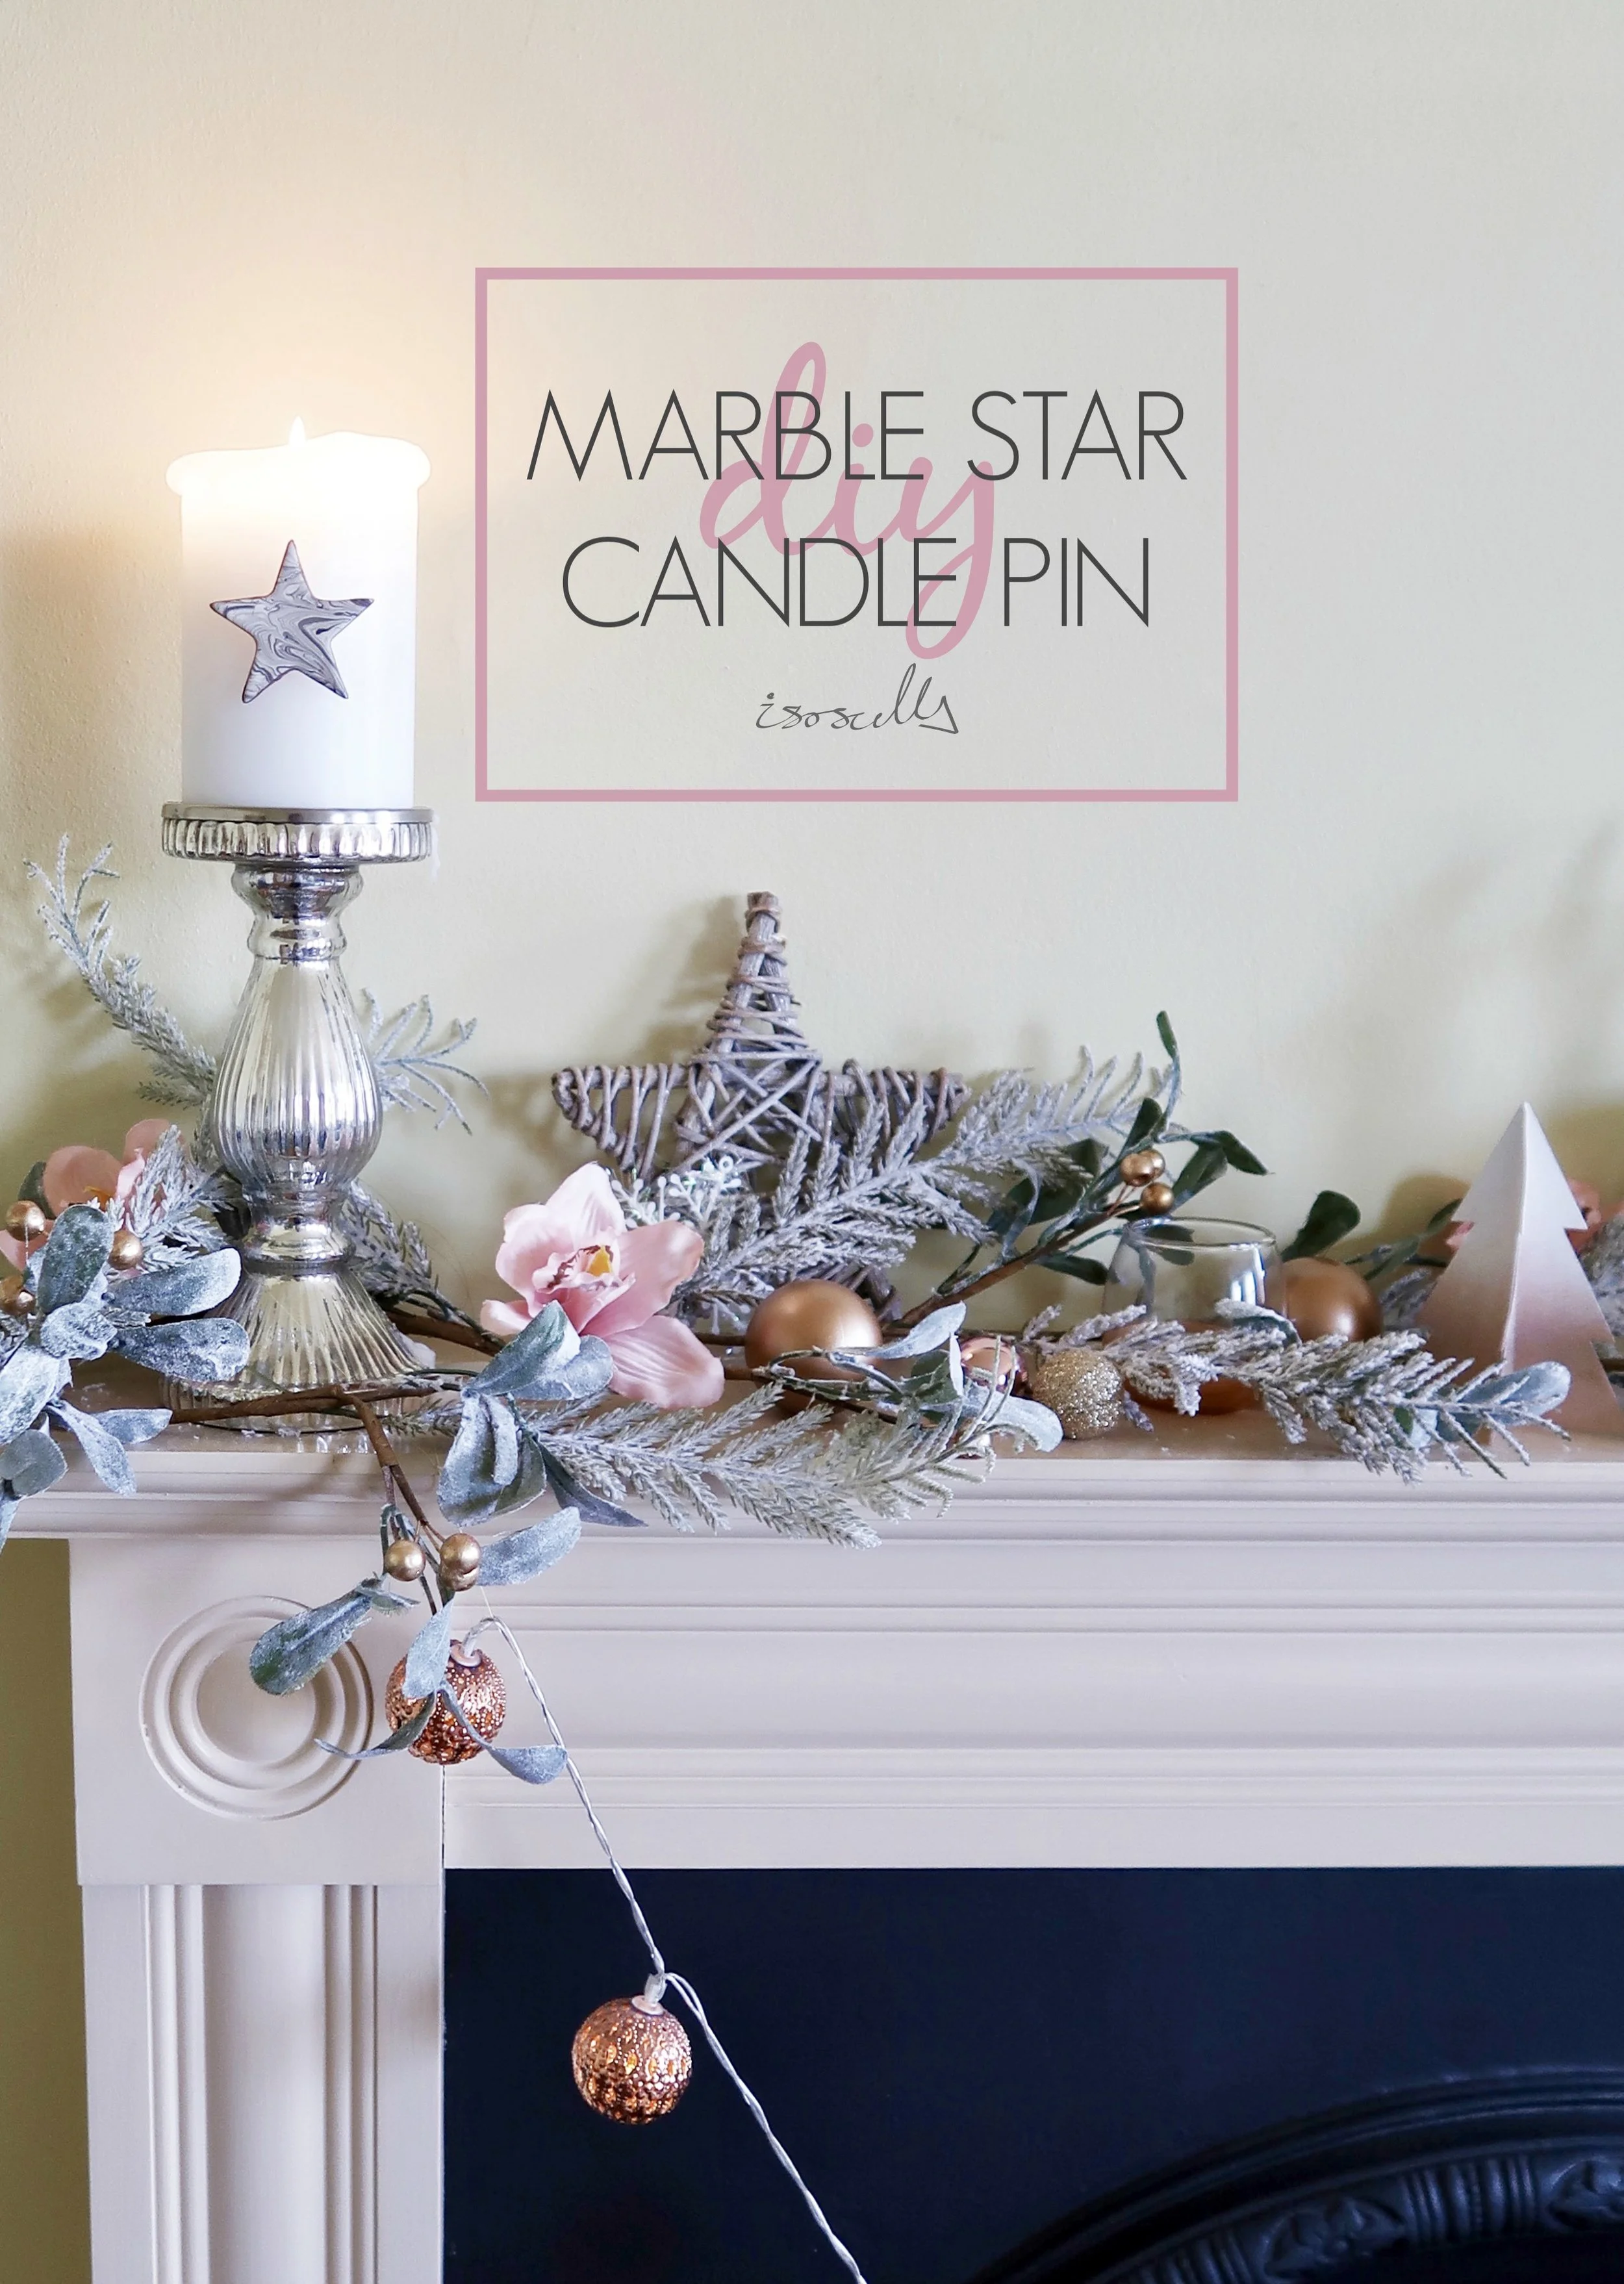
Pillar candles are a staple for my festive fireplace and I love seeing how other people decorate theirs. However at this time of year I get through them so quickly that it always seems a bit pointless to try and decorate them. If you feel similarly, then you're going to love this easy reusable candle pin decoration!

There's not long to go now, just over a week, but there is always still time to make some handmade Christmas decor. Candles are something I love to have in the flat throughout the year anyway, but during the festive period I light them as soon as I get in from work and have them lit in whichever room I happen to be in. Because of that, I get through candles pretty quickly in my flat, even the pillar candles on our fireplace, and so I've always thought it pointless to do anything to them. I've always loved seeing the various ways that people decorate theirs for Christmas though and so this year I decided to make these marble-effect candle pins, which I can use again and again. When I thought of these candle pins, I had a look around on the internet and couldn't seem to find any other similar ideas or products. Are candle pins a thing? If not, they really should be - I'm loving mine so far! Keep reading to find out what I used and how I made them...

DIY Marble Star Candle Pin by Isoscella
the What.jpg

Clay

Acrylic roller

Nail varnish

Bronze sharpie

Earring stud

Hot glue gun

Dash.jpg
DIY Marble Star Candle Pin by Isoscella
The How Header.jpg
DIY Marble Candle Pin by Isoscella

1.

First of all, you want to soften some clay in your hands and roll it out so that it is larger than your cutter or cookie cutter. Although I didn't use it myself this time (I seem to have misplaced it!) an acrylic roller works really well for this.

DIY Marble Star Candle Pin by Isoscella

2.

Next, press your cutter firmly into the clay. Give the cutter a little wiggle (technical term there) and remove the excess clay around the shape. Repeat step 1 and 2 until you have the number of clay shapes you need.

DIY Marble Star Candle Pin by Isoscella

3.

Carefully place these onto a tray and pop them into a preheated oven for the amount of time indicated. I used Fimo clay and baked these for approximately 30 minutes on 110 degrees celsius. Once baked, leave these to cool completely.

DIY Marble Star Candle Pin by Isoscella

4.

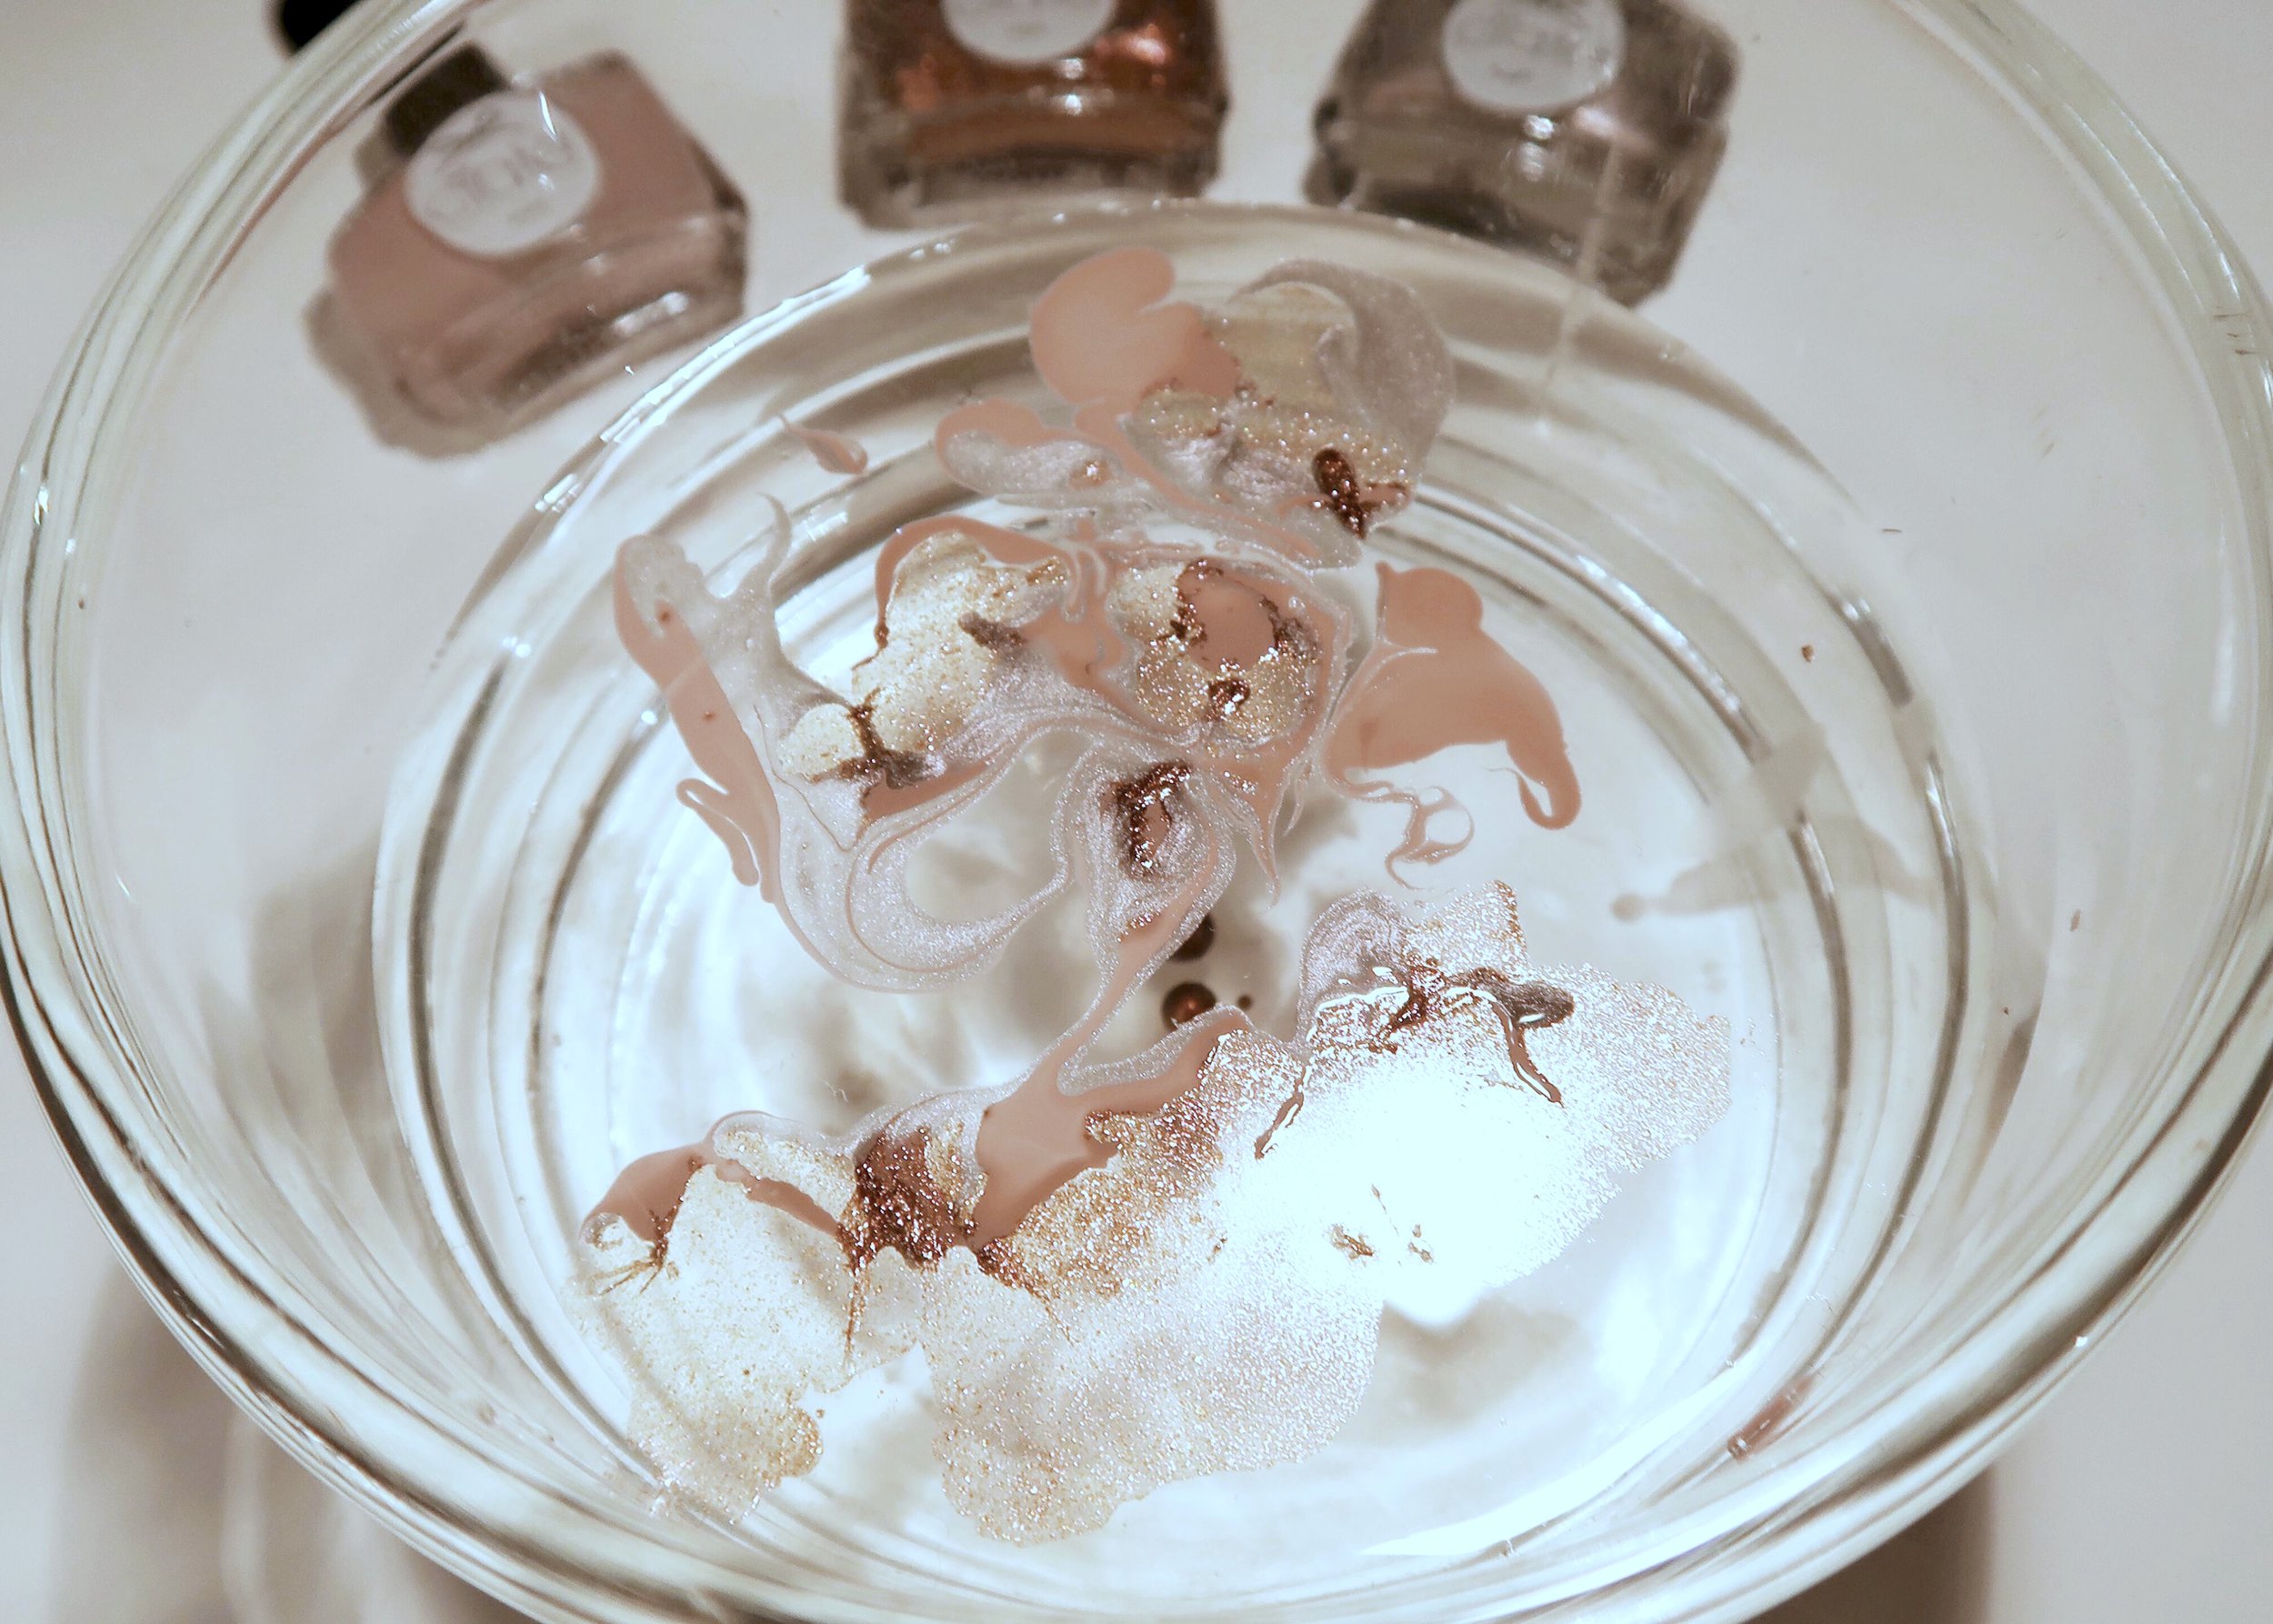
Next, fill a bowl or plastic container (that you don't mind getting messy) with water and choose some nail varnishes. In the end I chose to just use a grey nail varnish but I did some experimenting with these Ciate nail varnishes.

DIY Marble Star Candle Pin by Isoscella

5.

Placing the nail varnish close to the water line, pour some nail varnish carefully into the water so that it remains floating on top. Immediately use a cocktail stick to make a swirly pattern in this.

DIY Marble Star Candle Pin by Isoscella

6.

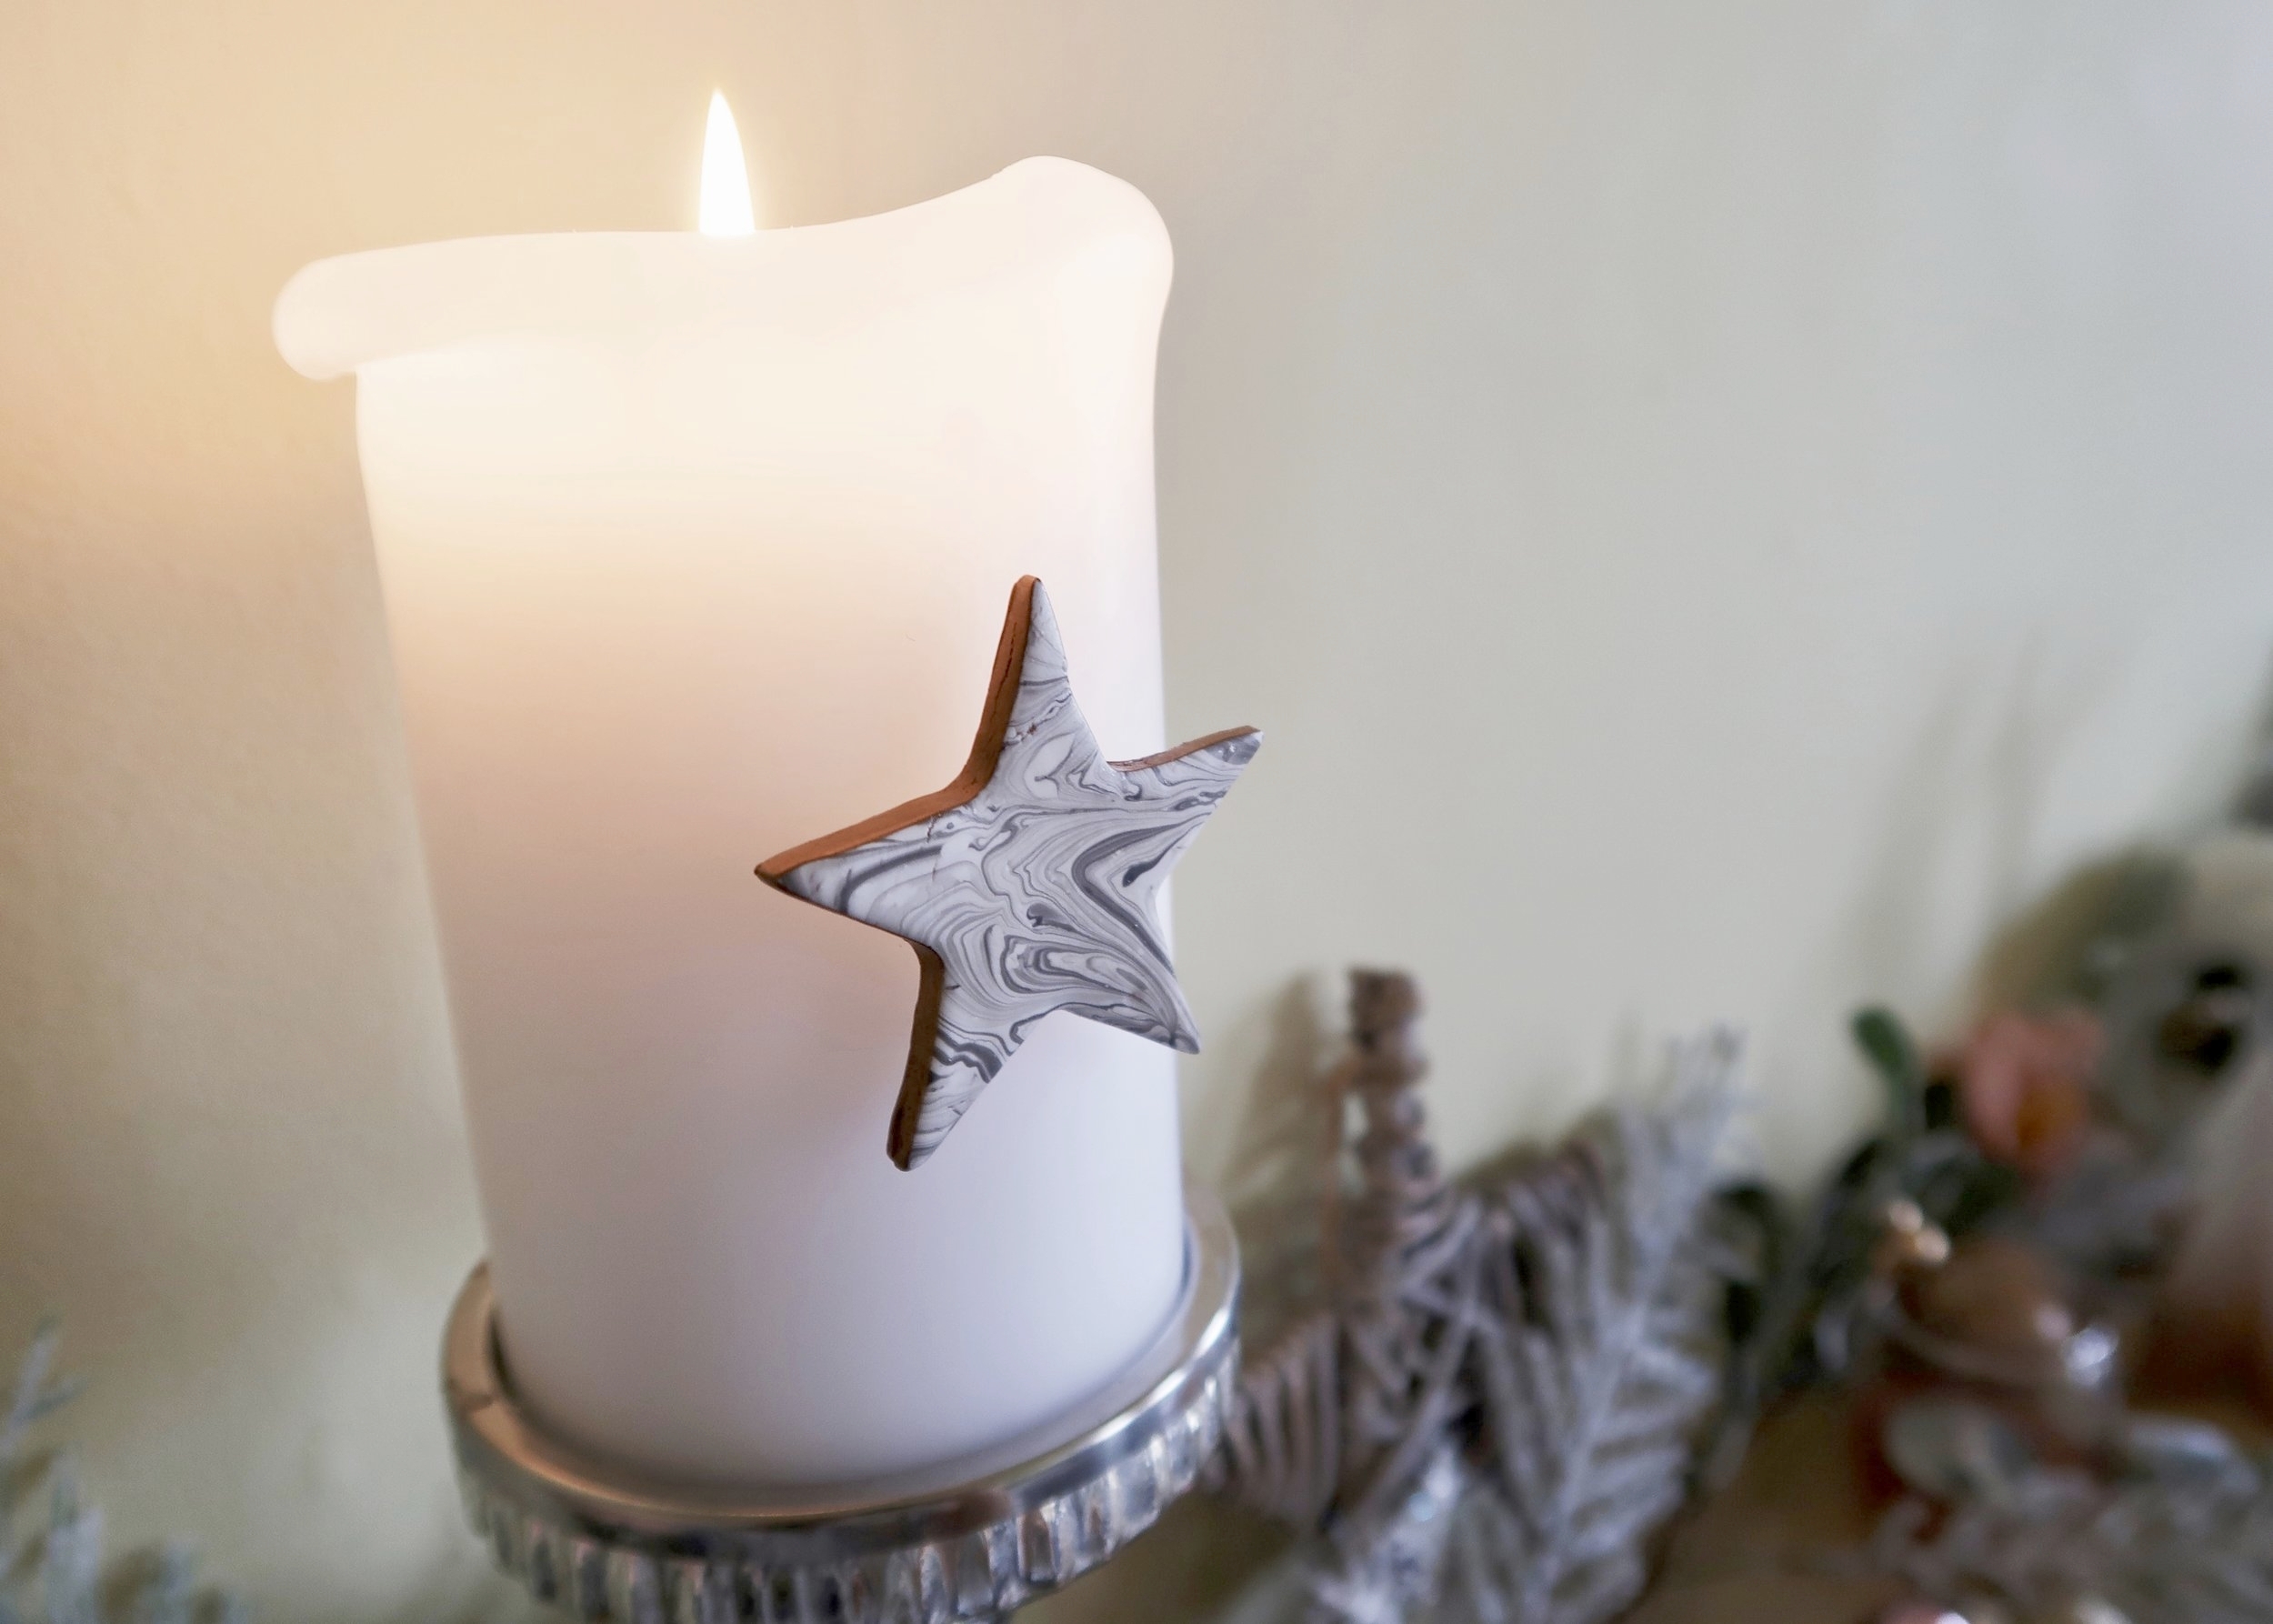
When you're happy with the design on the water, drop your clay shapes face down onto the nail varnish pattern. Remove the shape from the water and leave it to dry completely. I preferred the grey in the end and so just used these. Once dry, I used a bronze sharpie to colour the edges in copper.

DIY Marble Star Candle Pin by Isoscella

7.

Using a hot glue gun, add a dollop of glue into the middle of the back of each clay shape and press an earring stud firmly into the glue. Once completely dry, push your clay candle pins into the side of your pillar candles, a good distance away from the top and flame.

...AND THAT'S IT!

DIY Marble Star Candle Pin by Isoscella
YOU MIGHT ALSO LIKE...
Mushroom Fairy Lights
Dec 16, 2023
Mushroom Fairy Lights
Dec 16, 2023
Dec 16, 2023
3D Plaster Star Ornaments
Dec 9, 2023
3D Plaster Star Ornaments
Dec 9, 2023
Dec 9, 2023
How to Make Christmas Decor with Toilet Rolls
Dec 2, 2023
How to Make Christmas Decor with Toilet Rolls
Dec 2, 2023
Dec 2, 2023
Faux Stone Moon Ornaments
Nov 25, 2023
Faux Stone Moon Ornaments
Nov 25, 2023
Nov 25, 2023
Minimal Christmas Tablescape
Nov 18, 2023
Minimal Christmas Tablescape
Nov 18, 2023
Nov 18, 2023
Snowy Forest Boho Baubles
Nov 11, 2023
Snowy Forest Boho Baubles
Nov 11, 2023
Nov 11, 2023
23 Christmas DIY Ideas
Nov 4, 2023
23 Christmas DIY Ideas
Nov 4, 2023
Nov 4, 2023
Handmade Gift Box
Dec 24, 2022
Handmade Gift Box
Dec 24, 2022
Dec 24, 2022
Slatted Wood Christmas Tree Skirt
Dec 17, 2022
Slatted Wood Christmas Tree Skirt
Dec 17, 2022
Dec 17, 2022
Nordic House Gift Wrapping
Dec 14, 2022
Nordic House Gift Wrapping
Dec 14, 2022
Dec 14, 2022
In DIY Tags christmas, home
← DIY // PAPER TREE ORNAMENTSINTERIORS // CHRISTMAS DECOR ON A BUDGET →
 

Decorating, DIY-ing and doodling my way through life. Have a look around and let’s get creative!

>> FIND OUT MORE <<

Follow
The office is still one of my favourite transformations in the house! 😍

I started by panelling the wall with MDF strips and then painted the wall with a mix of colours. I used three IKEA drawer units for the base of the desk and then secured the de

ART

DIY

LIFE


THE LATEST

Featured
Wooden Mushroom Decor
Apr 26, 2025
Wooden Mushroom Decor
Apr 26, 2025
Apr 26, 2025
Hand-Painted Floral Mural Arch
Mar 29, 2025
Hand-Painted Floral Mural Arch
Mar 29, 2025
Mar 29, 2025
Easy IKEA Antilop Makeover
Mar 1, 2025
Easy IKEA Antilop Makeover
Mar 1, 2025
Mar 1, 2025
Clay Leaf Shelf
Jun 29, 2024
Clay Leaf Shelf
Jun 29, 2024
Jun 29, 2024
Nursery Feature Wall
Jun 15, 2024
Nursery Feature Wall
Jun 15, 2024
Jun 15, 2024


THE GREATEST

Featured
DIY // IKEA LACK TABLE INDUSTRIAL HACK
Sep 22, 2020
DIY
DIY // IKEA LACK TABLE INDUSTRIAL HACK
Sep 22, 2020
DIY
Sep 22, 2020
DIY
DIY // CLAY ALL-SEEING EYE MIRROR
Aug 14, 2020
DIY
DIY // CLAY ALL-SEEING EYE MIRROR
Aug 14, 2020
DIY
Aug 14, 2020
DIY
DIY // CLAY FACE DISH
Apr 29, 2020
DIY
DIY // CLAY FACE DISH
Apr 29, 2020
DIY
Apr 29, 2020
DIY
DIY // ABSTRACT ART FLORAL EGGS
Mar 25, 2020
DIY
DIY // ABSTRACT ART FLORAL EGGS
Mar 25, 2020
DIY
Mar 25, 2020
DIY
DIY // WIRE FACE EARRINGS
Feb 16, 2020
DIY
DIY // WIRE FACE EARRINGS
Feb 16, 2020
DIY
Feb 16, 2020
DIY

Follow
^^ BACK TO TOP
How does Monday come round so quick?!Wishing I could cosy up here today ✨

#mondaymood #storyofmyhome #mydailyhomesquare #interiordesign #budgetdiy #realstylishhomes #ourdiyhomes #femalediycollective #discoverunder5k #myhousethismonth #myhousedownsou
I&rsquo;ve got the day off today (woop!) and although it&rsquo;s not quite warm enough to sit out here yet, the sun is shining and I think a little walk to blow out the cobwebs is exactly what I need. Hope Monday is treating you well! ☀️

#summerdrea
Had such a lovely day seeing one of my besties and her adorable new baby that I completely forgot to share today&rsquo;s new blog post!

Head over to the blog for all the details of this easy DIY ring dish 🔝✨

#diy #diyhomedecor #diyhome #diyvalenti
That sunshine 👌🏻☀️

#mycosyhome #livingroomdecor #livingroominspo #mydiymydecor #homeobsessed #lovemydecor #homeinterioruk #discoverunder5k #diyhome #diyhomedecor #myhousethismonth #myhousedownsouth #realstylishhomes #ourdiyhomes #happythursday #in
A little corner our home on this chilly Tuesday morning ✨
.
.
#interior #homeobsessed #mycosyhome #homeinterioruk #instadecorating #homesofinstagram #happymonday #mondaymotivation #instainteriors #cornersofmyhome #myhousethismonth #myhousedownsouth #

Copyright 2021 isoscella. All rights reserved.

Powered by Squarespace