• ABOUT ME
    • PRIVACY POLICY
  • COLLABORATE
  • BLOG
    • ART
    • WEDDING
    • LIBRARY
    • DECOR
    • JEWELLERY
    • STATIONARY
    • NAIL ART
    • BAKING
    • CHRISTMAS
    • EASTER
    • ART PRINTS
    • WEDDING STATIONARY
  • CONTACT
Menu

ISOSCELLA

Street Address
City, State, Zip
Phone Number

Your Custom Text Here

ISOSCELLA

  • ABOUT
    • ABOUT ME
    • PRIVACY POLICY
  • COLLABORATE
  • BLOG
  • ART
    • ART
    • WEDDING
    • LIBRARY
  • DIY
    • DECOR
    • JEWELLERY
    • STATIONARY
    • NAIL ART
    • BAKING
    • CHRISTMAS
    • EASTER
  • SHOP
    • ART PRINTS
    • WEDDING STATIONARY
  • CONTACT

DIY // ORIGAMI STAR BACKDROP

December 30, 2017 Isoscella M
DIY Origami Star Backdrop by Isoscella

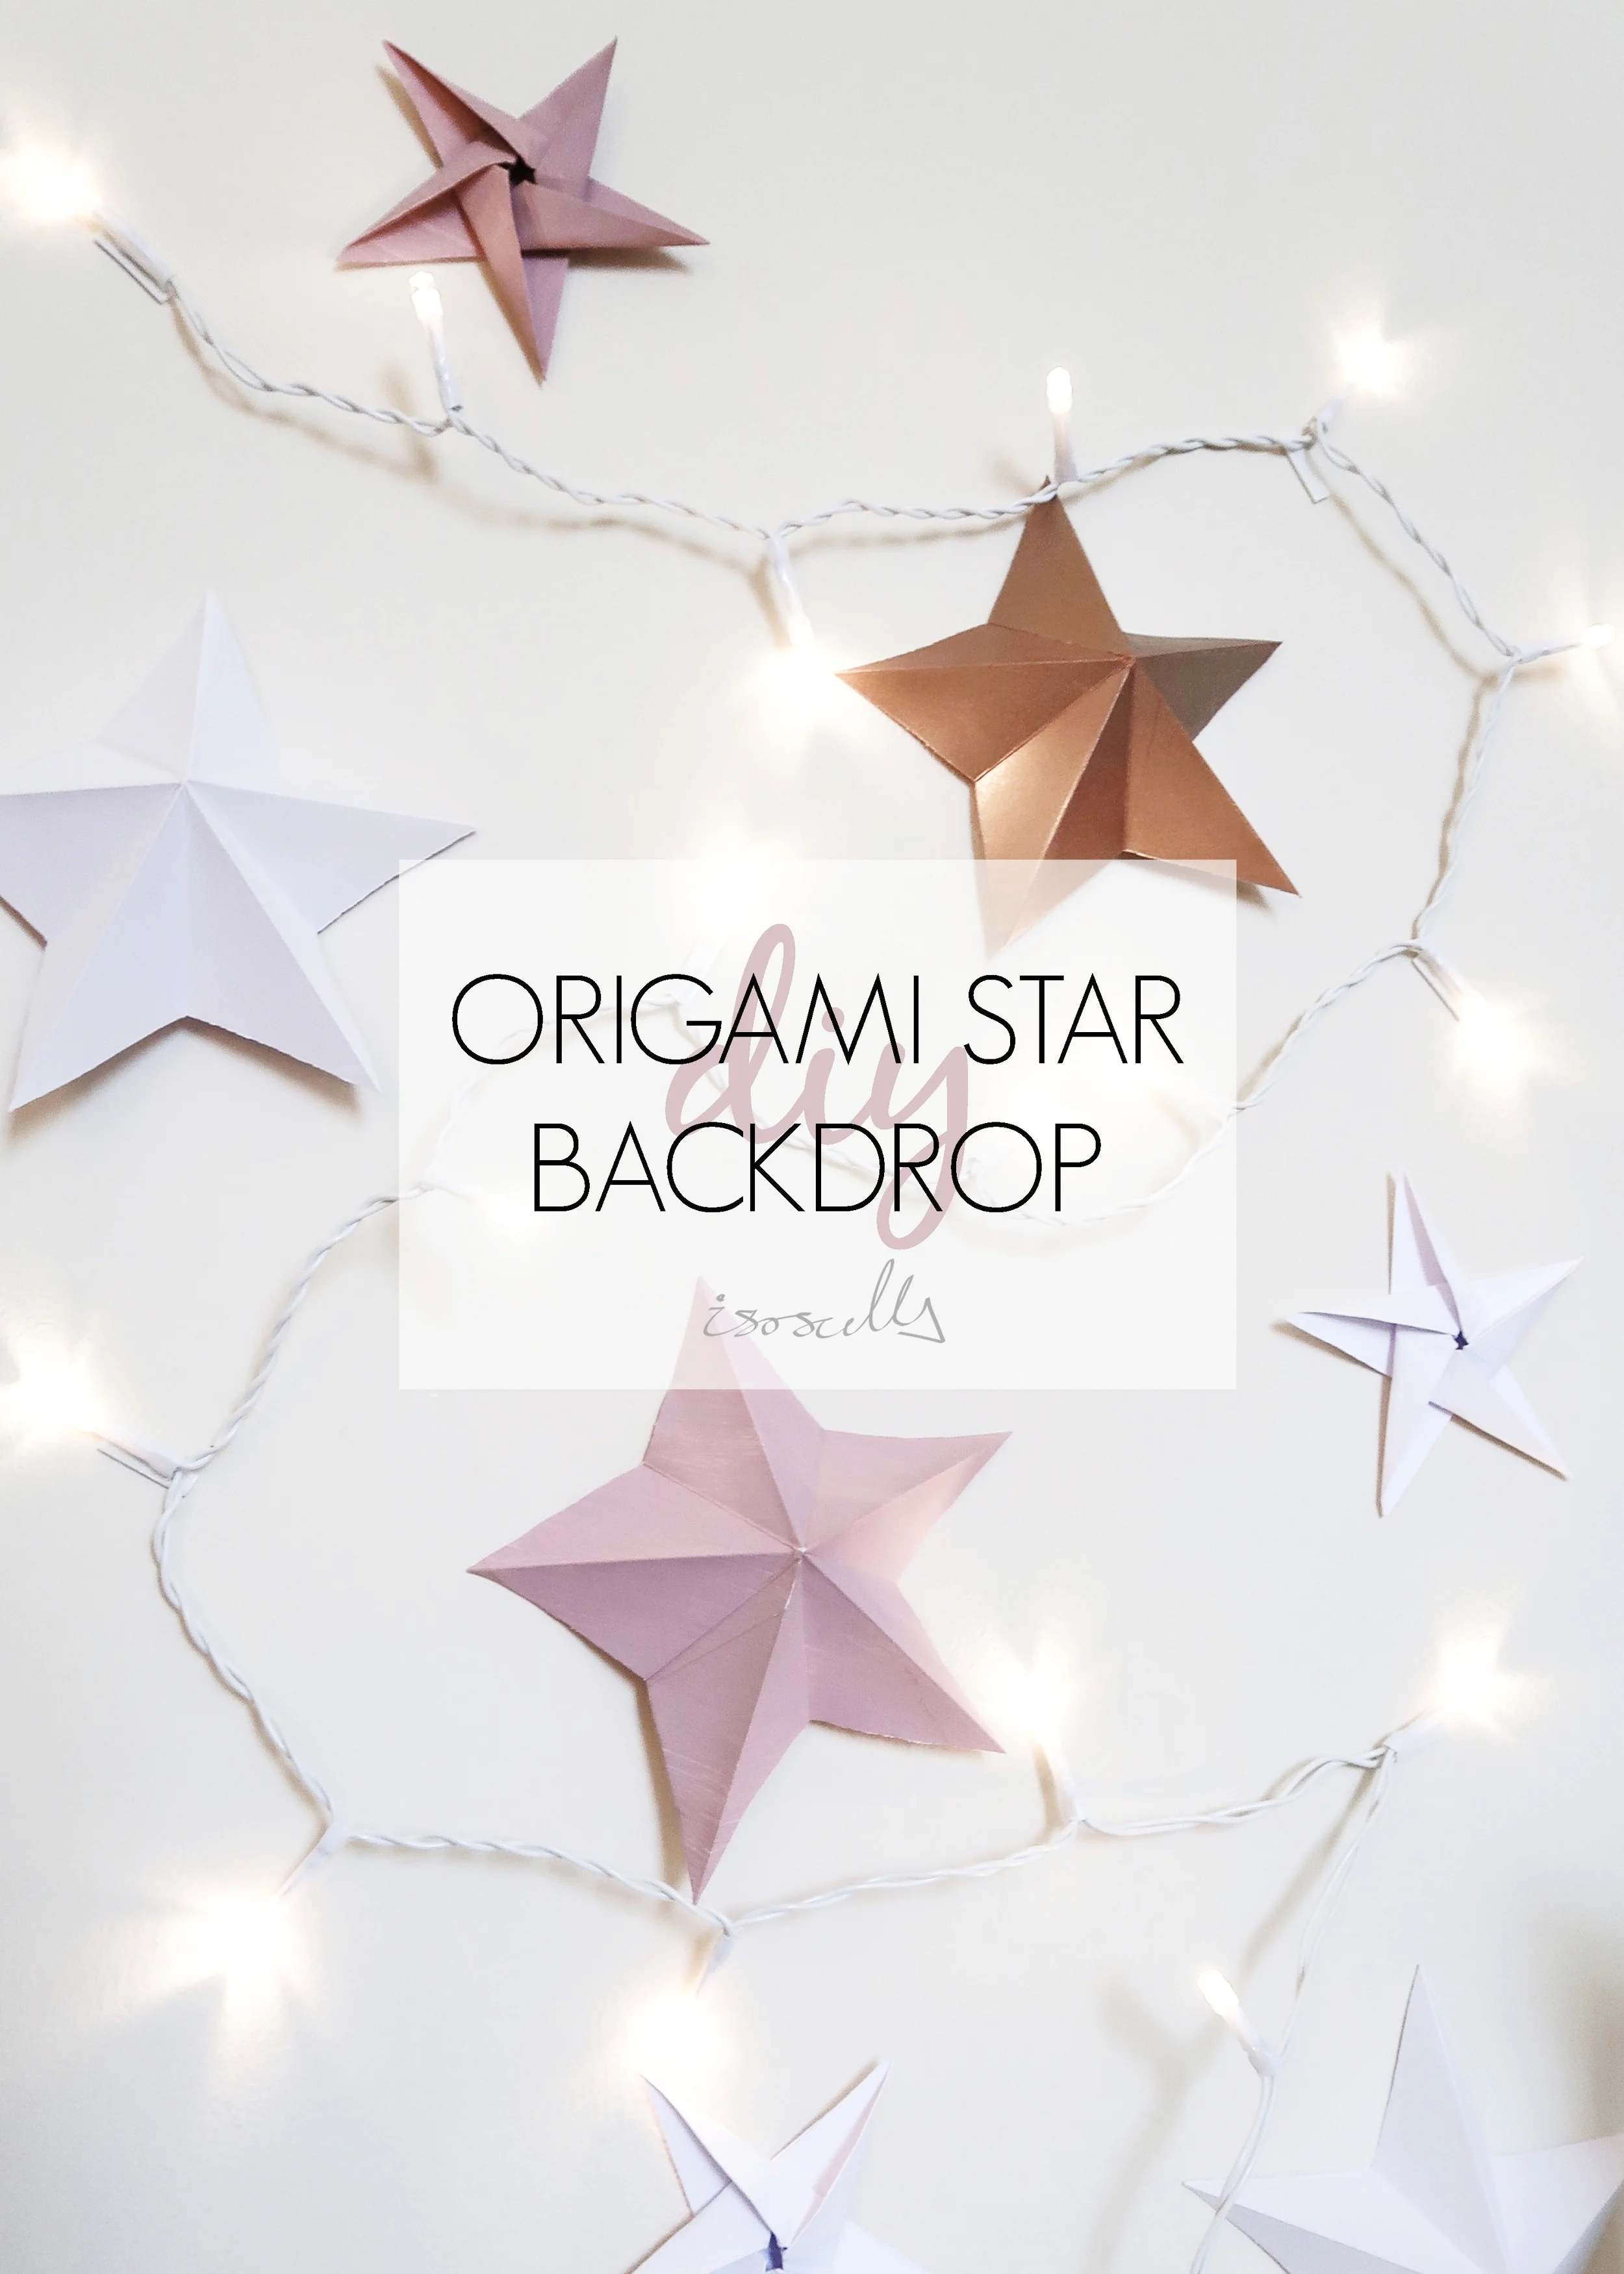
Christmas is over, which can only mean one thing; the new year is almost here and it's time to start decorating for those New Years Eve parties. If you're hosting this year, you're going to love these quick and cheap origami stars - perfect as a backdrop for your New Years table or as a backdrop for a homemade photo booth!

It may be just me but this year Christmas just seemed to fly by. I worked right up until the weekend before Christmas, did my usual mad present buying and wrapping dash over the weekend and then suddenly Christmas was here and in a blink of an eye it was gone. I absolutely loved having the time this year to make and fill our home with appropriately festive decor and was really pleased with how it all turned out. Although we usually try to keep our decorations up for 12 days after Christmas day (is that a thing with you too?), this year I am even more determined to keep them up because of the time and effort that I put into them. This does of course mean that our Christmas decor and New Years Eve decor need to go with one another somewhat and so when making this backdrop decided to continue with a similar colour theme; pink, white and copper. Keep reading to find out what I used and how I made them...

DIY Origami Star Backdrop by Isoscella
the What.jpg

Paper

Scissors

Dash.jpg
DIY Origami Star Backdrop by Isoscella
The How Header.jpg
DIY Origami Star Backdrop by Isoscella

1.

If it isn't already, cut your paper so that it is a perfect square. Next, fold the paper in half so that the coloured side is on the outside.

DIY Origami Star Backdrop by Isoscella

2.

With the fold at the top, take the bottom left corner and fold it so that the left side of the paper meets the top. Score and unfold. Repeat this with the top left corner so that the left side meets the bottom (open) side. Score and unfold.

DIY Origami Star Backdrop by Isoscella

3.

You now have a cross-shape on the left side of your paper. Bring the top right corner of the paper to the centre of this cross and fold.

DIY Origami Star Backdrop by Isoscella

4.

Now fold this newly created top layer in half so that its left edge lies adjacent to the right edge.

DIY Origami Star Backdrop by Isoscella

5.

Next, take the bottom left corner of the paper and fold it so that the bottom of the paper lies adjacent to the left side of the layer folded in Step 4.

DIY Origami Star Backdrop by Isoscella

6.

Turn the paper over and fold in half so that you end up with a multiple-layered and almost-triangle shape.
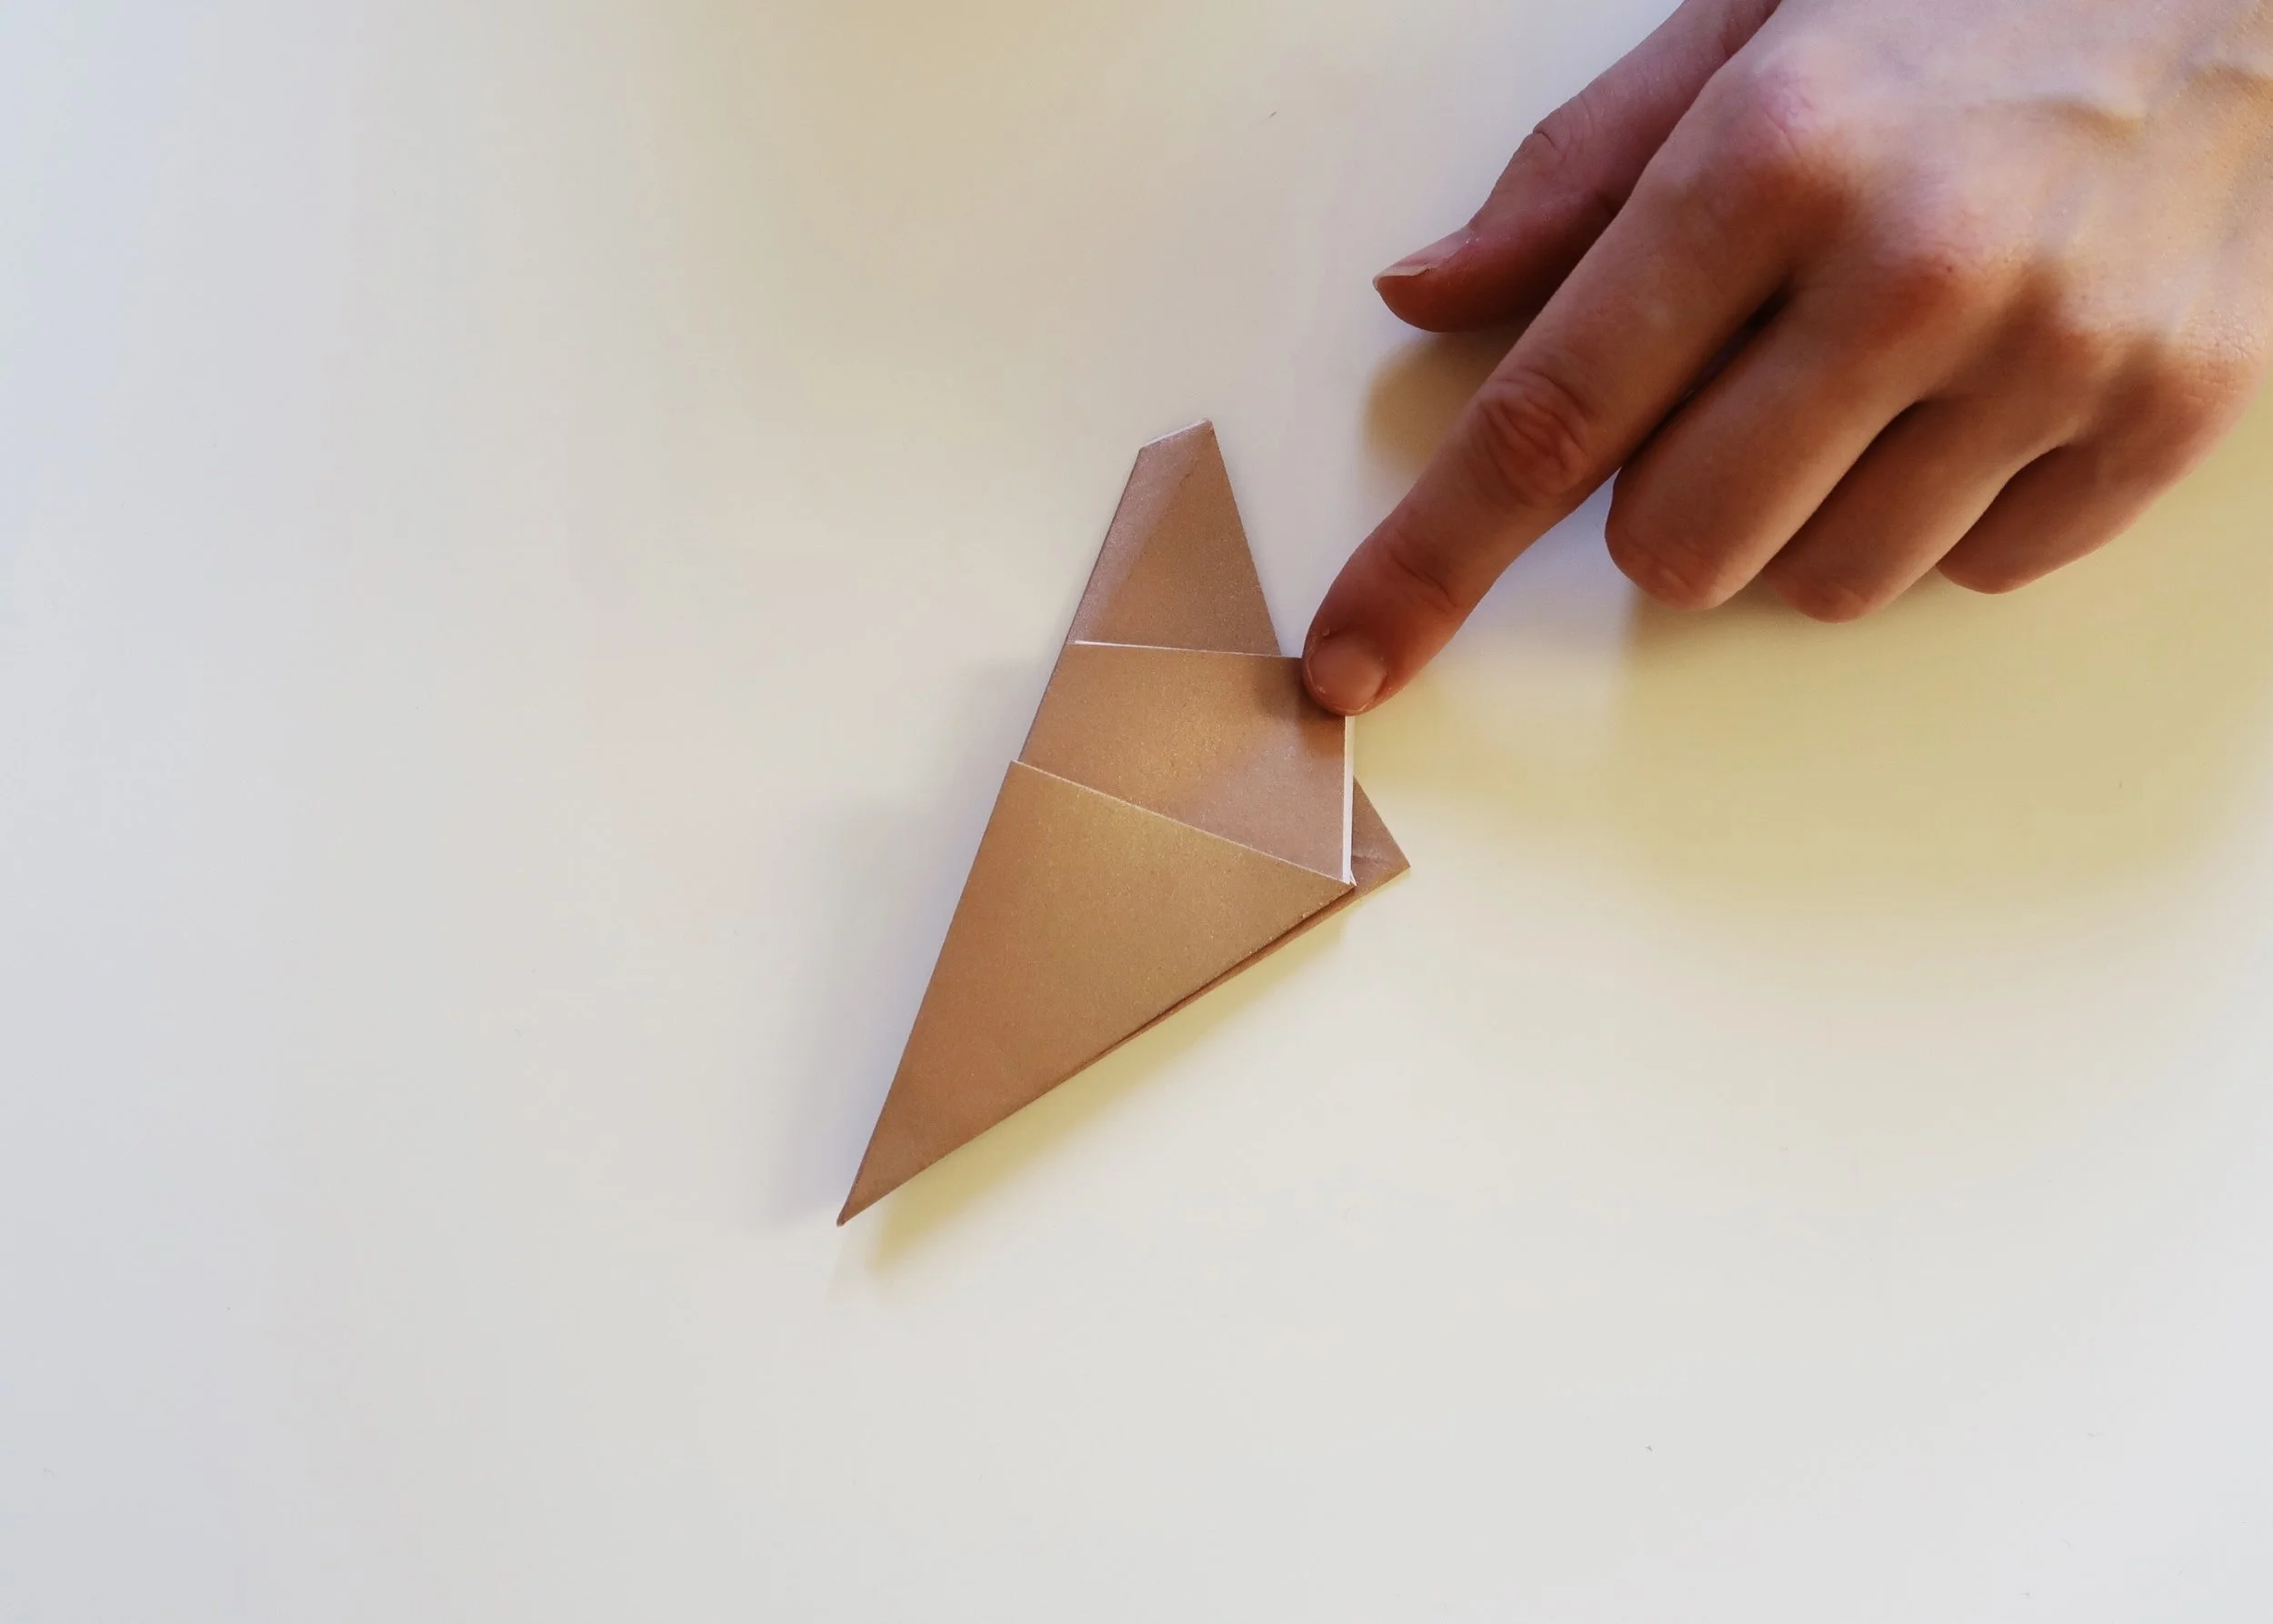
DIY Origami Star Backdrop by Isoscella

7.

Next, cut from the corner of the edge of the top layer in a straight line and at an angle away from the edge so that you end up with a folded triangle shape. Unfold this to reveal a star shape.
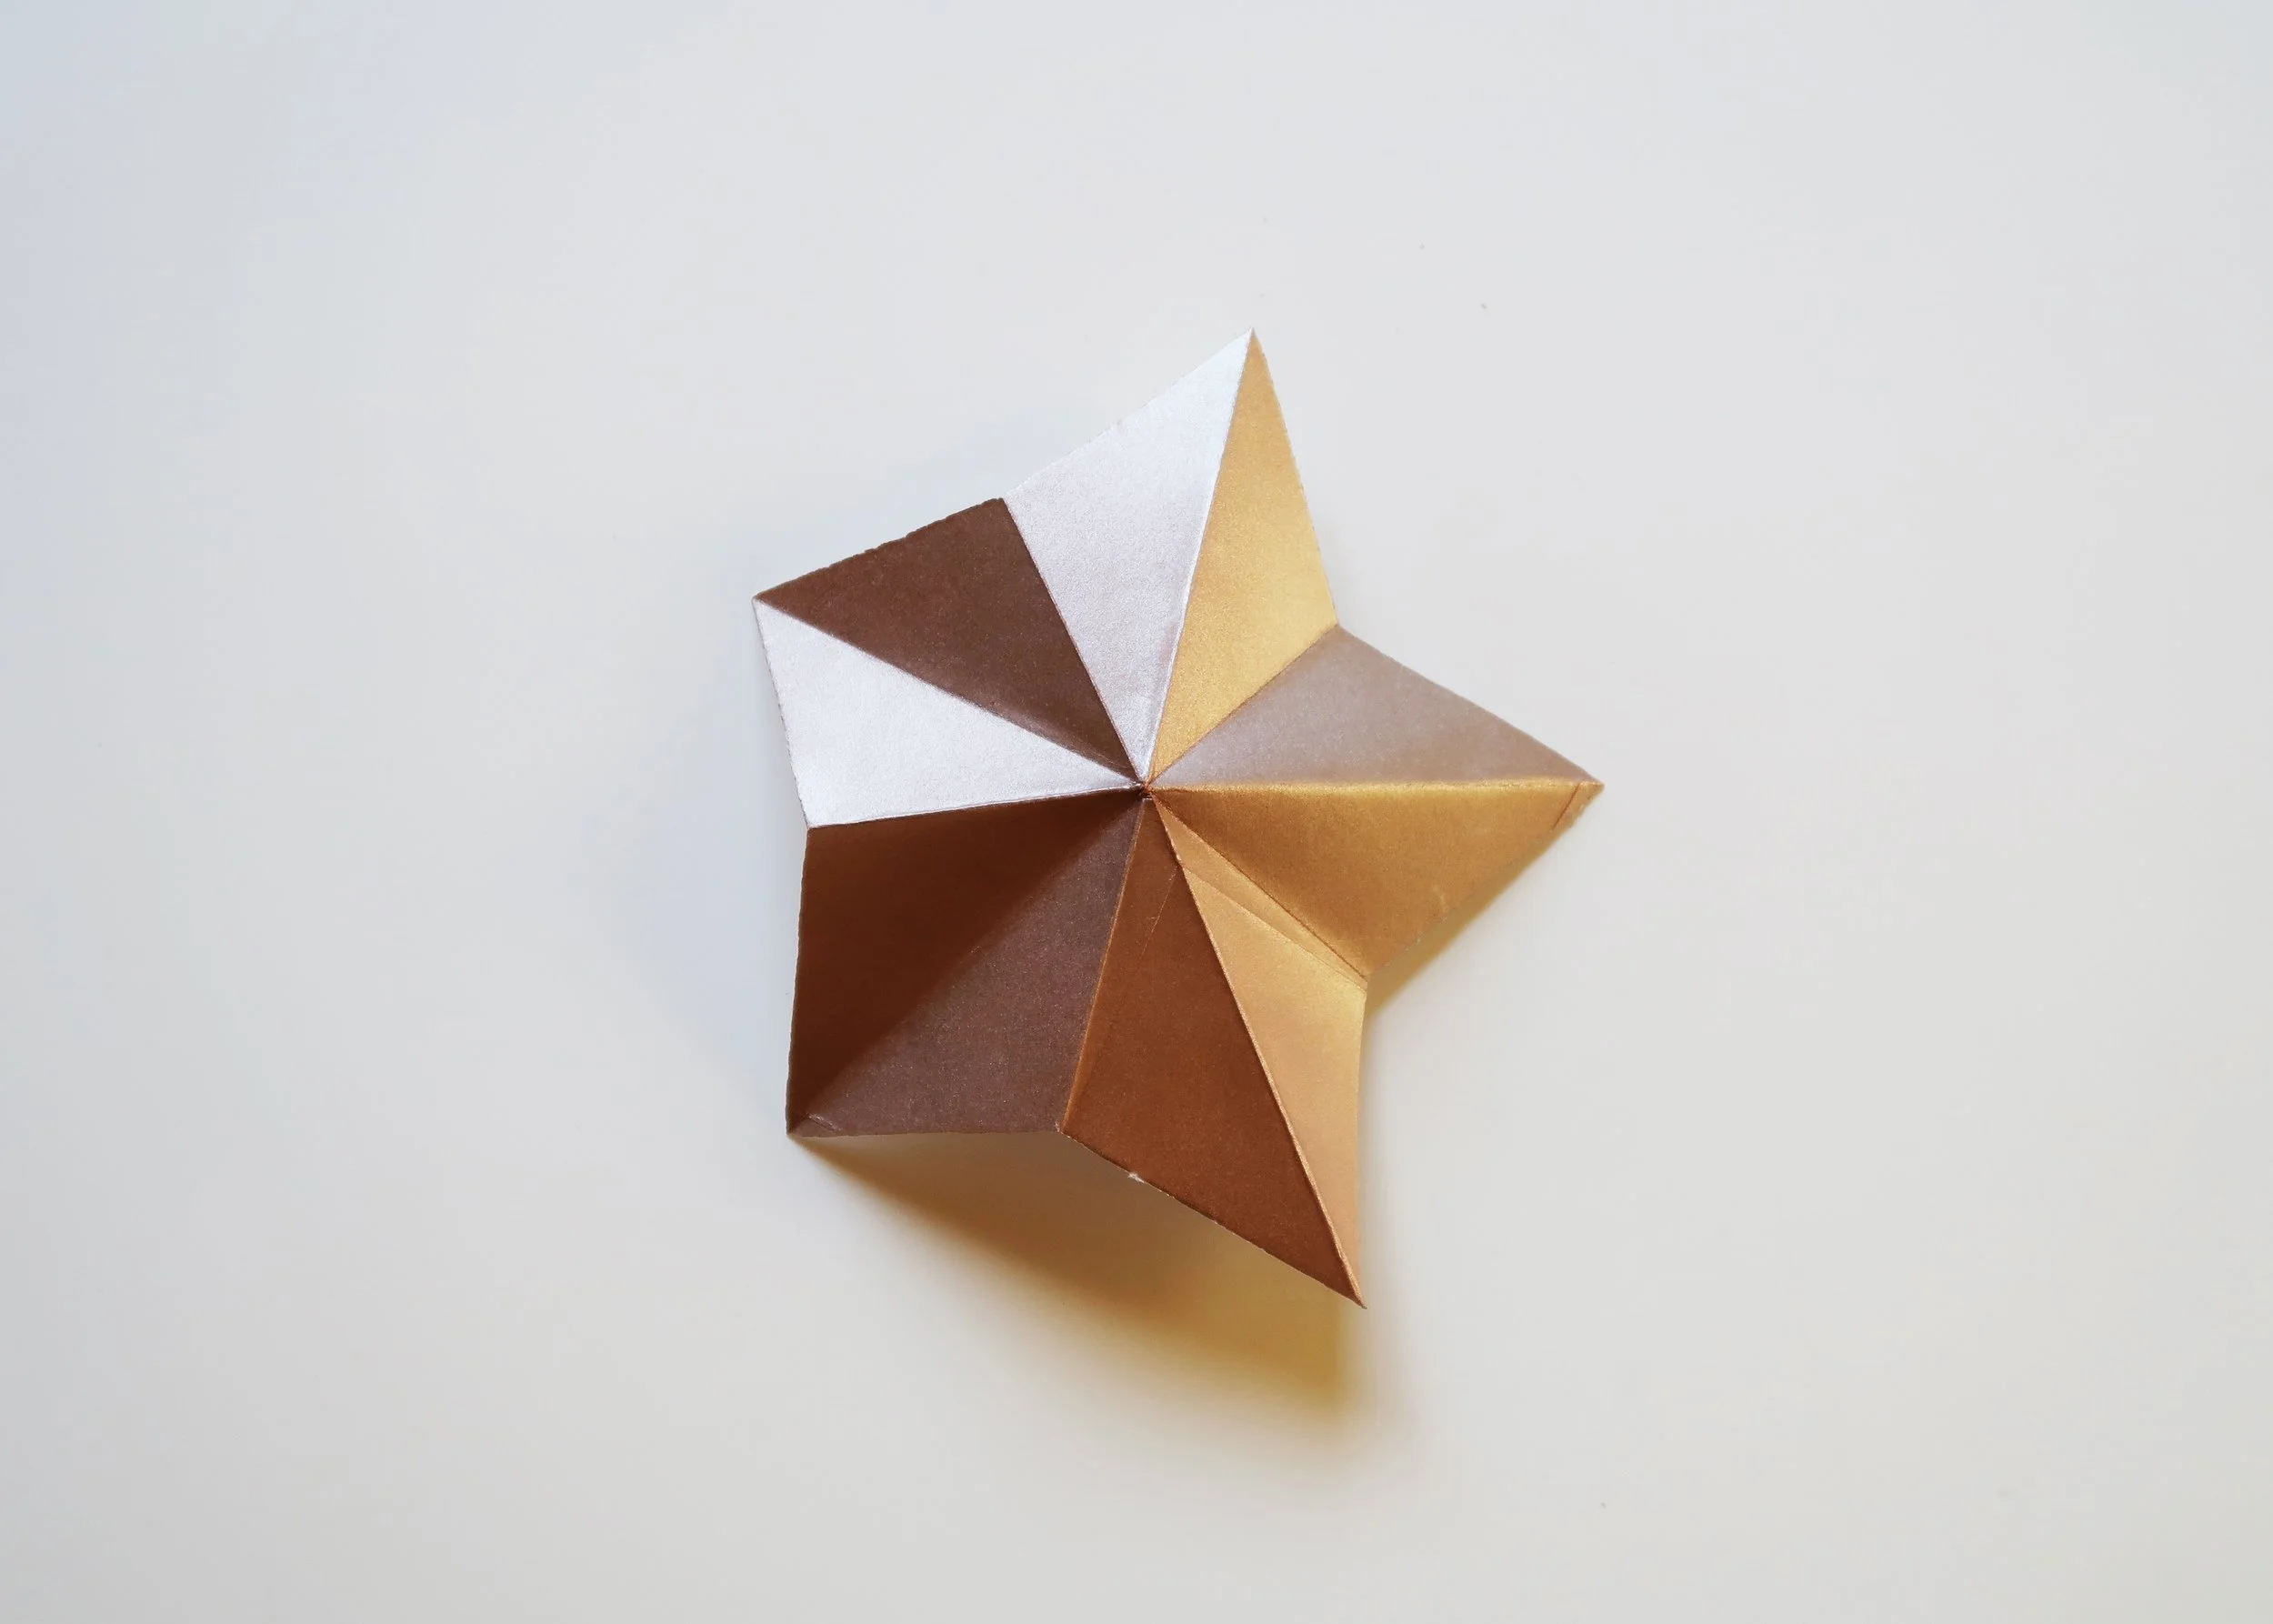
DIY Origami Star Backdrop by Isoscella

8.

Reinforce the folds on each point so that the points of the star stand up towards you whilst the folds in between go away from you. Finally, stick to your wall with masking tape to create a starry backdrop!

DIY Origami Star Backdrop by Isoscella

...AND THAT'S IT!

DIY Origami Star Backdrop by Isoscella

The other smaller stars in this backdrop were made slightly differently and were a little more complicated, however you can find a great step-by-step tutorial similar to how I made them here.

Happy New Year!

DIY Origami Star Backdrop by Isoscella
YOU MIGHT ALSO LIKE...
Mushroom Fairy Lights
16 December 2023
Mushroom Fairy Lights
16 December 2023
16 December 2023
3D Plaster Star Ornaments
9 December 2023
3D Plaster Star Ornaments
9 December 2023
9 December 2023
How to Make Christmas Decor with Toilet Rolls
2 December 2023
How to Make Christmas Decor with Toilet Rolls
2 December 2023
2 December 2023
Faux Stone Moon Ornaments
25 November 2023
Faux Stone Moon Ornaments
25 November 2023
25 November 2023
Minimal Christmas Tablescape
18 November 2023
Minimal Christmas Tablescape
18 November 2023
18 November 2023
Snowy Forest Boho Baubles
11 November 2023
Snowy Forest Boho Baubles
11 November 2023
11 November 2023
23 Christmas DIY Ideas
4 November 2023
23 Christmas DIY Ideas
4 November 2023
4 November 2023
Handmade Gift Box
24 December 2022
Handmade Gift Box
24 December 2022
24 December 2022
Slatted Wood Christmas Tree Skirt
17 December 2022
Slatted Wood Christmas Tree Skirt
17 December 2022
17 December 2022
Nordic House Gift Wrapping
14 December 2022
Nordic House Gift Wrapping
14 December 2022
14 December 2022
In DIY Tags home, new year
← DIY // FAVOURITE PROJECTS OF 2017 DIY // PAPER TREE ORNAMENTS →
 

Decorating, DIY-ing and doodling my way through life. Have a look around and let’s get creative!

>> FIND OUT MORE <<

No results found
Follow
The office is still one of my favourite transformations in the house! 😍

I started by panelling the wall with MDF strips and then painted the wall with a mix of colours. I used three IKEA drawer units for the base of the desk and then secured the de

ART

DIY

LIFE


THE LATEST

Featured
Wooden Mushroom Decor
26 April 2025
Wooden Mushroom Decor
26 April 2025
26 April 2025
Hand-Painted Floral Mural Arch
29 March 2025
Hand-Painted Floral Mural Arch
29 March 2025
29 March 2025
Easy IKEA Antilop Makeover
1 March 2025
Easy IKEA Antilop Makeover
1 March 2025
1 March 2025
Clay Leaf Shelf
29 June 2024
Clay Leaf Shelf
29 June 2024
29 June 2024
Nursery Feature Wall
15 June 2024
Nursery Feature Wall
15 June 2024
15 June 2024


THE GREATEST

Featured
DIY // IKEA LACK TABLE INDUSTRIAL HACK
22 September 2020
DIY
DIY // IKEA LACK TABLE INDUSTRIAL HACK
22 September 2020
DIY
22 September 2020
DIY
DIY // CLAY ALL-SEEING EYE MIRROR
14 August 2020
DIY
DIY // CLAY ALL-SEEING EYE MIRROR
14 August 2020
DIY
14 August 2020
DIY
DIY // CLAY FACE DISH
29 April 2020
DIY
DIY // CLAY FACE DISH
29 April 2020
DIY
29 April 2020
DIY
DIY // ABSTRACT ART FLORAL EGGS
25 March 2020
DIY
DIY // ABSTRACT ART FLORAL EGGS
25 March 2020
DIY
25 March 2020
DIY
DIY // WIRE FACE EARRINGS
16 February 2020
DIY
DIY // WIRE FACE EARRINGS
16 February 2020
DIY
16 February 2020
DIY

Follow
No results found
^^ BACK TO TOP
How does Monday come round so quick?!Wishing I could cosy up here today ✨

#mondaymood #storyofmyhome #mydailyhomesquare #interiordesign #budgetdiy #realstylishhomes #ourdiyhomes #femalediycollective #discoverunder5k #myhousethismonth #myhousedownsou
I&rsquo;ve got the day off today (woop!) and although it&rsquo;s not quite warm enough to sit out here yet, the sun is shining and I think a little walk to blow out the cobwebs is exactly what I need. Hope Monday is treating you well! ☀️

#summerdrea
Had such a lovely day seeing one of my besties and her adorable new baby that I completely forgot to share today&rsquo;s new blog post!

Head over to the blog for all the details of this easy DIY ring dish 🔝✨

#diy #diyhomedecor #diyhome #diyvalenti
That sunshine 👌🏻☀️

#mycosyhome #livingroomdecor #livingroominspo #mydiymydecor #homeobsessed #lovemydecor #homeinterioruk #discoverunder5k #diyhome #diyhomedecor #myhousethismonth #myhousedownsouth #realstylishhomes #ourdiyhomes #happythursday #in
A little corner our home on this chilly Tuesday morning ✨
.
.
#interior #homeobsessed #mycosyhome #homeinterioruk #instadecorating #homesofinstagram #happymonday #mondaymotivation #instainteriors #cornersofmyhome #myhousethismonth #myhousedownsouth #

Copyright 2021 isoscella. All rights reserved.

Powered by Squarespace