• ABOUT ME
    • PRIVACY POLICY
  • COLLABORATE
  • BLOG
    • ART
    • WEDDING
    • LIBRARY
    • DECOR
    • JEWELLERY
    • STATIONARY
    • NAIL ART
    • BAKING
    • CHRISTMAS
    • EASTER
    • ART PRINTS
    • WEDDING STATIONARY
  • CONTACT
Menu

ISOSCELLA

Street Address
City, State, Zip
Phone Number

Your Custom Text Here

ISOSCELLA

  • ABOUT
    • ABOUT ME
    • PRIVACY POLICY
  • COLLABORATE
  • BLOG
  • ART
    • ART
    • WEDDING
    • LIBRARY
  • DIY
    • DECOR
    • JEWELLERY
    • STATIONARY
    • NAIL ART
    • BAKING
    • CHRISTMAS
    • EASTER
  • SHOP
    • ART PRINTS
    • WEDDING STATIONARY
  • CONTACT

Selfie Station Sign

July 2, 2022 Isoscella M

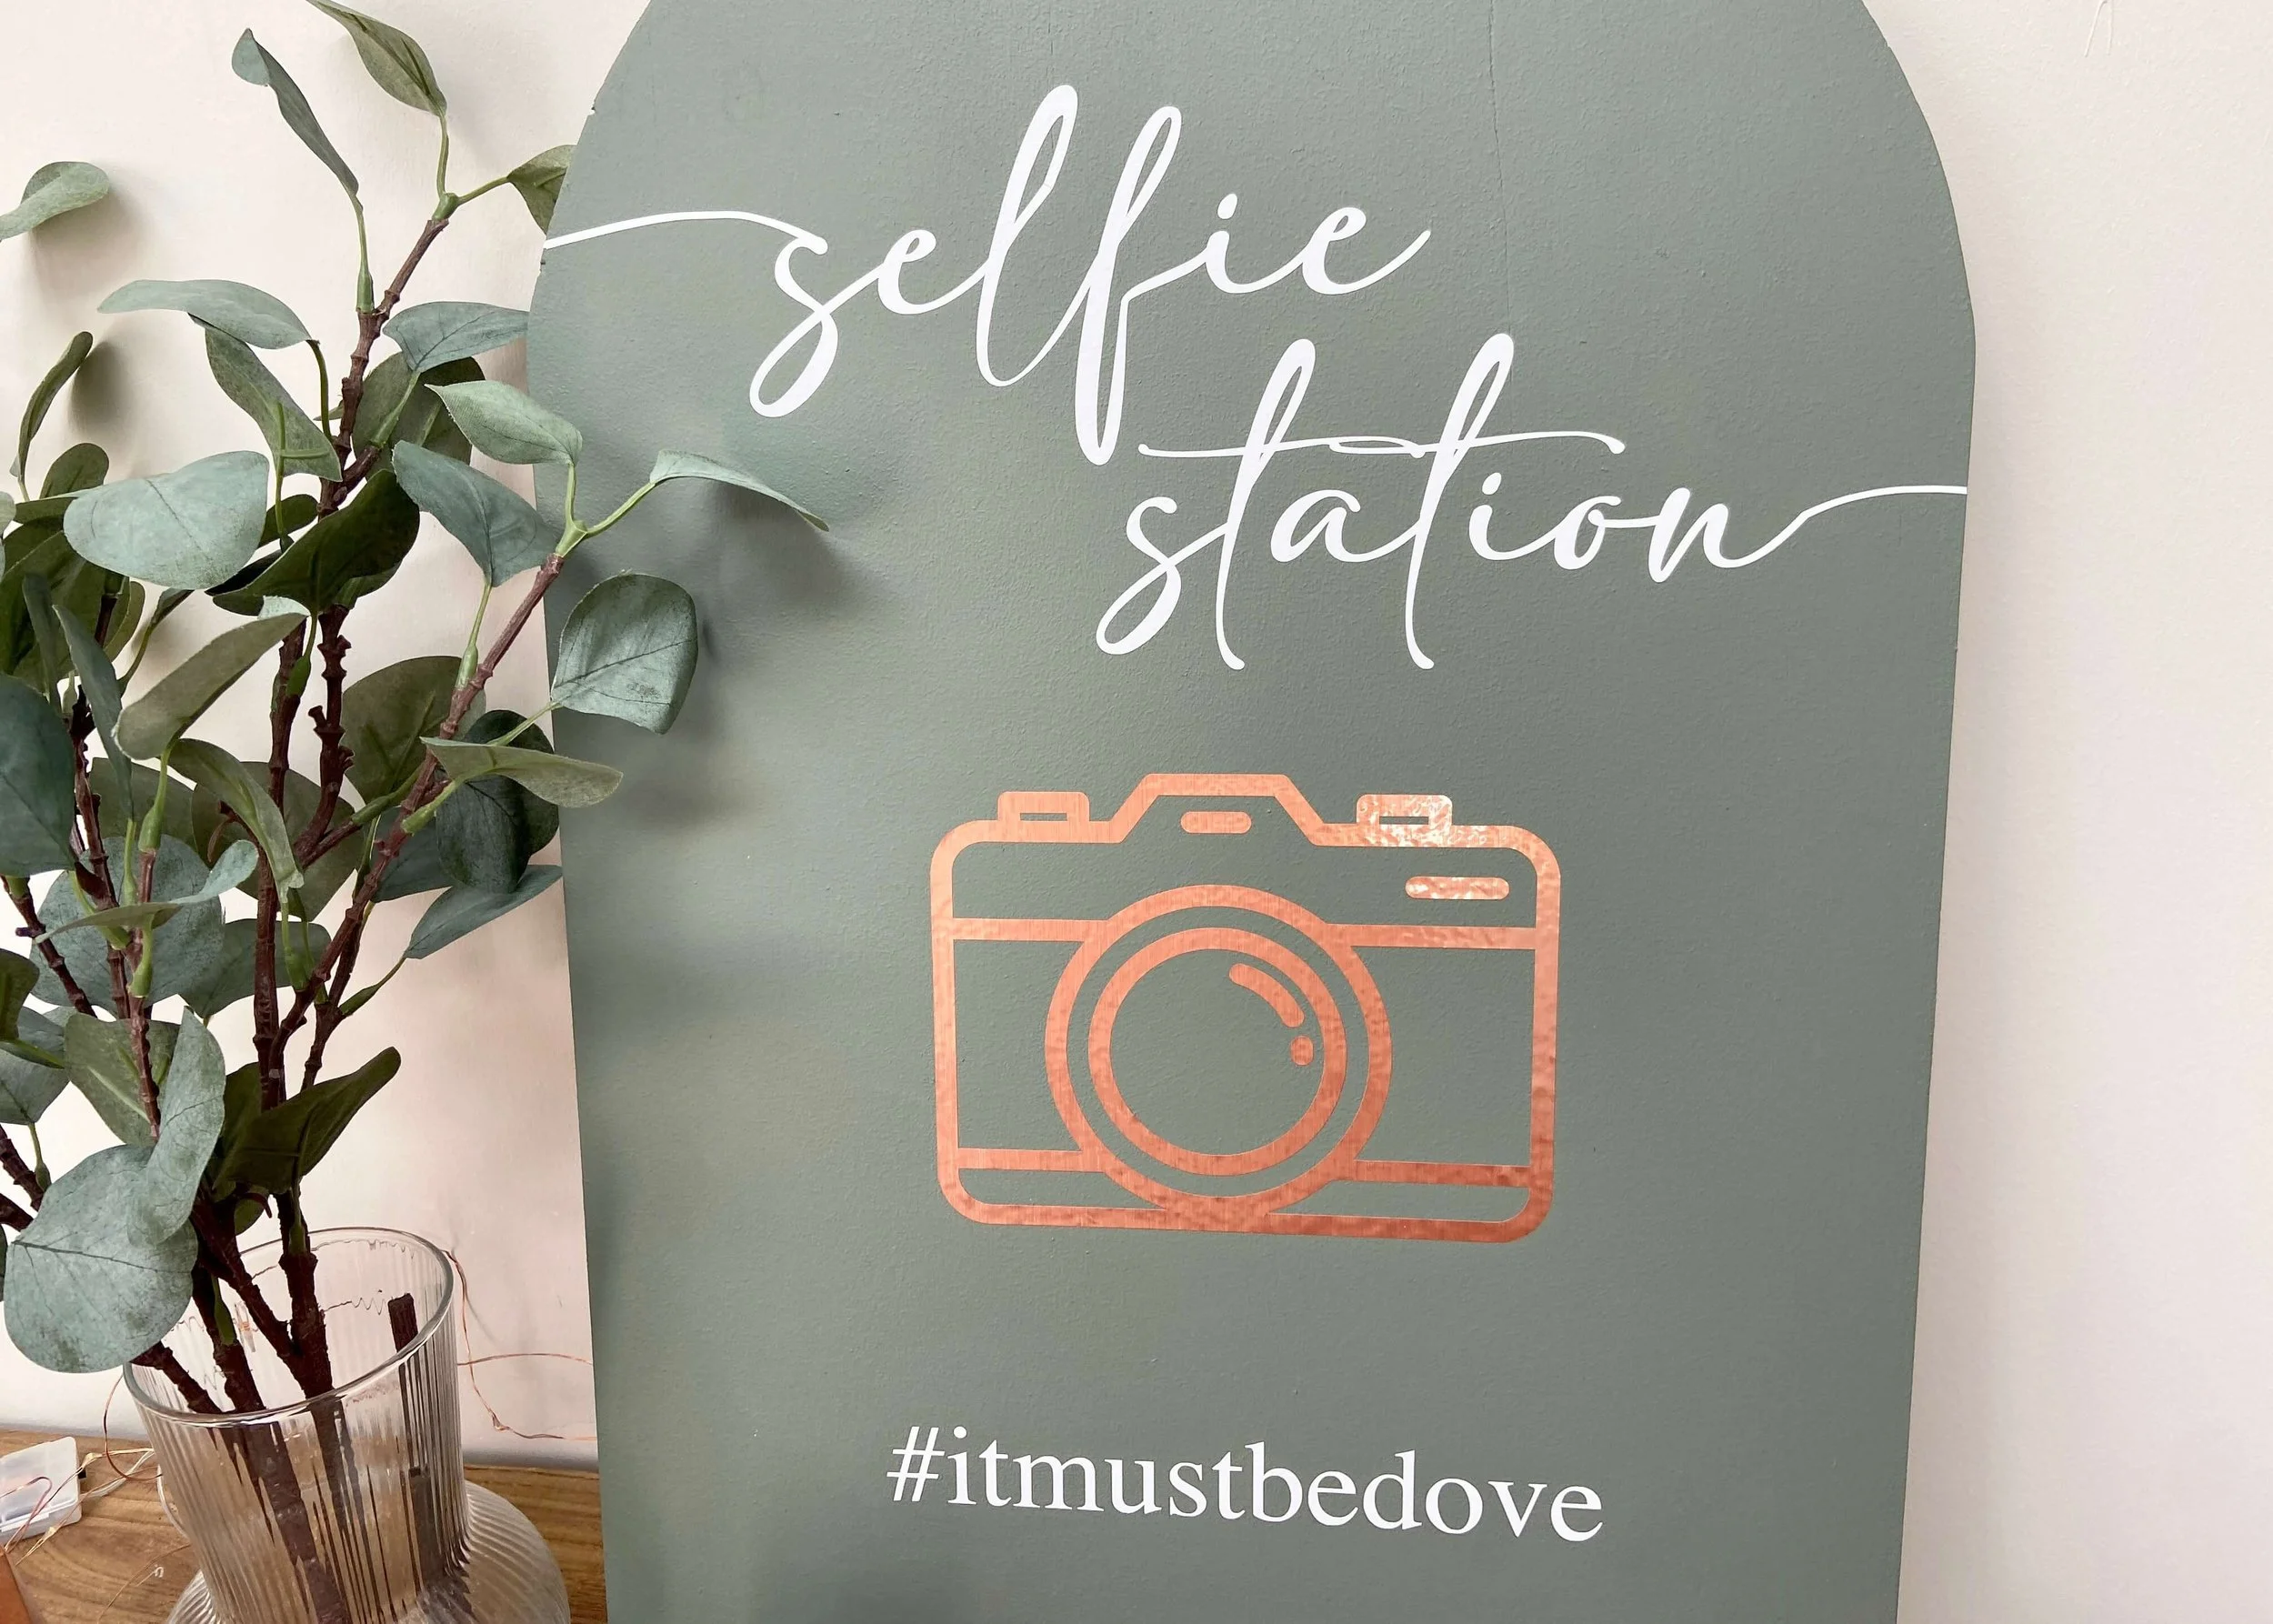
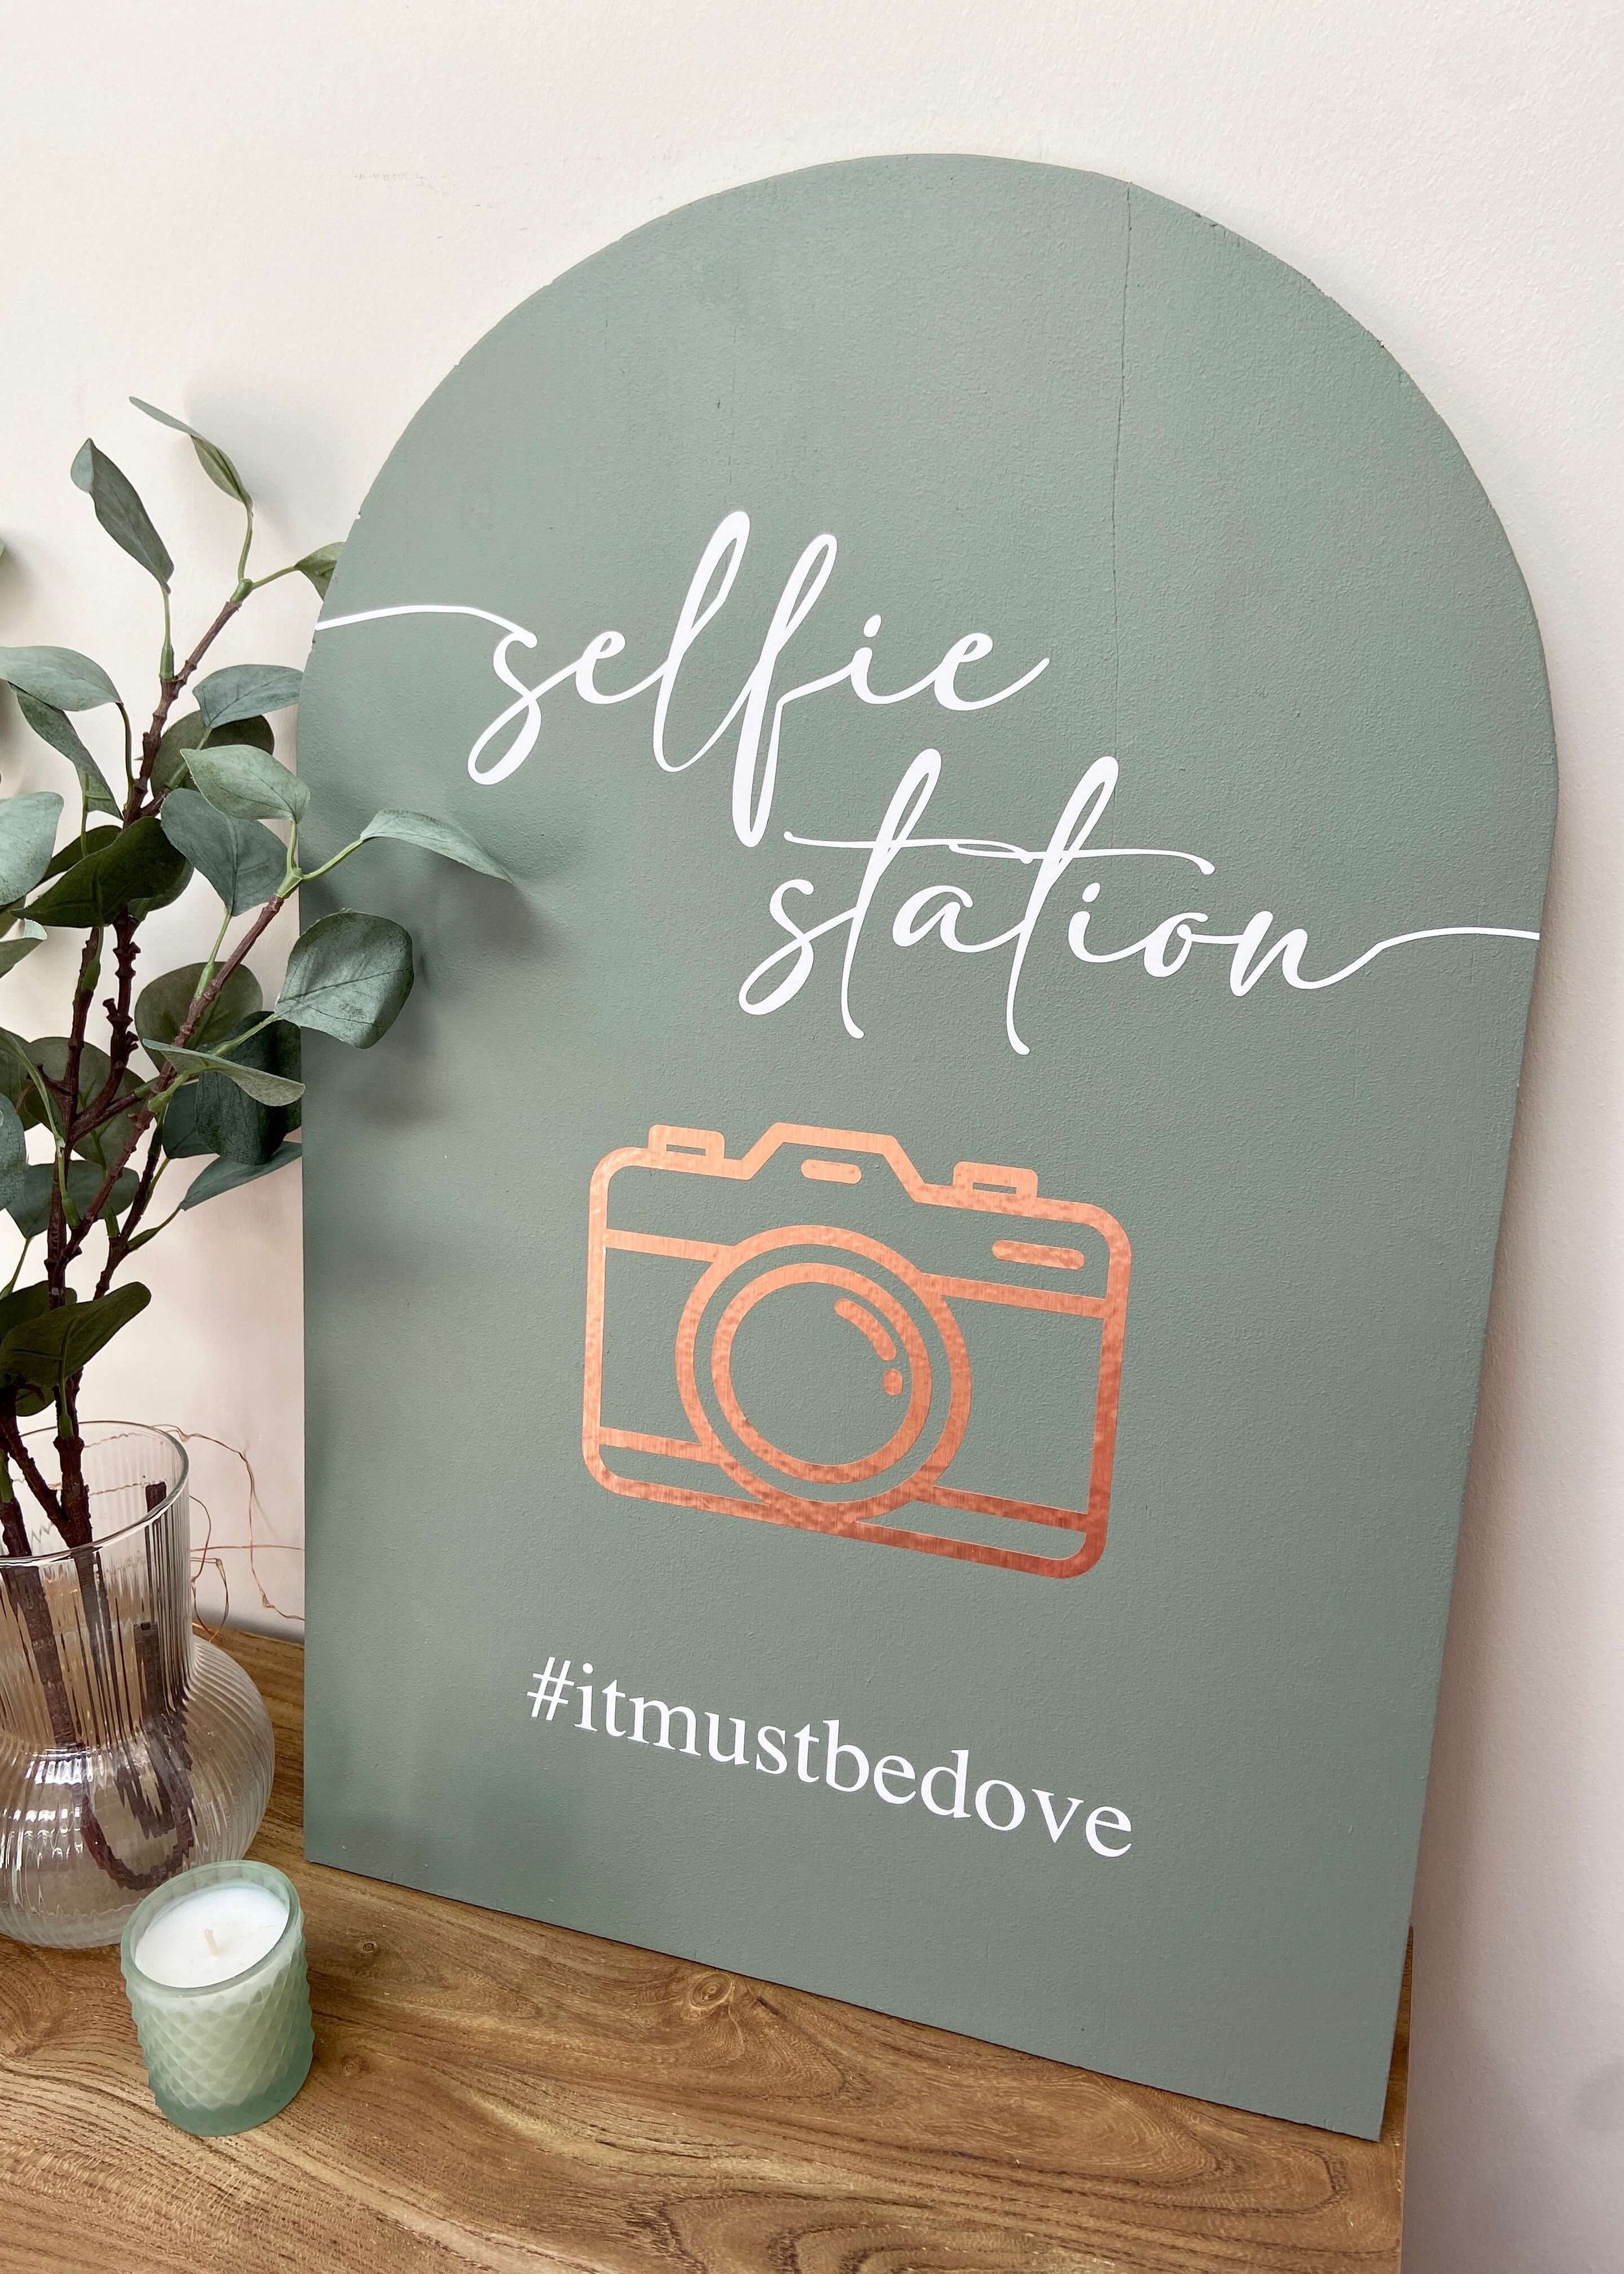
Make sure your guests know where to get their photo props and where to share their photos with this easy selfie station sign!

Every party or occasion has photos, and if you’ve got photo props or a beautiful backdrop, you want your guests to know to use it. With my wedding coming up, I wanted a pretty way of telling guests where to get their props, to take photos and then where to share them, and so I decided to use some scrap wood I had lying around to make an eye-catching large arched sign. Being made from wood it’s heavy enough to just be propped up on a table against the wall, and I chose colours that not only go with our colour scheme, but will also stand out beautifully against the flint wall it’ll be leaning against. I’ll be sure to share photos of all my creations in place from the day, but in the meantime I’ve just propped it up against a wall on the sideboard in my dining room. I created the text and image vinyls from a font I bought from SaltyInkFonts called ‘Sophisticated’ and found a free stock image that I converted into a cut file myself in Cricut. If you want to make this, and don’t want the faff of making your own cut files, then head to my shop where you can find digital downloads of the SVG’s that I made and used. Keep reading to find out what I used and how I made my wedding welcome sign…

Wood sheet

Sandpaper

Wood saw

Wood primer

Permanent vinyl

Cricut Maker

Light Grip Mat

Cricut Basic Tools

1.

First of all, measure and cut your wood sheet to size. You can get this done in stores like B&Q or you can do it yourself with a wood saw - just be super careful!

2.

To draw the arched top, measure out and draw a centreline down the wood sheet. Then tie a piece of string around your pencil and hold the other end on this centre point at a distance from the pencil that is the same as half the wood sheet. Hold the pencil lead down and swing it around with the thread taught between the pencil and your finger to create the arch.

3.

Next you want to remove the wood above this arched line. To do this, you’ll either want to use a jigsaw, a multi-tool or a coping saw. A coping saw is different to the one I used here, which is far from ideal for a curve and made my life a lot harder. Learn from my mistake and get yourself a coping saw!

4.

Use a sanding block with some sandpaper or an electronic sander to smooth the edges and remove any splinters,

5.

Paint a layer of wood primer all over to prevent your wood (especially if it’s MDF) warping or expanding.

6.

Once the primer is dry, paint a coat of your chosen paint colour all over. Be sure to let it dry and then give it a light sanding.

7.

Once dry, paint a second coat all over and leave to dry thoroughly.

8.

Use the measurements of your sign to create a template in Cricut Design Studio, and use your chosen font/images to create your sign details. You can find mine available in my shop here.

9.

Use your Cricut to cut these details out of permanent vinyl. I used the rotary blade, with vinyl selected as the material and the default pressure.

10.

Once your sign details are cut out, use the Cricut basic tool set, specifically the weeding tool, to remove the excess vinyl.

11.

Before transferring or sticking anything on your sign, do a dry fit and make sure you’re happy with sizing and placement.

12.

Finally, use transfer tape or masking tape to transfer your vinyl to the sign. Be sure to use the scraper tool to ensure the vinyl is properly stuck to the sign. If you plan on having your sign outside, you may want to give it a coat of a sealer.

…AND THAT’S IT!

this is the alt text
YOU MIGHT ALSO LIKE...
Minimal Floral Resin Tree Ornaments
Nov 26, 2022
Minimal Floral Resin Tree Ornaments
Nov 26, 2022
Nov 26, 2022
Autumn Wedding Place Names
Nov 5, 2022
Autumn Wedding Place Names
Nov 5, 2022
Nov 5, 2022
Selfie Station Sign
Jul 2, 2022
Selfie Station Sign
Jul 2, 2022
Jul 2, 2022
Acrylic Table Name Signs
Jun 28, 2022
Acrylic Table Name Signs
Jun 28, 2022
Jun 28, 2022
Copper Pipe Wedding Arch
Jun 12, 2022
Copper Pipe Wedding Arch
Jun 12, 2022
Jun 12, 2022
DIY Wood Cake Topper
Jun 4, 2022
DIY Wood Cake Topper
Jun 4, 2022
Jun 4, 2022
Wedding Welcome Sign
May 28, 2022
Wedding Welcome Sign
May 28, 2022
May 28, 2022
Wedding Directions Sign
May 14, 2022
Wedding Directions Sign
May 14, 2022
May 14, 2022
Wedding Card Box
Apr 30, 2022
Wedding Card Box
Apr 30, 2022
Apr 30, 2022
Minimal Eucalyptus Wedding Invite
Mar 12, 2022
Minimal Eucalyptus Wedding Invite
Mar 12, 2022
Mar 12, 2022
In DIY Tags wedding
← Moroccan-Inspired MirrorAcrylic Table Name Signs →
 

Decorating, DIY-ing and doodling my way through life. Have a look around and let’s get creative!

>> FIND OUT MORE <<

Follow
The office is still one of my favourite transformations in the house! 😍

I started by panelling the wall with MDF strips and then painted the wall with a mix of colours. I used three IKEA drawer units for the base of the desk and then secured the de

ART

DIY

LIFE


THE LATEST

Featured
Wooden Mushroom Decor
Apr 26, 2025
Wooden Mushroom Decor
Apr 26, 2025
Apr 26, 2025
Hand-Painted Floral Mural Arch
Mar 29, 2025
Hand-Painted Floral Mural Arch
Mar 29, 2025
Mar 29, 2025
Easy IKEA Antilop Makeover
Mar 1, 2025
Easy IKEA Antilop Makeover
Mar 1, 2025
Mar 1, 2025
Clay Leaf Shelf
Jun 29, 2024
Clay Leaf Shelf
Jun 29, 2024
Jun 29, 2024
Nursery Feature Wall
Jun 15, 2024
Nursery Feature Wall
Jun 15, 2024
Jun 15, 2024


THE GREATEST

Featured
DIY // IKEA LACK TABLE INDUSTRIAL HACK
Sep 22, 2020
DIY
DIY // IKEA LACK TABLE INDUSTRIAL HACK
Sep 22, 2020
DIY
Sep 22, 2020
DIY
DIY // CLAY ALL-SEEING EYE MIRROR
Aug 14, 2020
DIY
DIY // CLAY ALL-SEEING EYE MIRROR
Aug 14, 2020
DIY
Aug 14, 2020
DIY
DIY // CLAY FACE DISH
Apr 29, 2020
DIY
DIY // CLAY FACE DISH
Apr 29, 2020
DIY
Apr 29, 2020
DIY
DIY // ABSTRACT ART FLORAL EGGS
Mar 25, 2020
DIY
DIY // ABSTRACT ART FLORAL EGGS
Mar 25, 2020
DIY
Mar 25, 2020
DIY
DIY // WIRE FACE EARRINGS
Feb 16, 2020
DIY
DIY // WIRE FACE EARRINGS
Feb 16, 2020
DIY
Feb 16, 2020
DIY

Follow
^^ BACK TO TOP
How does Monday come round so quick?!Wishing I could cosy up here today ✨

#mondaymood #storyofmyhome #mydailyhomesquare #interiordesign #budgetdiy #realstylishhomes #ourdiyhomes #femalediycollective #discoverunder5k #myhousethismonth #myhousedownsou
I&rsquo;ve got the day off today (woop!) and although it&rsquo;s not quite warm enough to sit out here yet, the sun is shining and I think a little walk to blow out the cobwebs is exactly what I need. Hope Monday is treating you well! ☀️

#summerdrea
Had such a lovely day seeing one of my besties and her adorable new baby that I completely forgot to share today&rsquo;s new blog post!

Head over to the blog for all the details of this easy DIY ring dish 🔝✨

#diy #diyhomedecor #diyhome #diyvalenti
That sunshine 👌🏻☀️

#mycosyhome #livingroomdecor #livingroominspo #mydiymydecor #homeobsessed #lovemydecor #homeinterioruk #discoverunder5k #diyhome #diyhomedecor #myhousethismonth #myhousedownsouth #realstylishhomes #ourdiyhomes #happythursday #in
A little corner our home on this chilly Tuesday morning ✨
.
.
#interior #homeobsessed #mycosyhome #homeinterioruk #instadecorating #homesofinstagram #happymonday #mondaymotivation #instainteriors #cornersofmyhome #myhousethismonth #myhousedownsouth #

Copyright 2021 isoscella. All rights reserved.

Powered by Squarespace