• ABOUT ME
    • PRIVACY POLICY
  • COLLABORATE
  • BLOG
    • ART
    • WEDDING
    • LIBRARY
    • DECOR
    • JEWELLERY
    • STATIONARY
    • NAIL ART
    • BAKING
    • CHRISTMAS
    • EASTER
    • ART PRINTS
    • WEDDING STATIONARY
  • CONTACT
Menu

ISOSCELLA

Street Address
City, State, Zip
Phone Number

Your Custom Text Here

ISOSCELLA

  • ABOUT
    • ABOUT ME
    • PRIVACY POLICY
  • COLLABORATE
  • BLOG
  • ART
    • ART
    • WEDDING
    • LIBRARY
  • DIY
    • DECOR
    • JEWELLERY
    • STATIONARY
    • NAIL ART
    • BAKING
    • CHRISTMAS
    • EASTER
  • SHOP
    • ART PRINTS
    • WEDDING STATIONARY
  • CONTACT

NAIL ART // SPOOKTACULAR NAILS

October 30, 2015 isoscella

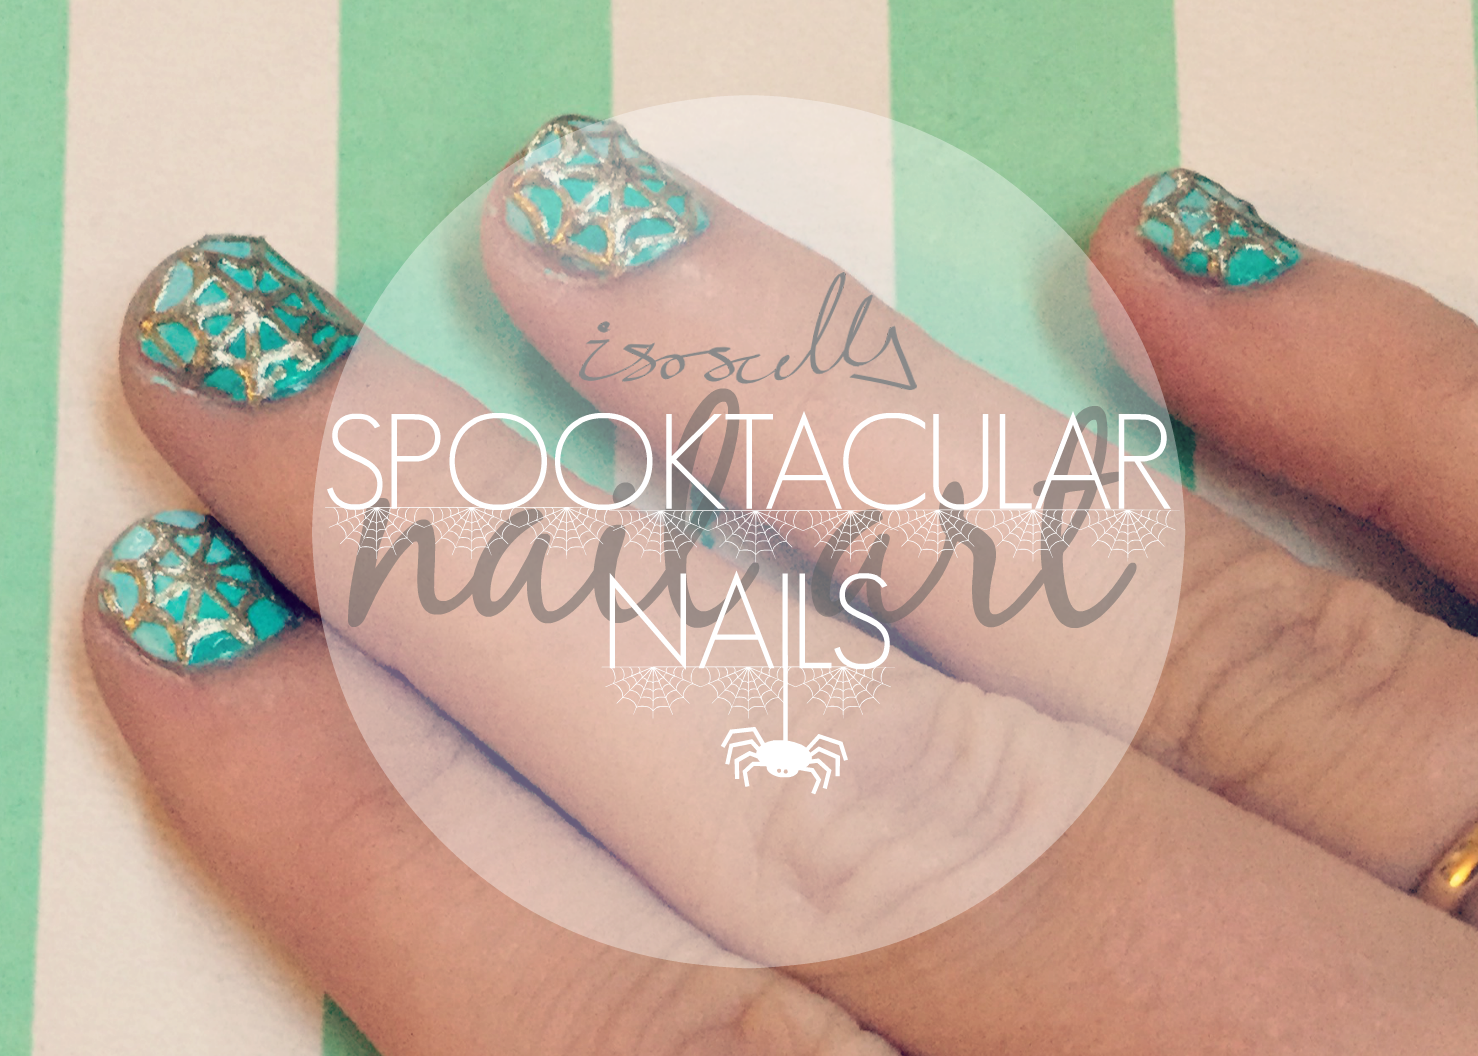
It's almost halloween which means it's time for me to sort out my nails and get them looking less ghastly and more spooktacular. I'm really not a fan of blood and gore and so I really struggled to come up with a halloween-related design for my nails this year. I'm loving the Snow Queen look (probably because it's more festive than it is spooky...) and so I thought I would go with a bit of an icey theme. This definitely inspired my choice of colours, however whilst I was looking for inspiration, I stumbled across this beautiful photograph of a spiders web. I intended to add 'dew drops' like those in the photo but in the end I decided that I quite liked the nail design as it was.

1. Paint all over with a base coat and leave to dry. Here, I used the Sally Hansen Double Duty Base and Top Coat.

2. Paint the bottom half of the nail with mint green and the top half of the nail with a light blue. For this I used Barry M Gelly Hi-Shine nail varnishes in Green Berry and Sugar Apple. I did one nail at a time and used a brush to blend the two colours together slightly as I went.

3. Draw a line down the middle of the nail from top to bottom and a line across the middle of the nail from left to right. For this I used a nail art pen that I bought ages ago from New Look but you could also do this with a pot of nail varnish and a thin paintbrush.

4. Draw a line across from the top left of the nail to the bottom right and the top right to the bottom left. Here, I made sure that each line went through intersection where the lines I had drawn in step 3 crossed over one another.

5. Connect each line with a curved line approximately halfway down. Here, I found it helpful to draw over the line slightly at each end of the curved line.

6. Repeat this closer to the edges of the nail. As in step 5, connect each line with a curved line in the space between the curved lines created in step 6 and the edge of the nail.

7. Once dry, paint all over the whole nail with a clear top coat to protect your hard work! For this I once again used my Sally Hansen Double Duty Base and Top Coat.

AND THAT'S IT!

Let me know what you think and what you're up to for halloween in the comments below.

Happy Halloweeen!

♥

YOU MIGHT ALSO LIKE...
DIY // 6 PUMPKIN PROJECTS
Oct 31, 2018
DIY // 6 PUMPKIN PROJECTS
Oct 31, 2018
Oct 31, 2018
DIY // FALLING LEAVES NO-CARVE PUMPKIN
Oct 23, 2018
DIY // FALLING LEAVES NO-CARVE PUMPKIN
Oct 23, 2018
Oct 23, 2018
DIY // NO CARVE VINTAGE PUMPKINS
Oct 31, 2017
DIY // NO CARVE VINTAGE PUMPKINS
Oct 31, 2017
Oct 31, 2017
DIY // HALLOWEEN HAND-LETTERED PUMPKIN
Oct 30, 2016
DIY // HALLOWEEN HAND-LETTERED PUMPKIN
Oct 30, 2016
Oct 30, 2016
DIY // GLITTER PUMPKIN
Oct 29, 2016
DIY // GLITTER PUMPKIN
Oct 29, 2016
Oct 29, 2016
DIY // SPRAY-PAINTED PUMPKINS
Oct 29, 2016
DIY // SPRAY-PAINTED PUMPKINS
Oct 29, 2016
Oct 29, 2016
NAIL ART // SPOOKTACULAR NAILS
Oct 30, 2015
NAIL ART // SPOOKTACULAR NAILS
Oct 30, 2015
Oct 30, 2015
DIY // NO-MESS MUMPKINS
Oct 26, 2015
DIY // NO-MESS MUMPKINS
Oct 26, 2015
Oct 26, 2015
5 FAVES FRIDAY // CLASSY CRAFTOWEEN
Oct 23, 2015
5 FAVES FRIDAY // CLASSY CRAFTOWEEN
Oct 23, 2015
Oct 23, 2015
In DIY Tags nail art, halloween
Comment

DIY // NO-MESS MUMPKINS

October 26, 2015 isoscella

Hello! I'm writing this from my 'sick bed' and feeling very sorry for myself today as I seem to have contracted an evil lurgy. It's not unusual for me to be poorly at this time of year; as soon as the winter comes knocking on my front door, my immune system gets up and leaves the building (what a traitor!). Before my immune system abandoned me though, I did manage to squeeze in a craftoween project that I'd been wanting to do for a while. If you follow me on Pinterest, you may have seen how obsessed I am with 'no-carve pumpkins' and so I thought I would share with you a few photos of my own 'no-mess mumpkins'.

Read more
In DIY Tags halloween, home, autumn
Comment

5 FAVES FRIDAY // CLASSY CRAFTOWEEN

October 23, 2015 isoscella

If, like me, you love getting into the spirit of Halloween - it is after all, a good excuse to have a party and wear fancy dress, which, post-uni becomes a bit of a rarity - but hate the thought of decorating your home with (probably badly in my case) carved orange pumpkins (orange will definitely never be the new black), cobwebs (why did I bother cleaning?!) and generally all things offensive to the eye, then you'll love some of the alternative halloween decoration and fancy dress ideas that you can find on Pinterest.

Read more
In DIY Tags halloween, five faves friday, autumn
2 Comments

DIY // CLAY SPHERE NECKLACE

October 12, 2015 isoscella

Another quick and easy clay jewellery DIY from me again! I'm loving simple delicate jewellery pieces at the moment and after pulling out a beautiful concrete necklace by Maple + Mauve that one of my friends bought me for my birthday (how lucky am I!), I thought I would have a bash at making my own sphere necklace using air dry clay. 

I really love the 'dipped' effect that I've seen on some other jewellery pieces and so wanted to also incorporate this. Rather comically, it didn't quite go to plan... Instead of a burgundy sphere with a gold dipped effect on the lower half, I accidentally dropped the entire sphere into my bowl of gold paint and ended up with an entirely gold sphere (and entirely gold fingers!).

It seemed a shame to start again and so I decided to work with what I had; mixing up some more burgundy paint to create a gold sphere with a burgundy dipped effect on the bottom. Now the reason I've explained this (and not just pretended that I meant it to turn out this way!) is that otherwise the photos below won't make sense. Plus, it's always good to share our little crafting disasters isn't it! 

Air-dry clay  |  Headpin  |  Eyepin  |  Acrylic paint  |  Superglue  |  Wire cutters  |  Round nose pliers  |  Jump rings  |  Chain  |  Lobster clasp

1. Knead the clay to soften before rolling into a ball. Here, I found that it took very little time at all before the clay was malleable. Once it was, I just rolled the clay in the palm of my hands until it was roughly a sphere.

2. Push a wire through the centre of the clay. For this, I used a spare headpin and just gently pushed it through what I felt was roughly the middle.

3. Leave the clay to dry overnight. Once dry, the clay will be much harder and slightly lighter in colour. If there are still any dark areas, leave it for a bit longer. To neaten up any lumps and bumps, I very gently sanded it with a fine sandpaper.

4. Remove the wire and paint the ball with paint. When I was happy with how the clay was looking, I removed the headpin and painted all over the clay with one colour of acrylic paint. As I explained above, this was originally burgundy but as you will see later, the sphere ended up being entirely gold.

5. Using the cutters, trim an eyepin so that it is the same length (or just shorter) as the ball. Here, I used a gold plated eyepin and cut the eyepin using the wire cutters.

6. When the ball is dry, push the eyepin into the ball & fix with superglue. Using my pliers (you don't want your fingers to get stuck!), I held the eyepin at the loop and painted superglue over the rest of the eyepin. I then pushed the eyepin back into the sphere and left it to dry.

7. Once dry, dip the ball into another colour of paint to create a 'dipped' effect. To make sure that I didn't drop the clay in this time, I used another eyepin like a little fishing rod.

8. Attach a jump ring to the loop of the eyepin. Using two sets of pliers, open up the jump ring by holding one side and pushing the other side away from you. Loop the now open jump ring through the eyepin and close it up by pulling the side of the jump ring back towards you.

9. Using the cutters, trim the chain to your desired length. I wanted mine to be quite long and so I cut my chain down to approximately 30 inches. Don't forget to keep any leftover chain, you can always use these for other projects!

10. Pull the chain through the jump ring & attach a jump ring to one end of the chain and a lobster clasp to the other end of the chain. To attach the lobster clasp, I find it easier to use a jump ring. To do this, you'll want to open up a jump ring (as above), loop the chain and clasp onto the now open jump ring, and then close the jump ring.

... ta dah!

Although it certainly wasn't how I'd planned it to be, I'm still pretty pleased with how it turned out. As it's air-dry clay, it's really light and the gold paint is really metallic and vibrant which makes it a nice little addition to a plain t-shirt.

Let me know what you think in the comments below! 

And if you liked this post, don't forget to share and subscribe :)

♥

In DIY Tags jewellery
Comment

BAKING // HEY MACARON-A!

October 5, 2015 isoscella

I feel like the title of this blog post has probably been done many times before, however the song 'Hey Macarena' (well, macaron-a) was the first thing that popped into my head when I decided to have a go at making macarons and I haven't been able to say macarons (heeey, macaron-a, ahai!) quite the same way ever since.

I've got quite a bit of work due in for the academic side of the course at the moment and so as a result, I have been finding more elaborate and interesting ways of procrastinating. I've wanted to make macarons for ages, related probably to the Great British Bake Off which shows the bakers making them (with complete ease I have to say!) almost every other week. So I thought I'd have a go myself, as I've never made them before.

Chocolate orange is one of my favourite pudding flavours and so I decided to make Chocolate orange macarons. I found a Chocolate Orange Macaron recipe on BBC Food Recipes however part of it suggests heating sugar in a pan until it reaches a certain temperature, which for me is all a bit too complicated. So I took bits and bobs from the BBC food recipe and took bits and bobs from a macaron book that my (almost) mother-in-law rather kindly lent me. First, I lined three baking trays with greaseproof paper and preheated the oven (170°C). I then grabbed a huge glass mixing bowl and mixed some icing sugar (180g), ground almonds (180g) and cocoa powder (1 tbsp), before sieving the mixture to remove any lumps. 

In a separate bowl, I whisked the whites of 5 eggs and once they were fluffy, added a tablespoon of caster sugar, one at a time (whilst still whisking) and only added the next spoonful, when the last was fully mixed. Using a metal spoon, I folded the ground almond, sugar and cocoa mixture into the egg whites thoroughly. Once mixed, I spooned the mixture into a piping bag and piped circles onto the lined baking trays. I only had three baking trays and so tried to fit as many circles on as possible but I realised afterwards that this probably wasn't a good idea as it resulted in some circles merging into one another. To remove any air bubbles, I dropped the trays on my work surface a few times (it felt very dramatic!) and left the circles to harden for about 45 minutes.

I knew the macaron shells were ready to bake when I touched the shells and they no longer felt sticky or wet. I baked each tray of macaron shells one at a time for 10-12 minutes each. Whilst baking, I made the chocolate orange ganache (for the middle) by heating some double cream (100ml) on the hob until it boiled and by mixing in some plain chocolate (200g). When it was thoroughly melted and mixed, I added some orange extract (1.5 tsp) and popped it in the fridge to stiffen slightly. Once cool, I assembled the macarons by putting a spoonful of ganache in the middle of the bottom of one macaron shell and by placing another shell on top. I then popped these into the fridge overnight and sprinkled some edible bronze paint over the top to decorate them.

I'm so pleased with how they turned out and can confirm that they tasted amazing! Not bad for my first attempt, though I definitely think it was down to the fool-proof recipes I followed. Here's to a macaron-filled future!

Have you made macarons before? Any recipe recommendations?

Let me know in the comments below and don't forget to share and subscribe :)

♥

In DIY Tags baking
Comment
← Newer Posts Older Posts →
 

Decorating, DIY-ing and doodling my way through life. Have a look around and let’s get creative!

>> FIND OUT MORE <<

Follow
The office is still one of my favourite transformations in the house! 😍

I started by panelling the wall with MDF strips and then painted the wall with a mix of colours. I used three IKEA drawer units for the base of the desk and then secured the de

ART

DIY

LIFE


THE LATEST

Featured
Wooden Mushroom Decor
Apr 26, 2025
Wooden Mushroom Decor
Apr 26, 2025
Apr 26, 2025
Hand-Painted Floral Mural Arch
Mar 29, 2025
Hand-Painted Floral Mural Arch
Mar 29, 2025
Mar 29, 2025
Easy IKEA Antilop Makeover
Mar 1, 2025
Easy IKEA Antilop Makeover
Mar 1, 2025
Mar 1, 2025
Clay Leaf Shelf
Jun 29, 2024
Clay Leaf Shelf
Jun 29, 2024
Jun 29, 2024
Nursery Feature Wall
Jun 15, 2024
Nursery Feature Wall
Jun 15, 2024
Jun 15, 2024


THE GREATEST

Featured
DIY // IKEA LACK TABLE INDUSTRIAL HACK
Sep 22, 2020
DIY
DIY // IKEA LACK TABLE INDUSTRIAL HACK
Sep 22, 2020
DIY
Sep 22, 2020
DIY
DIY // CLAY ALL-SEEING EYE MIRROR
Aug 14, 2020
DIY
DIY // CLAY ALL-SEEING EYE MIRROR
Aug 14, 2020
DIY
Aug 14, 2020
DIY
DIY // CLAY FACE DISH
Apr 29, 2020
DIY
DIY // CLAY FACE DISH
Apr 29, 2020
DIY
Apr 29, 2020
DIY
DIY // ABSTRACT ART FLORAL EGGS
Mar 25, 2020
DIY
DIY // ABSTRACT ART FLORAL EGGS
Mar 25, 2020
DIY
Mar 25, 2020
DIY
DIY // WIRE FACE EARRINGS
Feb 16, 2020
DIY
DIY // WIRE FACE EARRINGS
Feb 16, 2020
DIY
Feb 16, 2020
DIY

Follow
^^ BACK TO TOP
How does Monday come round so quick?!Wishing I could cosy up here today ✨

#mondaymood #storyofmyhome #mydailyhomesquare #interiordesign #budgetdiy #realstylishhomes #ourdiyhomes #femalediycollective #discoverunder5k #myhousethismonth #myhousedownsou
I&rsquo;ve got the day off today (woop!) and although it&rsquo;s not quite warm enough to sit out here yet, the sun is shining and I think a little walk to blow out the cobwebs is exactly what I need. Hope Monday is treating you well! ☀️

#summerdrea
Had such a lovely day seeing one of my besties and her adorable new baby that I completely forgot to share today&rsquo;s new blog post!

Head over to the blog for all the details of this easy DIY ring dish 🔝✨

#diy #diyhomedecor #diyhome #diyvalenti
That sunshine 👌🏻☀️

#mycosyhome #livingroomdecor #livingroominspo #mydiymydecor #homeobsessed #lovemydecor #homeinterioruk #discoverunder5k #diyhome #diyhomedecor #myhousethismonth #myhousedownsouth #realstylishhomes #ourdiyhomes #happythursday #in
A little corner our home on this chilly Tuesday morning ✨
.
.
#interior #homeobsessed #mycosyhome #homeinterioruk #instadecorating #homesofinstagram #happymonday #mondaymotivation #instainteriors #cornersofmyhome #myhousethismonth #myhousedownsouth #

Copyright 2021 isoscella. All rights reserved.

Powered by Squarespace