• ABOUT ME
    • PRIVACY POLICY
  • COLLABORATE
  • BLOG
    • ART
    • WEDDING
    • LIBRARY
    • DECOR
    • JEWELLERY
    • STATIONARY
    • NAIL ART
    • BAKING
    • CHRISTMAS
    • EASTER
    • ART PRINTS
    • WEDDING STATIONARY
  • CONTACT
Menu

ISOSCELLA

Street Address
City, State, Zip
Phone Number

Your Custom Text Here

ISOSCELLA

  • ABOUT
    • ABOUT ME
    • PRIVACY POLICY
  • COLLABORATE
  • BLOG
  • ART
    • ART
    • WEDDING
    • LIBRARY
  • DIY
    • DECOR
    • JEWELLERY
    • STATIONARY
    • NAIL ART
    • BAKING
    • CHRISTMAS
    • EASTER
  • SHOP
    • ART PRINTS
    • WEDDING STATIONARY
  • CONTACT

Minimal Celestial Bead Garland

December 11, 2021 Isoscella M

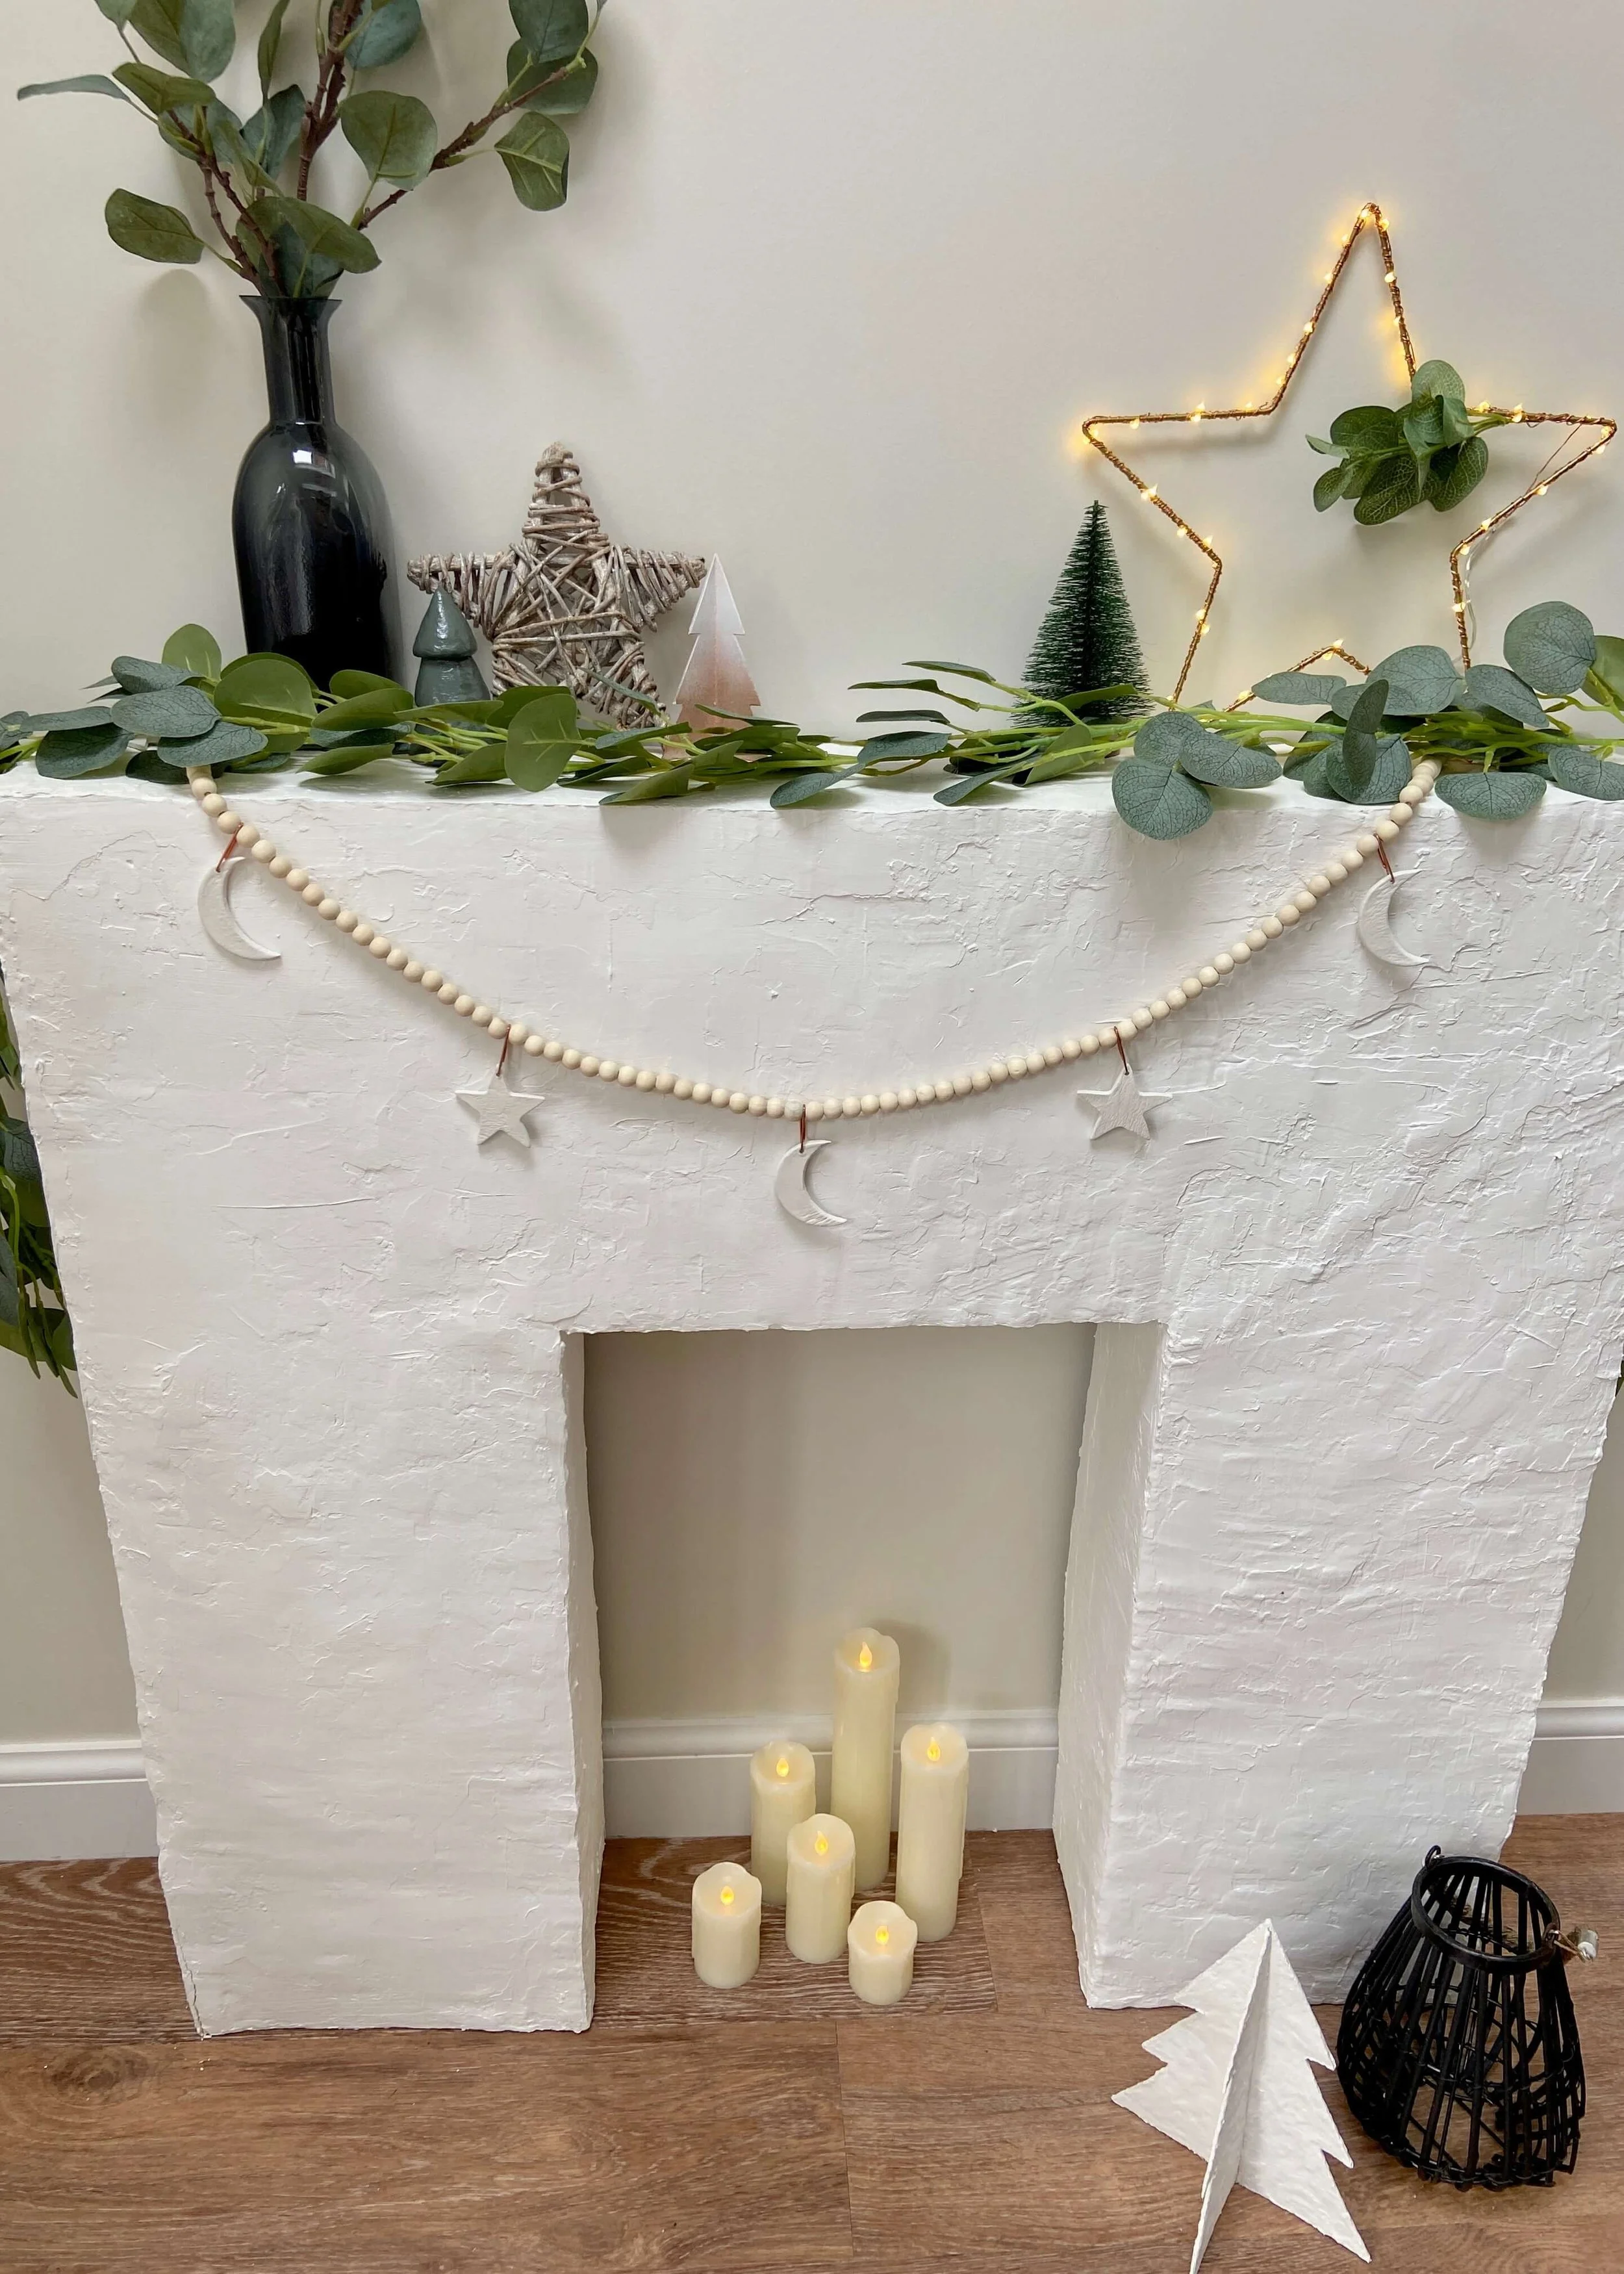
Recreate this celestial Christmas bead garland with just a few supplies!

I saw this garland on Oliver Bonas, fell in love with the idea of it but knew that I could make my own more minimal and rustic version. I was tempted to spray my moons and stars in a metallic spray paint but in the end I really liked the white clay against the copper and wood and so I kept it as it was. You could definitely jazz this up further if you wanted; you could not only paint the clay stars and moons in various colours to go with your Christmas theme, but you could also add beads and tassels to the bottom of them. I find neutral and natural colours, really soothing at the moment, and so this ticked all the boxes for me. If you fancy making one of these yourself, keep reading for the step by step tutorial…

Macrame cord or string

Wood beads

Copper paperclips

Air-dry clay

1.

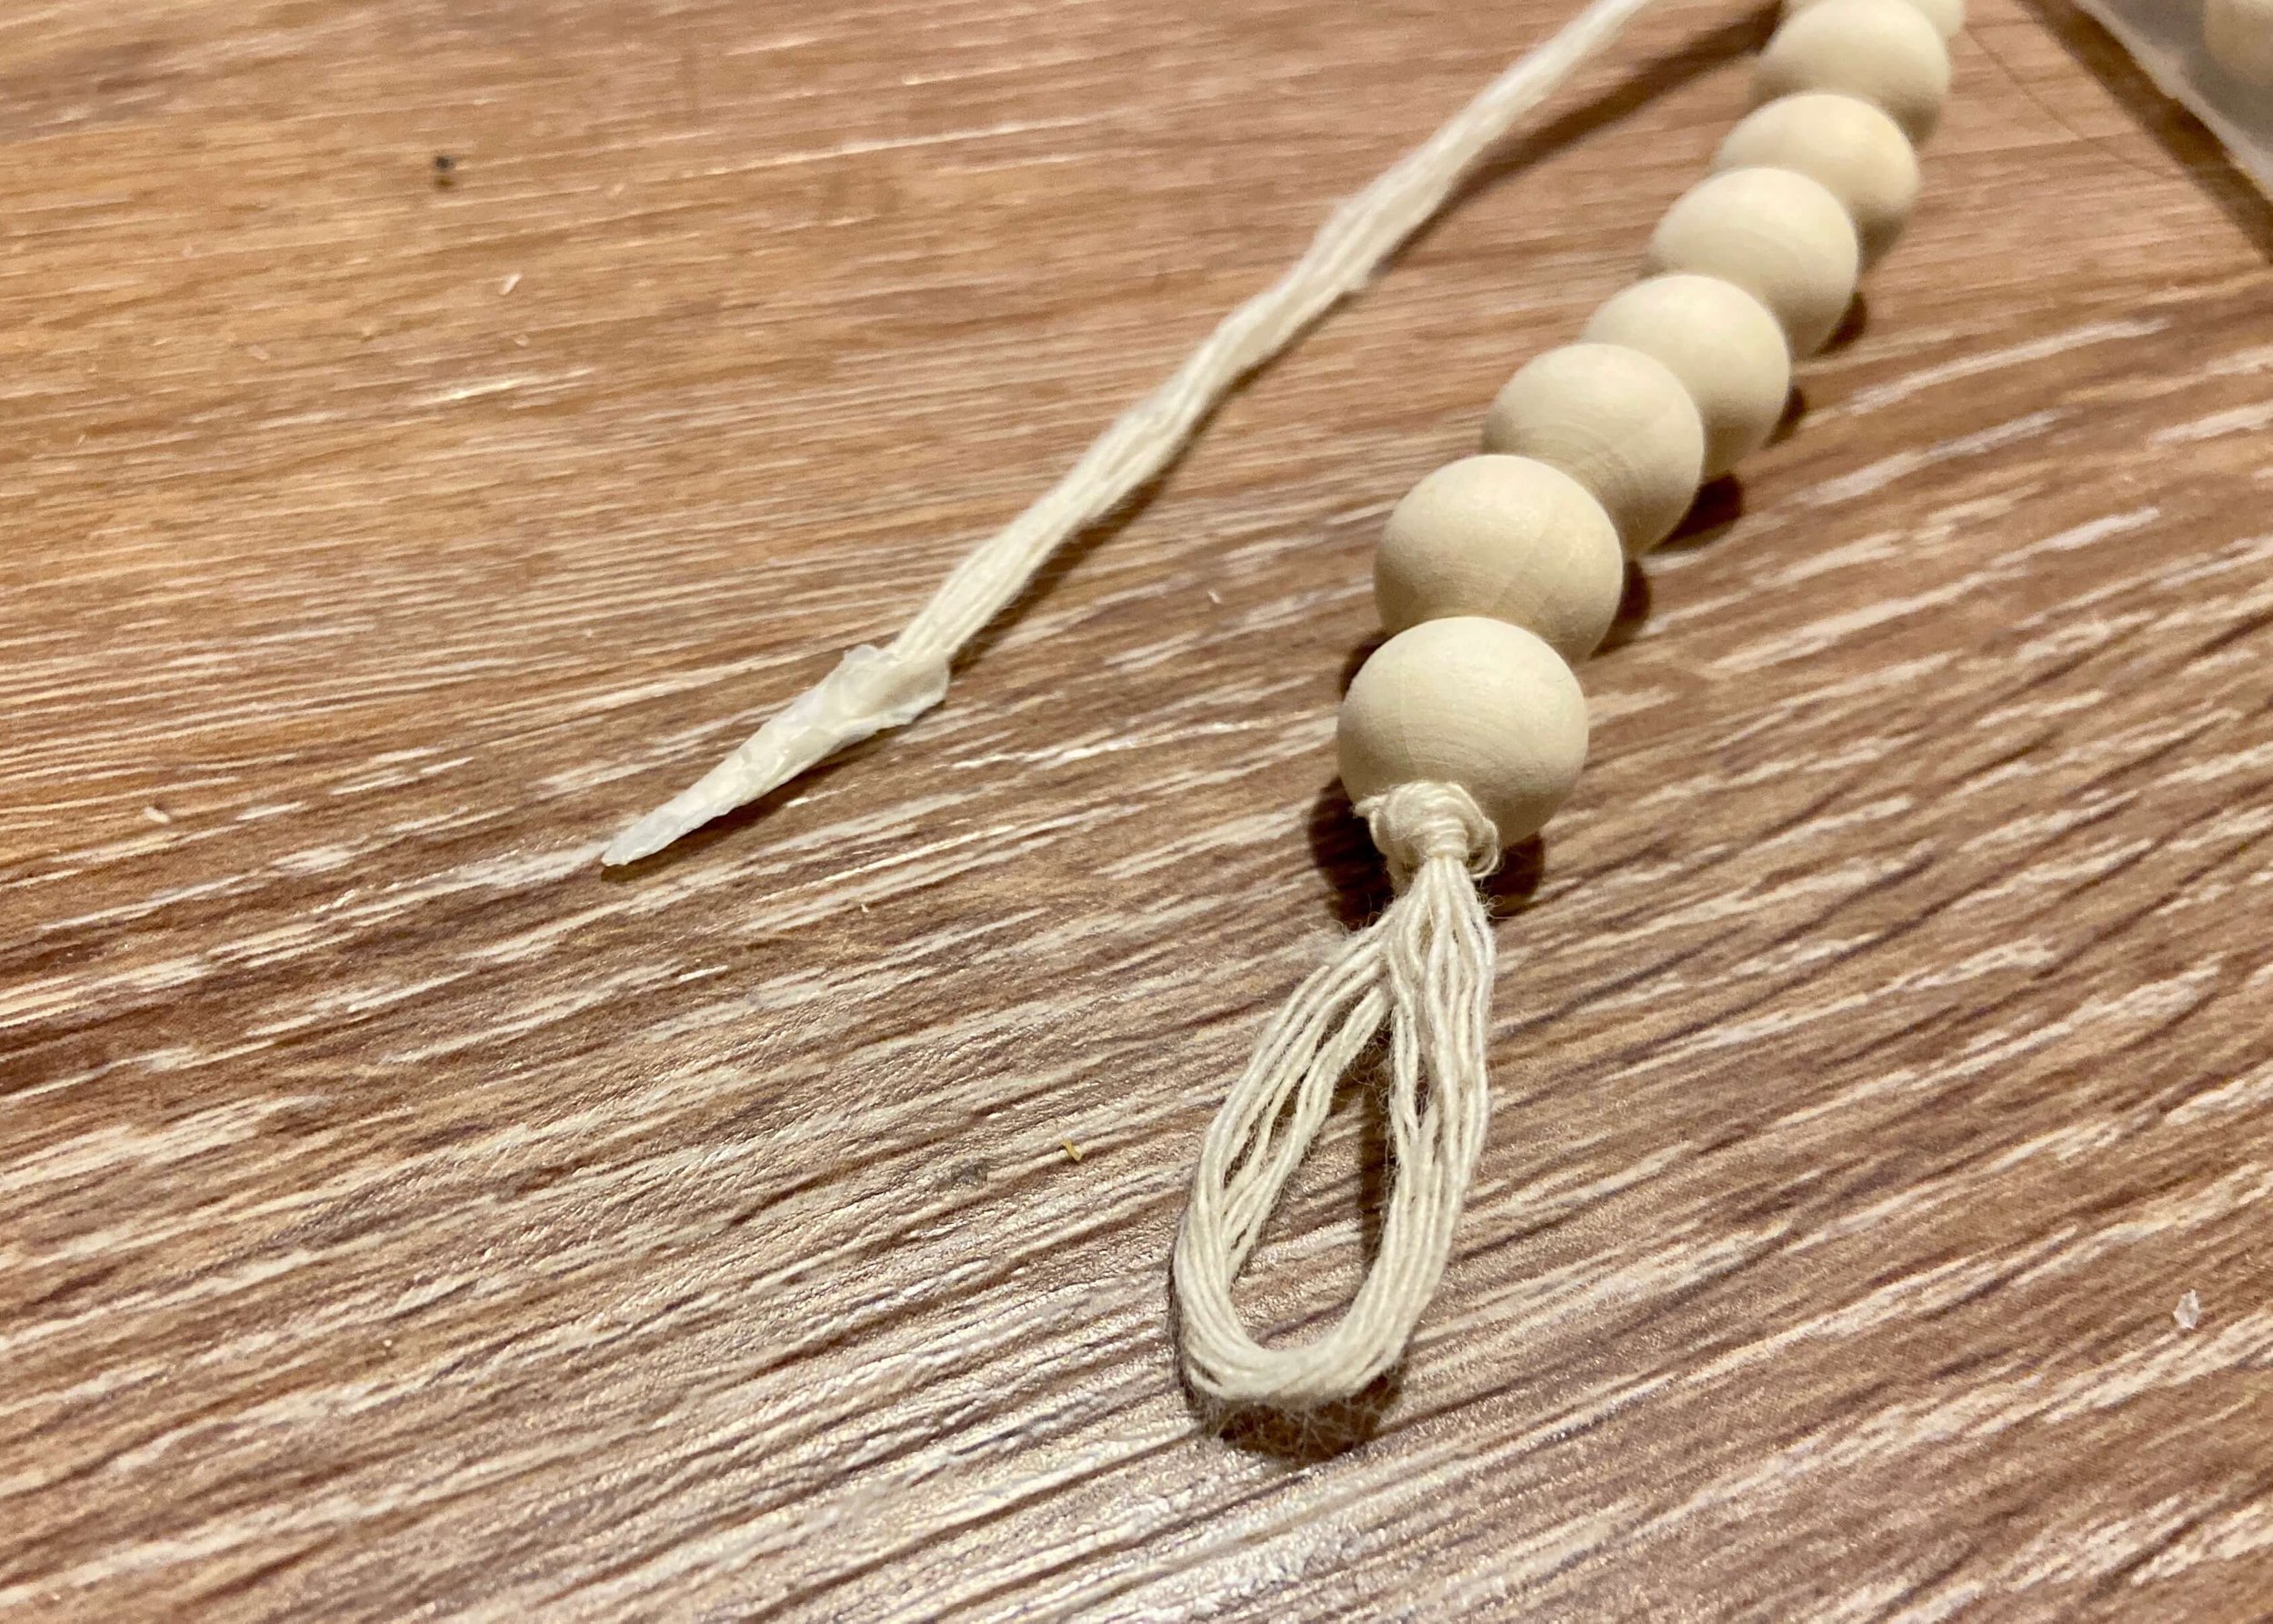
First of all, measure your macrame cord and cut it to your desired length. I cut mine to about 60 inches long as this was the length of the garland I saw on Oliver Bonas that inspired this project.

2.

Add tape to one end of your length of cord and wrap it around creating a point. This will make adding the beads so much easier. At the other end of the cord, create an overhand loop.

3.

Start threading on beads and continue until reach a couple of inches before the end of the cord.

4.

When you get to the end, tuck the end with the tape on back through the centre of the beads and then create another overhang loop.

5.

Next, roll out some clay and use card or wood either side of your roller to ensure a consistent thickness.

6.

Use a star-shaped cutter to create four clay stars in total. One one point of each, use a pen or straw to create a hole for it to hang from. Leave to dry thoroughly.

7.

Use a glass or circular cutter to create three circular shapes of a similar size to the stars. Use the same cutter or glass to then remove around 2/3 of the circle to create a crescent moon shape. Again, create a small hole at the top of these so they can hang. Leave to dry.

8.

Once completely dry, use sandpaper or a nail file to smooth the edges of the clay pieces.

9.

Count how many beads are on your garland and then divide this number by 8. This is the number of beads you’ll have between each hanging star/moon. At this points, add on a paperclip.

10.

Open up the paperclip to hang the clay ornament on, and then close it again to secure it. Repeat this along the garland until you have added all the stars and moons.

…AND THAT’S IT!

YOU MIGHT ALSO LIKE...
Mushroom Fairy Lights
Dec 16, 2023
Mushroom Fairy Lights
Dec 16, 2023
Dec 16, 2023
3D Plaster Star Ornaments
Dec 9, 2023
3D Plaster Star Ornaments
Dec 9, 2023
Dec 9, 2023
How to Make Christmas Decor with Toilet Rolls
Dec 2, 2023
How to Make Christmas Decor with Toilet Rolls
Dec 2, 2023
Dec 2, 2023
Faux Stone Moon Ornaments
Nov 25, 2023
Faux Stone Moon Ornaments
Nov 25, 2023
Nov 25, 2023
Minimal Christmas Tablescape
Nov 18, 2023
Minimal Christmas Tablescape
Nov 18, 2023
Nov 18, 2023
Snowy Forest Boho Baubles
Nov 11, 2023
Snowy Forest Boho Baubles
Nov 11, 2023
Nov 11, 2023
23 Christmas DIY Ideas
Nov 4, 2023
23 Christmas DIY Ideas
Nov 4, 2023
Nov 4, 2023
Handmade Gift Box
Dec 24, 2022
Handmade Gift Box
Dec 24, 2022
Dec 24, 2022
Slatted Wood Christmas Tree Skirt
Dec 17, 2022
Slatted Wood Christmas Tree Skirt
Dec 17, 2022
Dec 17, 2022
Nordic House Gift Wrapping
Dec 14, 2022
Nordic House Gift Wrapping
Dec 14, 2022
Dec 14, 2022
In DIY Tags christmas
← Repurposed Cardboard Star GarlandMinimal Dowel Christmas Tree →
 

Decorating, DIY-ing and doodling my way through life. Have a look around and let’s get creative!

>> FIND OUT MORE <<

Follow
The office is still one of my favourite transformations in the house! 😍

I started by panelling the wall with MDF strips and then painted the wall with a mix of colours. I used three IKEA drawer units for the base of the desk and then secured the de

ART

DIY

LIFE


THE LATEST

Featured
Wooden Mushroom Decor
Apr 26, 2025
Wooden Mushroom Decor
Apr 26, 2025
Apr 26, 2025
Hand-Painted Floral Mural Arch
Mar 29, 2025
Hand-Painted Floral Mural Arch
Mar 29, 2025
Mar 29, 2025
Easy IKEA Antilop Makeover
Mar 1, 2025
Easy IKEA Antilop Makeover
Mar 1, 2025
Mar 1, 2025
Clay Leaf Shelf
Jun 29, 2024
Clay Leaf Shelf
Jun 29, 2024
Jun 29, 2024
Nursery Feature Wall
Jun 15, 2024
Nursery Feature Wall
Jun 15, 2024
Jun 15, 2024


THE GREATEST

Featured
DIY // IKEA LACK TABLE INDUSTRIAL HACK
Sep 22, 2020
DIY
DIY // IKEA LACK TABLE INDUSTRIAL HACK
Sep 22, 2020
DIY
Sep 22, 2020
DIY
DIY // CLAY ALL-SEEING EYE MIRROR
Aug 14, 2020
DIY
DIY // CLAY ALL-SEEING EYE MIRROR
Aug 14, 2020
DIY
Aug 14, 2020
DIY
DIY // CLAY FACE DISH
Apr 29, 2020
DIY
DIY // CLAY FACE DISH
Apr 29, 2020
DIY
Apr 29, 2020
DIY
DIY // ABSTRACT ART FLORAL EGGS
Mar 25, 2020
DIY
DIY // ABSTRACT ART FLORAL EGGS
Mar 25, 2020
DIY
Mar 25, 2020
DIY
DIY // WIRE FACE EARRINGS
Feb 16, 2020
DIY
DIY // WIRE FACE EARRINGS
Feb 16, 2020
DIY
Feb 16, 2020
DIY

Follow
^^ BACK TO TOP
How does Monday come round so quick?!Wishing I could cosy up here today ✨

#mondaymood #storyofmyhome #mydailyhomesquare #interiordesign #budgetdiy #realstylishhomes #ourdiyhomes #femalediycollective #discoverunder5k #myhousethismonth #myhousedownsou
I&rsquo;ve got the day off today (woop!) and although it&rsquo;s not quite warm enough to sit out here yet, the sun is shining and I think a little walk to blow out the cobwebs is exactly what I need. Hope Monday is treating you well! ☀️

#summerdrea
Had such a lovely day seeing one of my besties and her adorable new baby that I completely forgot to share today&rsquo;s new blog post!

Head over to the blog for all the details of this easy DIY ring dish 🔝✨

#diy #diyhomedecor #diyhome #diyvalenti
That sunshine 👌🏻☀️

#mycosyhome #livingroomdecor #livingroominspo #mydiymydecor #homeobsessed #lovemydecor #homeinterioruk #discoverunder5k #diyhome #diyhomedecor #myhousethismonth #myhousedownsouth #realstylishhomes #ourdiyhomes #happythursday #in
A little corner our home on this chilly Tuesday morning ✨
.
.
#interior #homeobsessed #mycosyhome #homeinterioruk #instadecorating #homesofinstagram #happymonday #mondaymotivation #instainteriors #cornersofmyhome #myhousethismonth #myhousedownsouth #

Copyright 2021 isoscella. All rights reserved.

Powered by Squarespace